Situatie
Adding new fonts to Windows 10 is a quick way to customize your PC and your documents, and it is easy to do. Your newly installed fonts will be available in Microsoft Office applications like Microsoft Word as well as other Windows applications, including Adobe Photoshop.
Solutie
Pasi de urmat
You need to navigate to your downloads folder after you download a font package you want to install. You can extract the fonts from the archive into a folder, or just install them directly from the archive by double-clicking on them. Either works. To extract the fonts from the archive, right-click on the archive file, then click “Extract All.”
Click “Extract” in the new window that pops up. You should probably leave the path alone — by default, it just creates a new folder with the name of the archive.
Double click the fonts you want to install. Click “Install” in the window that pops up, and then click the “X” in the top-right to close the window.
Some font packages contain multiple versions of the font you downloaded, like bold or italicized variants. You can double-click these individually and hit “Install” for each one.
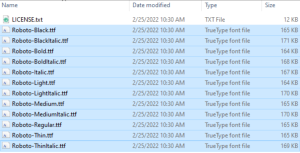
Alternatively, you can install them all at once. To install them simultaneously, you first need to select them all. To do so, click the first font on the list, hold the “Shift” key, and click the last font. You can also drag to select them if you want. As long as they’re all selected, it doesn’t matter how you do it. It should look like this:
Next, right-click on the name of any of the font files. If you have multiple user accounts on your PC, you might want to click “Install for All Users.” Otherwise, just click “Install.”
If you already installed some of the fonts, you’ll get a popup warning you about it. Click “Yes” and let it proceed.


Leave A Comment?