Situatie
Are you worried your PC’s CMOS battery is dead or dying? The good news is that testing it, even without special equipment, is easy, and so is swapping it out. Here’s how to test your CMOS battery and replace it if needed.
Solutie
The CMOS (Complementary Metal-Oxide-Semiconductor) battery on your computer’s motherboard acts as an emergency power for the BIOS and date and time settings. The CMOS keeps those BIOS or UEFI settings stored in CMOS RAM when your computer doesn’t receive any external power, e.g., when the PSU is disconnected.
All batteries degrade over time, though, and your CMOS battery may die before you’re through with your motherboard. If that happens, the CMOS memory chip won’t be able to hold your BIOS settings between power cycles, resulting in a reset, which can be very frustrating.
How to Test Your CMOS Battery
Now, the fastest way to test your CMOS battery is by checking its voltage with a digital multimeter. To do that, though, you’d have to open your PC’s case and remove the battery, and you’d need to own a digital multimeter.
There’s a simpler (if less immediate) method we recommend: simply unplugging your desktop PC’s PSU cable and leaving it powered off overnight. Just flip the PSU switch from 1 to 0, unplug the PSU cable, and leave the PC unplugged. In the morning, connect the PSU cable and turn on the PC. If you don’t need to set the date and time and your operating system boots without issues, the battery’s most likely fine.
If you need to set the date and time upon boot, if you notice that your BIOS settings switched to default, or if your PC shows you an error that reads something like “CMOS Checksum Error” before booting into Windows or your OS of choice, the battery’s most likely fit for a replacement.
Common Signs That Your CMOS Battery is Dying
The most common sign of a dying CMOS battery is having to set date and time each time you turn your PC on. Other signs include your BIOS settings being reset to defaults and seeing the “CMOS Checksum Error” during the boot process.
How to Replace Your CMOS Battery on a Desktop PC
CMOS battery replacement is a straightforward procedure on a desktop PC. All you have to do is open your enclosure, locate the battery, and replace it.
Step 1: Locate the CMOS Battery on Your Motherboard
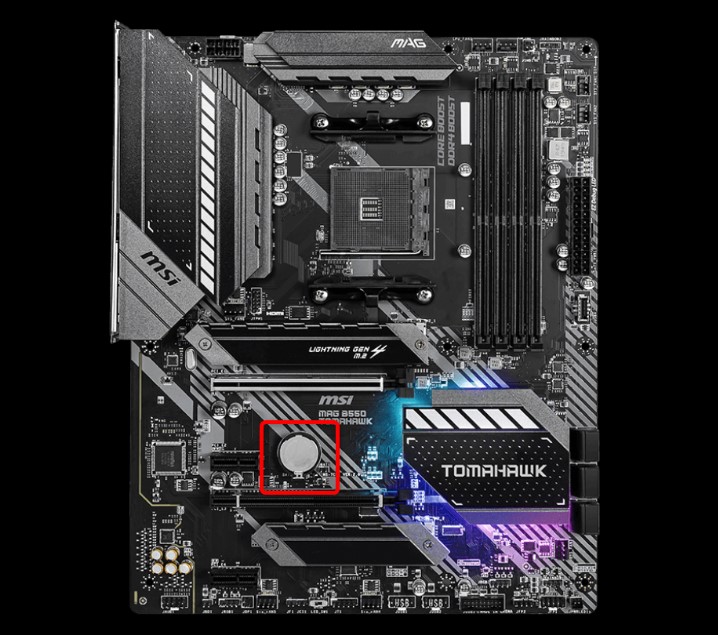
Before opening your PC case, try searching for your motherboard photos —if you know what motherboard model you have— online. Once you find a photo, look for a round silver thingy, usually located under the main PCIe slot. Below you can see the CMOS battery location on a popular B550 motherboard, the MSI B550 Tomahawk. As you can see, the CMOS battery is quite easy to spot.
Step 2: Disconnect the Cables From Your PC and Open Your PC Case
Once you locate your CMOS battery on your motherboard, disconnect every cable hooked to your PC and open the side panel. If you didn’t find the CMOS battery location with a Google search, now’s the time to search for it. Again, look for a round, silver thing on the motherboard’s lower part.
Step 3 (Optional): Remove the Graphics Card If You Have One
If you have a graphics card installed, especially a long and thick high-end GPU, you might have to remove it in order to locate and access the CMOS battery. In most cases, this isn’t needed, but on some motherboards, the GPU can obstruct access to the CMOS battery.
Step 4: Take a Photo of the Battery to Find Out Its Type
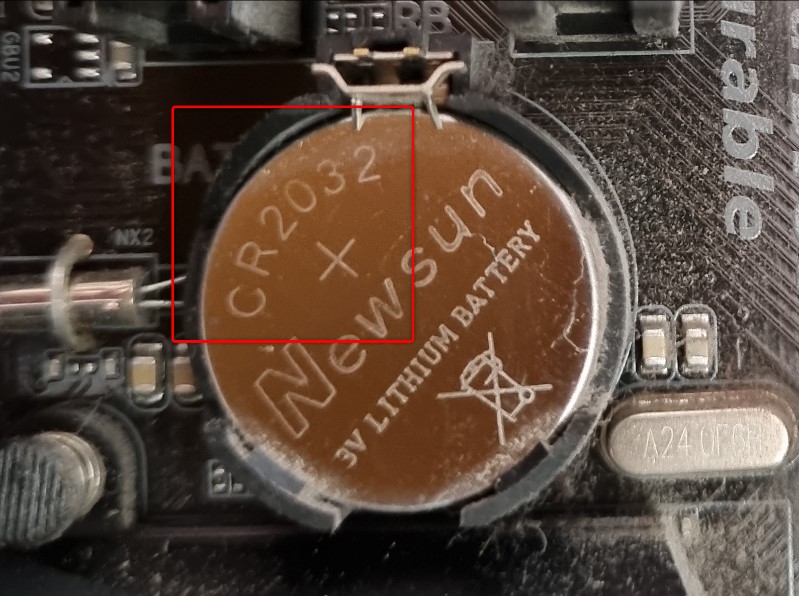
Once you locate the CMOS battery, take a photo of it to find out its type. Most newer motherboard models use a CR2032 battery, but there’s a chance your board uses a different type. As you can see below, the CMOS battery on our secondary PC is a CR2032 unit.
Step 5: Get a New Battery and Replace it
Once you find the CMOS battery type installed in your motherboard, get a new one and replace it.
Most CMOS batteries are secured to the motherboard with a metal or plastic latch. To remove the battery, press the latch with a flathead screwdriver or your fingernails and pop the battery out. Next, slot the new battery into the CMOS battery slot.

Leave A Comment?