Situatie
Does your Windows computer shut down without warning? Here’s how you can fix Kernel-Power Event ID 41 and stop Windows from crashing.
Does your Windows computer shut down without warning? Or does it crash every time you attempt to wake it from Sleep? Your computer might have a power supply fault, causing it to crash without warning. The issue, known as a Kernel-Power error, seemingly appears for no reason, yet is a critical system issue. Here’s how to fix Kernel-Power Event ID 41 and stop your computer from crashing.
What Is a Kernel-Power Critical Error?
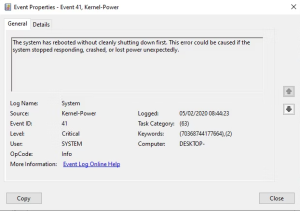
The Kernel-Power critical error is a system error that causes your system to crash. The error can trigger under a range of circumstances, though all relate to power issues or system reboots without a clean shutdown. However, the Kernel-Power 41 issue doesn’t always indicate a power supply issue but can also indicate an issue with your system hardware, causing a power fault and, in turn, your system to crash.
The Kernel-Power critical error is typically associated with Event ID 41. Furthermore, Kernel-Power Event ID 41 is accompanied by the keywords (70368744177664),(2), which you can use to pinpoint your bug troubleshooting.
So, what causes Kernel-Power error 41? While it is a common shutdown error code, there are several common causes with easy fixes:
- Update Windows 10 or Windows 11
- Disable Windows fast startup
- Reseat your RAM and graphics card
- Test for a faulty PSU
- Run CHKDSK and SFC
Let’s take these fixes step by step and solve the Windows Kernel-Power error. Please note that this article deals exclusively with the Kernel-Power 41 error. However, we’ve also covered fixes for the unexpected kernel mode trap error, some of which differ from the fixes for the Kernel-Power error.
Solutie
Pasi de urmat
Update Windows
Check if Windows 10 or Windows 11 is up to date. Microsoft releases Windows updates frequently, fixing bugs and other issues. Your Kernel-Power critical error could stem from a bug that there is a fix ready for in an update.
Press Win + I, type update in the search box, and select Check for updates. If there is an update waiting, download and install it, then restart your system.
Disable Windows Fast Startup
Windows fast startup is a hybrid sleep mode that enables your computer to boot extremely quickly. Windows 10 and Windows 11 enable fast startup as a default setting during installation.
If you enable fast startup, your computer doesn’t completely shut down. Instead, it enters a middle ground that combines a full shutdown with hibernation mode, saving the last machine state to enable you to start working straight away.
However, unlike full hibernation mode, when you return to Windows 10, it is like starting the machine from scratch. There are no windows open, and your previous applications are not open, and so on.
To disable Fast Startup:
- Type power set in your Start Menu search bar, then select Choose a power plan.
- Now, select Choose what the power buttons do, followed by Change settings that are currently unavailable.
- Uncheck Turn on fast start-up and hit Save changes.
Once disabled, restart your system and run it for a while. If your Kernel-Power errors are similar to mine, the error doesn’t always immediately replicate itself and can take a few days to return.
Reseat Your RAM and Graphics Card, and Check Your Power Cables
Some users report their Kernel-Power 41 error resolving after reseating their RAM and graphics card (GPU). You’ll need to get inside the case of your PC or laptop to reseat the hardware. Please be aware that this will void your manufacturer’s warranty in certain cases, so proceed with caution.
While you have your PC case open, check the power cables and connectors joining your power supply unit and the motherboard. Your PC power supply cables should fit snugly in their port, and a loose connection could trigger the Kernel-Power error.
Test for Faulty PSU With OCCT
Testing for hardware faults with your power supply unit isn’t easy unless you have the correct hardware on hand. You can check your PSU using a multimeter or a dedicated PSU testing tool.
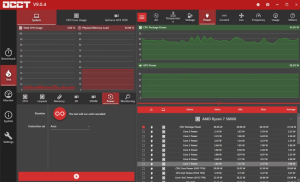
The majority of software-based PSU checking tools cannot deliver an accurate reading on whether your PSU is working correctly. That said, if you do want to attempt a PSU software test, I would suggest using OCCT, a free CPU/GPU/PSU stress testing tool. OCCT stress tests your CPU, GPU, and motherboard and, in the process, can discover any faults with your power supply unit.
- Open OCCT.
- Under Test Configuration, select Power.
- Set the Instruction Set to Auto.
- Save any work and close any other open programs on your system.
- When ready, hit the big red play icon in OCCT to begin the stress test.
The OCCT developer states that “Most errors are detected within the first 5 minutes. However, I recommend doing at least a 1-hour long test just to be sure.” Once the test completes, OCCT produces a log highlighting any potential PSU errors (or with other hardware!).
Try Another Power Supply Unit if Possible
Switching out your power supply unit for another is one way to confirm if the issue stems from a faulty power supply. Of course, not everyone has a spare PSU lying around, so it’s not always the easiest way to test. However, if you have the chance, do give it a try.
Run CHKDSK and SFC
CHKDSK is a Windows system tool you can use to verify your Windows 10 file system. You can add specific options to find and fix faults as the tool runs. Run it from the Command Prompt, and use the CHKDSK scan to find the problem and fix your machine.
- Type command prompt in your Start menu search bar, then right-click the best match and select Run as administrator. (Alternatively, press Win + X, then select Command Prompt (Admin) from the menu.)
- Next, type chkdsk /r and press Enter. The command will scan your system for errors and fix any issues along the way.
If CHKDSK finds no faults, you can run the Windows System File Check (SFC). System File Check is another Windows system tool you can use to check for missing or corrupt Windows system files.
In case you’re wondering, the difference between CHKDSK and SFC is the scope of the scan. CHKDSK scans your entire drive for errors, whereas SFC scans your Windows system files specifically. However, before running the SFC command, it is best to check that it is completely functional.
DISM stands for Deployment Image Servicing and Management. DISM is an integrated Windows utility with a vast range of functions. In this case, the DISM Restorehealth command ensures that our next fix will work properly.
Work through the following steps.
- Type Command Prompt (Admin) in the Start menu search bar, then right-click and select Run as administrator to open an elevated Command Prompt.
- Type the following command and press Enter: DISM /online /cleanup-image /restorehealth
- Wait for the command to complete. The process can take up to 20 minutes, depending on your system’s health. The process seems stuck at certain times, but wait for it to complete.
- When the process completes, type sfc /scannow and press Enter.
Let the scan run, then restart your system.


Leave A Comment?