What to Do When Your iPhone or iPad Won’t Turn On

Plug It In, Let It Charge — And Wait

An iPhone, iPad, or iPod Touch may fail to turn on if its battery is completely dead. Generally, you’ll see some sort of “low battery” indicator when you try to turn an iOS device on and it doesn’t have enough battery power. But, when the battery is completely dead, it won’t respond and you’ll just see the black screen.

Connect your iPhone or iPad to a wall charger and let it charge for a little while — give it fifteen minutes, perhaps. If the battery is completely dead, you can’t just plug it in and expect it to respond immediately. Give it a few minutes to charge and it should turn itself on. This will fix your device if its battery was just completely drained.

Make sure your charger is working if this doesn’t work. A broken charger or charging cable may prevent it from charging. Try another charger and cable if you have them available.
Perform a Hard Reset on iPhone 8 or Newer

A “hard reset” will forcibly reboot your iPhone or iPad, which is useful if it’s completely frozen and isn’t responding. The hard reset process has changed a bit on the iPhone 8, iPhone X, iPhone XS, iPhone XR, and new iPad Pro without the Home button.

To perform a hard reset on a newer iPhone, quickly press and release the Volume Up button, quickly press and release the Volume Down button, and then press and hold the Side button (also known as the “Sleep/Wake” button.) Hold the Side button down until your iPhone reboots. You’ll see the Apple logo appear on the screen as it’s booting up, and you can release the button. This will take about ten seconds.

If you’ve waited longer than ten seconds and nothing happened, try again. You need to press the buttons in quick succession, and you can’t pause for too long in between each press.

Hold Power + Home to Perform a Hard Reset

iPhones and iPads can freeze completely, just like other computers. If they do, the Power and Home buttons will do nothing. Perform a “hard reset” to fix this. This was traditionally performed by removing a device’s battery and reinserting it or pulling the power cable on devices without batteries, which is why it’s also known as performing a “power cycle.” However, iPhones and iPads don’t have a removable battery. Instead, there’s a button combination you can use to forcibly restart your phone or tablet.

To do this, press both the Power and Home buttons and hold them down. (In the case of the iPhone 7, press and hold the Power button and the volume down button.) Keep holding both buttons down until you see the Apple logo appear on the screen. The logo should appear between ten and twenty seconds after you start holding the buttons. After the Apple logo appears, your iPhone or iPad will boot back up normally. (The Power button is also known as the Sleep/Wake button — it’s the button that normally turns your device’s screen on and off.)

If this button combination doesn’t work, your iPhone or iPad may need to be charged for a while first. Charge it for a while before attempting the Power+Home button hard reset.

Restore the iOS Operating System With iTunes

iPhones and iPads that don’t turn on immediately usually just have no battery power left or have a frozen operating system. However, sometimes your device’s screen may turn on and you’ll see an error screen instead of the normal boot-up logo. The screen shows a picture of a USB cable and an iTunes logo.

This “Connect to iTunes” screen appears when the iOS software on your iPhone or iPad is damaged or otherwise corrupted. To get your device working and booting up properly again, you’ll need to restore its operating system — and that requires iTunes on a PC or Mac.

Connect the iPhone or iPad to a computer running iTunes. You should see a message saying iTunes has detected a device in recovery mode. iTunes will inform you that “there is a problem” with your device “that requires it to be updated or restored.” You’ll probably need to perform a “restore” which will download the latest iOS software from Apple and install it on your device.

The restore process will wipe the files and data on your iPhone  or iPad, but they’re already inaccessible if your device won’t boot. You can recover your data from an iCloud backup later.
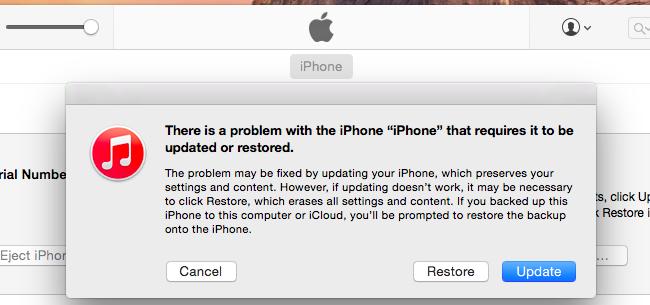
You can put any iPhone or iPad into recovery mode by turning it off and plugging it into a computer running iTunes with a USB cable. Press the Home button and hold it down as you plug in the USB cable. Keep holding the button down until the “Connect to iTunes” screen appears on the device. However, you shouldn’t have to do this if the device is working properly. If its operating system is damaged, it should automatically boot to the recovery mode screen without any additional tricks necessary.

[mai mult...]

How to Migrate Your Data from an Old iPhone to Your New One

What You Need

To follow along with today’s tutorial, you need just a few things–but read the list closely, as there’s a big caveat for people migrating to a new–but-previously-used phone.

First and foremost, you need access to a computer where you can run iTunes–available for Windows and macOS. You probably have one already, but if not, borrow one from a friend. Make sure it has enough free disk space for your backup–if you have a 64GB phone full of stuff, you’ll need 64GB of free space on the PC, too. (Don’t worry, you can delete that backup after you’ve restored it to your new phone.)

Second, you’ll need the two phones–your old phone and your new phone–and an appropriate syncing cable for them.

NOTE: If you got the new phone secondhand, you need to ensure that the previous owner is logged out of iCloud. Apple uses iCloud logins as a form of theft protection, and until the previous owner logs out, the phone is considered “iCloud locked”. If the device is iCloud locked, you won’t be able to transfer your data over to it.

Step One: Back Up Your Existing iOS Device

Once you have the two devices in hand and iTunes installed on your PC, it’s time to perform a local backup. You can perform this step even if you normally use iCloud backup so don’t worry about messing up your iCloud setup.

Launch iTunes and plug in your old iPhone with the syncing cable. It’s best to plug it directly into the computer’s USB port. (Don’t plug it into the fast charge port on your USB hub like us and wonder what’s taking so long, is all we’re saying). If you have never used your phone with this PC before, you’ll see the following message pop up:

This message is unnecessarily confusing even by iTunes standards, and might cause you to panic a bit. It really makes it sound like your only options for bringing the phone into iTunes is to wipe it (“Set up as a new iPhone”) or overwrite it (“Restore from this backup”) if there are backups on the PC already.

What the first option should say is “Create a new profile in iTunes for this phone”, because that’s what it means. Don’t panic: this option won’t wipe your phone. Go ahead and do so now if you see the above screen in front of you. Look for the device icon to appear in the navigation bar and click on it, as seen below.

In the detailed device view, look for the “Backups” section. In that section ensure that “Encrypt iPhone Backup” is checked on the left hand side before clicking “Back Up Now”. In order for all your data to be backed up properly (like your saved passwords and Health/HomeKit data), you must encrypt your backup and give it a password.

Once you’ve click “Back Up Now”, sit back and wait a few minutes as iTunes churns through your device and backs up all the data to the local disk. When the process is complete, eject your old phone from the computer and set it aside.

Step Two: Restore the Old Backup to Your New Device

This next step is where the magic happens. Unbeknownst to many people, you can take the backup from an old phone (say, your old iPhone 5s) and just slap it right on top of your new phone (say, an iPhone 7). There’s no special steps required. Simply grab your new device and plug it into the same PC with the sync cable. Wait for it to mount in iTunes. The new phone will register as a new iTunes device and you’ll see that same panic-inducing screen we highlighted earlier in the tutorial–only this time you’ve got a clear and calm path of action.

In the “Welcome to Your New iPhone” screen, select the option “Restore from this backup” and then confirm that the selected backup is the backup you just made of your old phone. Click “Continue” once you’ve confirmed the backup is the correct one.

Sit back and relax as all  your old data is copied over to your new phone. After the process is complete, you’ll see a message pop up indicating that your device will restart:

After the restart iTunes will run a few checks (like, for example, it may prompt you to update iOS if the new device can run a higher version of iOS than the old device) and then you’re back in business. All your photos, contact, apps, health data, and such from your old phone will now be on your new phone.

[mai mult...]

How to Create an Audio Group in Google Home

How to Create an Audio Group in Google Home

Your first step is to set up audio groups in the Google Home app. You can create multiple groups with the same speakers, which is nice if you have a bunch of Homes and want multiple groups for different occasions. To get started, fire up the Google Home app, then tap the “Devices” icon in the upper right corner.

From there, find any speaker you’d like in a group and tap the three-dot overflow menu in the upper right. Choose “Create Group” from this menu.

On the next screen, give the group a name (use something that Google Assistant can easily understand) and then choose any other speakers you’d like to add to the group. You’ll need at least two speakers to create a group.

After adding your speakers, click the “Save” button to create the group. This should also generate a new entry at the bottom of the Devices page, though I had to close the Home app and re-open it for this new card to show up.

How to Use Your New Audio Group

Audio Groups in Google Home work pretty much the same way as any standalone speaker: either by issuing a voice command or by casting to the group. To play something with your voice, just say “OK Google, play <song/artist/album> in the <name of your audio group>.” So, for example, I can say “Play In Flames in the back of the house,” and Google Home recognizes this as my audio group.

Similarly, you can cast audio from apps that support this feature, like Pandora, Play Music, and the like. In the app, tap the “Cast” button, then choose your audio group. It’s that easy.

How to Edit or Remove Audio Groups from Google Home

If you get a new Google Home and want to add it to your group, you can do this quickly. Jump back into the Home app, hit the “Devices” button on the top corner, and then scroll down to your group.

Tap the overflow menu button and then tap the “Edit Group” command. From there you can add or remove speakers.

Similarly, you can remove the group from that same menu by tapping the “Delete Group” command.

[mai mult...]

How to set up Adaptive Lighting With Apple HomeKit Lights

What Is Adaptive Lighting?

The Adaptive Lighting feature was first introduced alongside the iOS 14 and iPadOS 14 software updates in September of 2020. With this feature, Apple’s HomeKit smart home software can automatically adjust the color temperature of supported smart home lights throughout the day. You can get warm yellow tones in the morning as the sun rises, cool white lighting at mid-day, and softer yellow hues at night as the sun sets—all automatically.

The Hardware You’ll Need

Adaptive Lighting only works with smart lights that support it. As of February 2021, Philips Hue bulbs support it, as does the Eve Light Strip. Other lights will hopefully add support for it in the future. You will also need to set up your lights to work with Apple HomeKit if you haven’t already done so. For Hue lights, for example, you can open the Hue app on your iPhone or iPad and select Settings > HomeKit & Siri to set this up. (If you’ve previously set this up and you can currently control your lights with Siri and the Home app, you’ve already set this up.)

Also, you need a device set up to function as a “home hub.” You can set up an Apple TV, HomePod, HomePod mini, or even an iPad as a home hub. The automation actually runs on this device—it constantly communicates with your lights and changes their color temperatures. Here’s how to set up a home hub, courtesy of Apple.

How to Set up Adaptive Lighting

If you have the required hardware and you’ve set up a home hub, this option should be easy to find. Just launch the “Home” app on your iPhone or iPad. You may see a banner saying “Adaptive Lighting Now Available.” If so, tap it to set up your lights.

The Adaptive Lightning Now Available banner in the Home app.

You can also select a specific light and manually enable Adaptive Brightness. Locate your light in the Home app and long-press it to bring up its controls.

Long-press a light tile in the Home app.

When a light supports Adaptive Lighting, you will see a special “Adaptive Lighting” control in the first place in the color presets. Unlike the other color controls, it has a logo of a sun on it. To turn on Adaptive Lighting for a light, just tap that Adaptive Lighting icon.

Tap the "Adaptive Brightness" circle at the top-left corner of the color grid.

That’s it—the light is now in Adaptive Lighting mode. You can change it to another color whenever you want, but it’ll stay in that color until you put it back in Adaptive Lighting mode by tapping the Adaptive Lighting circle.

How Adaptive Lighting Works With Brightness Controls

Adaptive Lighting will not automatically adjust the brightness of your light—just its color temperature. In fact, when you manually adjust the brightness of your light, Adaptive Brightness will automatically change its color temperature. It’s cooler at higher brightness and warmer at lower brightness.

For example, the coolest temperature will be at 100% brightness at mid-day. If you decrease the brightness, the color temperature will get warmer—even if it’s the middle of the day. If it’s night time and your lights are already a warm hue, dimming them will result in them becoming an even warmer color. Give it a try and see how it works.

[mai mult...]

How to Stop Low Cardio Fitness Notifications on Apple Watch

How to Turn off the Notifications the Easy Way

Confusingly, while you set up Low Cardio Fitness notifications in the Health app, that isn’t where you turn them off. Instead, to disable the alerts, open the “Watch” app on your iPhone and go to “Heart.” Toggle “Cardio Fitness Notifications” off from here.

watch app with heart option highlighted cardio fitness notifications toggle

How to Stop Low Cardio Fitness Alerts the Hard Way

While turning off Low Cardio Fitness notifications is one way to stop seeing them, there’s a better way: increase your cardio fitness. Higher levels of physical fitness have been linked with lower risks of getting heart disease, strokes, type 2 diabetes, high blood pressure, dementia, Alzheimer’s disease, and some cancers. Just look at this list from the American Heart Association.

Also, it’s important to remember that your cardio fitness is measured against other people of your age and sex. If you’re in your 60s, your level of fitness is naturally going to be lower than it was when you were in your 20s. Apple doesn’t somehow expect everyone to stack up against a field of elite athletes.

Note: Before starting any new exercise program, make sure that you talk to your personal physician. We’re not doctors here at How-To Geek, and we aren’t qualified to give you nuanced and specific health advice.

Increasing your cardio fitness takes time and, yes, exercise. If you’re just starting out, try increasing the number of steps that you take per day, or even do a couch to 5k program. After a few weeks, you’ll be able to see your cardio fitness number climb in the Health app. To check your cardio fitness, open the “Health” app, tap “Browse,” tap “Heart,” then tap “Cardio Fitness.”

heart option in health app cardio fitness option in health app

Move more and you should see the trend-line start to go up over the next days, weeks, and months. You can also tap the “i” icon to see the different ranges for all demographics.

trend line low fitness average values for different demographics

[mai mult...]

Why Can’t I See the Burn Bar on My Apple Fitness+ Workouts?

What the Burn Bar Shows

First, let’s quickly recap what the Burn Bar actually shows. It compares how many calories you’ve burned in the past two minutes of your workout (and at the end, the average for the whole workout) to people who are roughly the same age, weight, and gender (so newbies aren’t compared to elite athletes). You’re given a ranking—“Behind the Pack,” “In the Pack,” “Middle of the Pack,” “Front of the Pack,” or “Ahead of the Pack”—based on how you’re doing.

The Burn Bar Takes Two Minutes to Appear

Since the Burn Bar is based on how hard you’ve gone over the previous two minutes of your workout, it doesn’t appear until after you’ve actually worked out for two minutes. If you’re not seeing the Burn Bar at the very start of a workout, this is probably why.

The Burn Bar Only Shows on Certain Workouts

strength workout in fitness+
Strength workouts aren’t about burning calories.

The Burn Bar only shows up on workouts where the aim is to burn calories. Some workouts, like Strength, Yoga, and Mindful Cooldowns, have different goals. The Burn Bar won’t appear in workouts like these because it’s not a good measure of performance.

In a Strength workout, for example, your goal is to perform high-quality repetitions that build muscle, not to get your heart rate up by bouncing around. The Burn Bar can’t compare your reps to other people’s, so Fitness+ won’t show it.

The Burn Bar Might Be Turned off

After your first workout, you get the option to disable the Burn Bar. If you did that by mistake—or deliberately turned off the Burn Bar at some point—you might need to turn it on.

In a workout, tap the metrics icon in the bottom right of the screen.

metrics button highlighted

Tap the toggle to the right of “Burn Bar” to turn it on.

burn bar toggle highlighted

If the Burn Bar option is already enabled on this screen, you’re probably not seeing it for one of the other reasons—you might need to wait two minutes, or it might not be relevant to your current workout.

[mai mult...]

How to Use the Built-In Stocks Feature in Microsoft Excel

If you need stock market data for your spreadsheet, you can save time and get up-to-date information with the built-in Stocks data type in Microsoft Excel. Here’s how to populate your sheet with details like ticker symbols, market caps, previous close, and more.

Add Stock Data to Your Excel Sheet

To use the Stocks data type in Microsoft Excel, you only need an internet connection and a bit of your own data to start. Open your spreadsheet and type a piece of information, like a company name or stock symbol. With the cell still selected, open the “Data” tab, and then click “Stocks” in the “Data Types” section of the ribbon.

Click Data then Stocks in Data Types

After a few seconds (depending on your internet connection), you might see the “Data Selector” sidebar open on the right. This happens when your item can’t be found or more than one stock with that name is available. Click “Select” under any of the available options in the sidebar.

Stocks Data Selector

If you click away from the cell that contains your initial data, just select it again, and then click the small Insert Data icon that appears next to it. A long, scrollable list containing all the stock market details you could possibly need will appear.

Click Insert Data to View a List

Choose the information you want to include and it will pop into the cell at the right. You can continue adding details for the stock in this same way. Any additional details you choose will populate in the subsequent cells to the right. You can also add column headers to identify the data you include. At any time, though, you can just click the cell containing an item to see what it is in the Formula Bar.

Stocks Data Detail in Formula Bar

View the Data Type Card

The scrollable list of details for a stock is helpful, but you can also view this same data in a card format. Just right-click the cell containing the company or stock you first typed, and then select “Show Data Type Card” from the menu that appears.

Click Show Data Type Card

You can then see those same details in an easy-to-read snapshot. You can also drag the bottom-right corner to enlarge the card if necessary. To add move information from the card to your sheet, just hover your cursor over that piece of data, and then click the Extract to Grid icon.

Click Extract to Grid to Add Data

Refresh the Stocks Data

Like the Geography data type in Microsoft Excel, the Stocks data type retrieves information from an online source. This means you can update it without opening a web browser. To do so, just right-click the cell that contains the company name or stock symbol, and then select Data Type > Refresh from the menu that appears.

Click Data Type then Refresh

Don’t See the Stocks Feature?

If you don’t see the Stocks data type in Microsoft Excel, make sure your system meets the following requirements:

  • You’re using Excel for Microsoft 365: Microsoft might add this feature to additional versions in the future, but for now, you’ll have to use this one.
  • You’ve updated to the latest version of Office: Microsoft is rolling out this feature gradually, so you might have to wait a bit. Just keep checking for new versions of Office.
  • English is set as the editing language in Office: Excel’s data types are only available if you’ve done this. You can learn how to change it in Microsoft Word here, and this will also change it in Excel.
[mai mult...]

How to Get a Task Manager Inside PC Games on Windows 10

Windows 10 now has a Task Manager you can access from any PC game with a keyboard shortcut. You can even make it always-on-top above your gameplay. See what’s wasting resources and end tasks without Alt+Tabbing out of your game.

This article shows off the “Resources” widget in Windows 10’s built-in Game Bar. Microsoft added this widget at the end of October 2020. Like all the tools in the so-called “Xbox Game Bar,” it works everywhere in Windows—even when you’re not playing a game.

Open the Game Bar and Launch the Resources Widget

To find this feature, you’ll need to open the Xbox Game Bar. Press Windows+G to open it. You can use this shortcut while playing a game or using any other Windows application. At the top of the full-screen Game Bar interface, click the menu button to the right of the clock on the bar. Select “Resources” in the menu to show the Resources widget on the screen.

Click menu and select "Resources"

If you don’t see the full-screen Game Bar interface, you may have disabled it or changed its keyboard shortcut. Head to Settings > Gaming > Xbox Game Bar to control these settings. Ensure the Game Bar is toggled “On” at the top of this window. You can select a custom keyboard shortcut to open the Game Bar under the Keyboard Shortcuts header.

See What’s Using the Most Resources

The Resources tool will show you exactly what’s using the most resources. In its default form, it doesn’t even show you numbers—it just ranks processes by their impact. A process might have High, Medium, or Low impact. If you’re playing a game and want to free up resources, you can close a process that’s using a significant amount of resources. To do so, either Alt+Tab out of the game and close it normally, or click the “X” to the process’s in the Resources widget. This will end the process just as if you had ended it from inside Windows 10’s Task Manager.

Note that some processes are part of Windows and you should not attempt to end them.

The Resources panel in Windows 10's Game Bar

For more information, you can click “Show More.” You’ll get a Task Manager-style interface that shows you the list of processes running on your PC with their CPU, GPU, RAM, and disk usage. You can click the header of any column to sort by it—for example, to see the processes using the most CPU on top, click the “CPU” header.

As with the more compact interface, you can click the “X” to the right of a process to forcibly close it. It’s just like right-clicking a process and selecting “End Task” in the Task Manager.

The full Resources Task Manager-like interface in Windows 10's Game Bar

Pinning the Widget to Keep It Always-on-Top

Like other Game Bar features, this widget can be “pinned” so that it’s always on your screen, even when the Game Bar overlay is closed. You could have a panel that shows you resource usage always on screen while you’re playing a game or using any other Windows application. To pin the Resources widget—or any other widget—click the “Pin” icon at the top-right corner of the widget window. It will now appear on screen even when you close the Game Bar.

You’ll find more options for the Resource widget’s appearance in its options window. Click the Options button to the left of the Pin button to access it.

The Resources widget from the Xbox Game Bar pinned to a Windows 10 desktop


[mai mult...]

How to Copy and Paste Handwritten Text as Typed Text on iPad

This feature works with all iPads and iPad Pros that support the Apple Pencil (all generations). To get started, open the “Notes” app on your iPad.

If you don’t have any handwritten notes, you can get started quite easily. From a new note, tap the “Pencil” icon from the top toolbar to open the “Pencil” options.

Tap the Pen button from Notes toolbar

From here, choose the “Pen” option.

Select the Pen Tool from Toolbar

You can now start writing on the iPad’s screen. Keep writing for as long as you want. You can scroll using your finger.

Once you’re done and you want to select text, you’ll have to switch from your Apple Pencil to your fingers.

To quickly select a word, simply double-tap it.

Double tab on a word to select it

This will highlight the handwriting and you’ll see a selection point. Simply drag it to select more text.

Drag the selection

Alternatively, if all that you have in this note is handwritten text and you want to select it all, tap and hold in an empty part of the note and choose the “Select All” option.

Tap on the Select All button

Now, tap the selected text to reveal options.

Tap the selected text

From here, choose the “Copy As Text” option.

Tap Copy as Text

Your iPad will now convert the handwritten text to typed text, and it will be added to your clipboard.

You can now go to any app or text field to paste this. When you get to the text field, double-tap in an empty space and choose the “Paste” option.

Tap and hold and press the Paste button

You’ll see that your handwritten text will now be pasted as typed text.

Handwritten text pasted


[mai mult...]

How to Find Latitude and Longitude in Apple Maps

On an iPhone or iPad, first open “Apple Maps.” By browsing the map, position the Maps display in the general region where you’d like to determine the latitude and longitude. It could be your current area or somewhere else. Place your finger on the screen in the exact location whose latitude and longitude you’d like to determine. After a moment, a marker pin will drop onto that spot.

Tap and hold the screen on iPhone or iPad to drop a marker pin

On an iPad, after the pin drops, you’ll immediately see the latitude and longitude of that location in the “Marked Location” window.

Latitude and Longitude shown in Apple Maps on iPad

On the iPhone, swipe the “Marked Location” window upward until you see the latitude and longitude.

Latitude and Longitude shown in Apple Maps on iPhone

After you’re done, if you want to get rid of the pin, tap the “Remove” icon (with the trash can on it). Or you can keep the pin in place and add more marker pins to other locations.

How to Find Latitude and Longitude in Apple Maps on Mac

On a Mac, open the “Apple Maps” app. Position the map in the area near the spot whose latitude and longitude you’d like to discover. Click the exact position with your mouse or touchpad and hold it for a moment until a marker pin drops onto that spot. In the “Marked Location” bubble that appears beside the market pin, click the “Info” button (which looks like a lowercase “i” with a circle around it).

Place a pin in Apple Maps on Mac and click the "info" button.

In the larder “Marked Location” bubble that appears, you’ll find the latitude and longitude of that spot just below the address.

In the marked location info window on Apple Maps on Mac, you'll see the latitude and longitude.

After that, if you don’t need the pin anymore, click the “Remove Pin” button located in the bubble window. Otherwise, click outside the bubble to close it, then add more pins in other locations if necessary. Wherever you go, there you are.

[mai mult...]