How to use File History to create a backup to a network folder windows 11

To create a file backup to a network folder with File History, use these steps:

  1. Open Start.
  2. Search Control Panel and select the top result to open the app.
  3. Click on System and Security.
  4. Click on File History.
  5. Open File History
  6. Click the Select drive option from the left pane.
  7. File History select drive
  8. Click the “Add network location” option.
  9. Add network location
  10. Select the network folder to backup files with File History on Windows 11.
  11. Click the Select Folder button.
    Quick note: It’s assumed that you already have access to the shared folder. Otherwise, you can use these instructions to set up file sharing on Windows 11.
  12. Click the OK button.
  13. Click the “Turn on” button to enable Windows 11’s File History.
  14. File History enable network folder
  15. (Optional) Click the Advanced Settings option from the left pane.
  16. Under the “Advanced settings” section, choose how often File History should create incremental backups of your files using the “Save copies of files” setting.File History backup frequency and retention
  17. Choose the backup retention using the “Keep saved versions” setting.
  18. Click the Save changes button.
  19. (Optional) Click the Exclude Folders option from the left pane.
  20. Click the Add button.
  21. File Explorer exclude locations
  22. Select the folder location to exclude from the backup.
  23. Click the Select Folder button.
  24. Click the Save changes button.

After you complete the steps, the feature will create a backup of your files to the network location.

[mai mult...]

How to use File History to create a backup to a USB drive on windows 11

On Windows 11, “File History” is a legacy feature that allows you to create a file backup on an external or network drive to have the means to recover files in case of accidental deletion, modification, or corruption.

File History backs up your files in the “Documents,” “Pictures,” “Videos,” “Music,” and “Desktop” folders, including the OneDrive files locally stored on the device by default. However, on Windows 11, it’s no longer possible to include additional folder locations in the backup.

To enable File History to create a file backup on Windows 11, connect an external drive, and use these steps:

  1. Open Start on Windows 11.
  2. Search Control Panel and select the top result to open the app.
  3. Click on System and Security.
  4. Click on File History.
  5. Open File History
  6. Click the “Turn on” button if the backup drive already shows in the list.File History enable option
    Quick tip: If you want to use another drive, click the “Select drive” option on the left to change the settings.
  7. (Optional) Click the Advanced Settings option from the left pane.
  8. Under the “Advanced settings” section, choose how often File History should create incremental backups of your files using the “Save copies of files” setting.File History backup frequency and retention
  9. Choose the backup retention using the “Keep saved versions” setting.
  10. Click the Save changes button.
  11. (Optional) Click the Exclude Folders option from the left pane.
  12. Click the Add button.
  13. File Explorer exclude locations
  14. Select the folder location to exclude from the backup.
  15. Click the Select Folder button.
  16. Click the Save changes button.

Once you complete the steps, File History will begin saving copies of your files in the external storage. On the “Advanced Settings” page, you will also find the “Event logs” section with an option to open the Event Viewer, where you can check errors and other events generated by File History. If you want to stop File History, you can always click the “Turn off” button.

[mai mult...]

How to Install Apache Maven on Ubuntu 22.04

Maven is a free, open-source, popular build tool developed by the Apache Group. It is used to build, publish, and deploy several projects simultaneously for better performance. It is based on the concept of a project object model  and is used to manage projects written in C#, Ruby, Scala, and other languages.

Install Apache Maven From the APT Repository

By default, the Apache Maven package is included in the Ubuntu 22.04 default repository. You can install it by running the following command:

apt install maven -y

Once the Apache Maven is installed, you can verify its version using the following command:

mvn -version
Install Apache Maven from Source

The latest version of Apache Maven is not included in the Ubuntu 22.04 default repository by default. So it is a good idea to install the latest version of Apache Maven from the source.

Install Java JDK

Apache Maven is a Java-based application. So you will need to install the Java JDK to your server. You can install it with the following command:

apt install default-jdk -y

After the successful installation, verify the Java version using the following command:

java --version
Install Apache Maven

Next, download the latest version of Apache Maven using the following command:

wget https://dlcdn.apache.org/maven/maven-3/3.8.5/binaries/apache-maven-3.8.5-bin.tar.gz

Once the download is completed, extract the downloaded file to the /opt directory:

tar xzf apache-maven-3.8.5-bin.tar.gz -C /opt/

Next, navigate to the /opt directory and rename the extracted directory:

cd /opt/
mv apache-maven-3.8.5 maven

Next, you will need to create a maven.sh file to export the Apache Maven path.

nano /etc/profile.d/maven.sh

Add the following lines:

export M2_HOME=/opt/maven
export PATH=${M2_HOME}/bin:${PATH}

Save and close the file then activate the Maven environment with the following command:

source /etc/profile.d/maven.sh

Next, verify the Apache Maven version using the following command:

mvn -version

You can now choose your preferred way to install Apache Maven on Ubuntu 22.04
[mai mult...]

How to Install Redmine Project Management Software on Debian 11

Redmine is a free and open-source project management software and issue-tracking tool. It is written using the Ruby on Rails framework and can be integrated with various version control systems. It includes a repository browser and a diff viewer. It can be used to manage projects’ features per project wikis and forums, time tracking, and role-based access control.

Before we start your system must have these packages:

$ sudo apt install wget curl nano software-properties-common dirmngr apt-transport-https gnupg2 ca-certificates lsb-release unzip debian-archive-keyring -y
And ake sure everything is updated.
$ sudo apt update && sudo apt upgrade
Step 1 – Configure Firewall

The first step before installing any packages is to configure the firewall to allow HTTP and HTTPS connections. Check the status of the firewall.

$ sudo ufw status

You should see something like the following.

Status: active

To                         Action      From
--                         ------      ----
OpenSSH                    ALLOW       Anywhere
OpenSSH (v6)               ALLOW       Anywhere (v6)

Allow HTTP and HTTPs ports. Also, open port 3000 for Redmine.

$ sudo ufw allow http
$ sudo ufw allow https
$ sudo ufw allow 3000

Check the status again to confirm.

$ sudo ufw status
Status: active

To                         Action      From
--                         ------      ----
OpenSSH                    ALLOW       Anywhere                  
80/tcp                     ALLOW       Anywhere                  
443                        ALLOW       Anywhere                  
3000                       ALLOW       Anywhere                  
OpenSSH (v6)               ALLOW       Anywhere (v6)             
80/tcp (v6)                ALLOW       Anywhere (v6)             
443 (v6)                   ALLOW       Anywhere (v6)             
3000 (v6)                  ALLOW       Anywhere (v6)

Step 2 – Install Apache Server

We will use the Apache webserver to deploy Redmine. Install Apache using the following command.

$ sudo apt install apache2

Check the status of the Apache service.

Step 3 – Install and Configure MySQL Server

We will use the MySQL database to store the data. Debian doesn’t have MySQL anymore in its repositories. So we will be using the official MySQL repository for installation.

Import MySQL GPG key.

$ curl https://repo.mysql.com/RPM-GPG-KEY-mysql-2022 | gpg --dearmor | sudo tee /usr/share/keyrings/mysql.gpg >/dev/null

Create a MySQL repository file.

$ echo "deb [signed-by=/usr/share/keyrings/mysql.gpg arch=amd64] http://repo.mysql.com/apt/debian/ `lsb_release -cs` mysql-8.0" | sudo tee /etc/apt/sources.list.d/mysql.list

Update the system repository list.

$ sudo apt update

Install MySQL.

$ sudo apt install mysql-server

You will be prompted to set a root password. Choose a strong password. Next, you will be prompted to choose between the newer MySQL caching_sha2_password encryption or the older mysql_native_password encryption. Choose the newer one because Redmine supports it. Select OK to proceed and complete the installation.

Secure MySQL installation.

$ sudo mysql_secure_installation

First, you will be asked for the root password. Enter the password you chose during the installation. Next, you will be asked if you want to set up the Validate Password Plugin, which you can use to test the strength of your MySQL password. Choose Y to proceed. You will be asked to choose the password validation level in the next step. Choose 2 which is the strongest level and will require your password to be at least eight characters long and include a mix of uppercase, lowercase, numeric and special characters.

Securing the MySQL server deployment.

Enter password for user root:

VALIDATE PASSWORD COMPONENT can be used to test passwords
and improve security. It checks the strength of password
and allows the users to set only those passwords which are
secure enough. Would you like to setup VALIDATE PASSWORD component?

Press y|Y for Yes, any other key for No: Y

There are three levels of password validation policy:

LOW    Length >= 8
MEDIUM Length >= 8, numeric, mixed case, and special characters
STRONG Length >= 8, numeric, mixed case, special characters and dictionary          file

Please enter 0 = LOW, 1 = MEDIUM and 2 = STRONG: 2

You will be shown the strength of your root password and will be asked if you want to change it. Enter N if you don’t want to change and proceed further. If you wish to change it, you can do it now by entering Y and choosing a password satisfying the requirements above.

Using existing password for root.

Estimated strength of the password: 100 
Change the password for root ? ((Press y|Y for Yes, any other key for No) : N

 ... skipping.

Press Y and then ENTER key for all the following prompts to remove anonymous users and the test database, disable root logins and load the newly set rules.

By default, a MySQL installation has an anonymous user, allowing anyone to log into MySQL without having to have a user account created for them. This is intended only for testing, and to make the installation go a bit smoother. You should remove them before moving into a production environment. Remove anonymous users? (Press y|Y for Yes, any other key for No) : Y Success. Normally, root should only be allowed to connect from ‘localhost’. This ensures that someone cannot guess at the root password from the network.

Disallow root login remotely? (Press y|Y for Yes, any other key for No) : Y Success. By default, MySQL comes with a database named ‘test’ that anyone can access. This is also intended only for testing, and should be removed before moving into a production environment. Remove test database and access to it? (Press y|Y for Yes, any other key for No) : Y – Dropping test database… Success. – Removing privileges on test database… Success. Reloading the privilege tables will ensure that all changes made so far will take effect immediately. Reload privilege tables now? (Press y|Y for Yes, any other key for No) : Y Success.

Enter the MySQL shell. Enter your root password to continue.

$ mysql -u root -p

Create redmine user. Make sure the password meets the requirements set before.

mysql> CREATE USER 'redmine'@'localhost' IDENTIFIED BY 'Your_password2';

Create redmine database.

mysql> CREATE DATABASE redmine CHARACTER SET utf8mb4;

Grant the user privileges to the redmine database.

mysql> GRANT ALL PRIVILEGES ON redmine.* TO 'redmine'@'localhost';

Exit the Shell.

mysql> exit
Step 4 – Install Ruby and other requisites

Redmine’s latest version is compatible with Ruby 3.1. Debian ships with Ruby 2.7 so we will need to install the latest version using Ruby Version Manager (RVM).

Install RVM’s GPG key.

$ gpg2 --keyserver keyserver.ubuntu.com --recv-keys 409B6B1796C275462A1703113804BB82D39DC0E3 7D2BAF1CF37B13E2069D6956105BD0E739499BDB

Install RVM.

$ \curl -sSL https://get.rvm.io | bash -s stable

Source the RVM scripts.

$ source ~/.rvm/scripts/rvm

Install Ruby. You can check the latest version from the Ruby website.

Install all the remaining packages required by Redmine.

$ sudo apt install libxml2-dev libxslt1-dev zlib1g-dev imagemagick libmagickwand-dev libmysqlclient-dev apache2-dev build-essential libcurl4-openssl-dev

Visit the Redmine downloads page and check the latest stable version available. At the time of writing this tutorial, the latest available version is 5.0.5.

Use wget to download Redmine.

$ wget https://www.redmine.org/releases/redmine-5.0.5.tar.gz

You might get the following error while downloading the archive because one of the root certificates on the website has expired.

WARNING: The certificate of ‘www.redmine.org’ is not trusted.
WARNING: The certificate of ‘www.redmine.org’ doesn't have a known issuer.
WARNING: The certificate of ‘www.redmine.org’ has expired.

If you get this error, run the following command instead to download.

$ wget https://www.redmine.org/releases/redmine-5.0.5.tar.gz --no-check-certificate

Extract and move the files to the /var/www/redmine directory.

$ tar xfz redmine-5.0.5.tar.gz
$ sudo mv redmine-5.0.5 /var/www/redmine

Shift to the /var/www/redmine directory.

$ cd /var/www/redmine

You will get the following output and a warning about the Ruby version. You can safely ignore that.

RVM used your Gemfile for selecting Ruby, it is all fine - Heroku does that too,
you can ignore these warnings with 'rvm rvmrc warning ignore /var/www/redmine/Gemfile'.
To ignore the warning for all files run 'rvm rvmrc warning ignore allGemfiles'.

Unknown ruby interpreter version (do not know how to handle): >=2.5.0,<3.2.0.

Create Redmine configuration files by using the supplied example files.

$ cp config/configuration.yml.example config/configuration.yml
$ cp config/database.yml.example config/database.yml
$ cp public/dispatch.fcgi.example public/dispatch.fcgi

Open the database.yml file for editing.

$ nano config/database.yml

Find and configure your database settings under the following section.

production:
  adapter: mysql2
  database: redmine
  host: localhost
  username: redmine
  password: "Your_password2"
  # Use "utf8" instead of "utfmb4" for MySQL prior to 5.7.7
  encoding: utf8mb4

Save the file by pressing Ctrl + X and entering Y when prompted.

Install bundler for managing ruby gem dependencies.

$ gem install bundler

Set the environment for installing gem dependencies.

$ bundle config set --local without 'development test'

Install the gem dependencies.

$ bundle install

If you face any issues with gem versions, use the following command to restore.

$ gem pristine --all

Add webrick dependency.

$ bundle add webrick

Generate a random secret key to prevent tampering with the cookies for storing session data.

$ bundle exec rake generate_secret_token

Create the database structure.

$ RAILS_ENV=production bundle exec rake db:migrate

Insert the data into the MySQL database.

$ RAILS_ENV=production REDMINE_LANG=en bundle exec rake redmine:load_default_data

Create necessary directories and set file permissions.

$ mkdir -p tmp/pdf
$ mkdir -p public/plugin_assets
$ chown -R $USER:$USER files log tmp public/plugin_assets
$ chmod -R 755 /var/www/redmine/

Run the following command to start a Rails server instance.

$ bundle exec rails server -u webrick -e production

Open the URL http://<yourserverIP>:3000/login to obtain the Redmine Login screen.

Enter the default credentials (admin/admin) to log in. You will be asked to change the password. Next, you will be redirected to the My Account page. Redmine has been installed successfully.

[mai mult...]

How to use eCryptfs on Linux

eCryptfs is a powerful encryption tool for Linux that allows users to encrypt and decrypt files and directories on their system. It is a popular option for securing sensitive data on Linux systems.

Install eCryptfs

eCryptfs is already included in the official Ubuntu repositories, so we can install it using the apt command. Open the Terminal in your Ubuntu system by pressing Ctrl+Alt+T. Now in the Terminal, execute this command to install eCryptfs:

sudo apt install ecryptfs-utils –y

Encrypt Directories using eCryptfs

For instance, I want to encrypt the “Myfiles” directory under my Home directory. In this case, the command would be:

sudo mount -t ecryptfs ~/Documents/Myfiles/ ~/Documents/Myfiles/

When you run the above command, you will be asked to provide some details along with passphrase. The passphrase is actually the encryption key that will be used to later to decrypt the encrypted directory.Also, note that the details you provide will be later used when remounting the directory.

Now the directory is encrypted and mounted. You can verify it by running the following command:

mount | grep ecryptfs
Verifying Encryption

Let’s create a document in the mounted directory using the Nano editor.

sudo nano ~/Documents/Myfiles/sample.txt

Now add some text in the file and press Ctrl+O and Ctrl+X to save and exit the file respectively. Now try to view this document using the cat command:

cat ~/Documents/Myfiles/sample.txt

You will see that the document is unencrypted and you can view the content. It is due to the reason that the directory is mounted at this time. Remember that as long as the directory is mounted, you will be able to see the content unless you unmount it.

Now let’s try unmounting the directory. Use the following syntax to do so:

umount [mounted_directory]

In this case, it would be:

umount ~/Documents/Myfiles/

As the directory is unmounted, so now let’s view the document using the cat command. This time, you will not be able to view the original content. Instead, you will see the encrypted text.

To access your files again, you will need to re-mount them and enter the same passphrase and details you have set earlier while mounting for the first time.
[mai mult...]

How to turn off the Linux login banner

When you log into Linux, either via SSH or the console, you are greeted with a banner containing important information. If you do everything you can to protect your Linux server, the information this banner reveals can be a gold mine for strangers and potential attackers. Information such as kernel version, distribution type, available updates, and much more can be exposed.

How to disable the login banner on Linux or Unix with .hushlogin
  • First, create a new empty individual file in your login directory ($ HOME) called ~ / .hushlogin. At the Linux or Unix shell prompt, type the following touch command: touch ~/.hushlogin
  • That is all. Now try to login with ssh command: ssh vivek@192.168.2.17
Disable the login banner on Linux or Unix using the .hushlogin file
  • touch ~/.hushlogin
  • #OR#
  • touch $HOME/.hushlogin
  • #BASH#
  • >$HOME/.hushlogin

In summary, the .hushlogin file suppresses login messages in Linux or Unix, and using ssh command you can log in without revealing sensitive information about the system.

[mai mult...]

How to install duf on Debian/Ubuntu

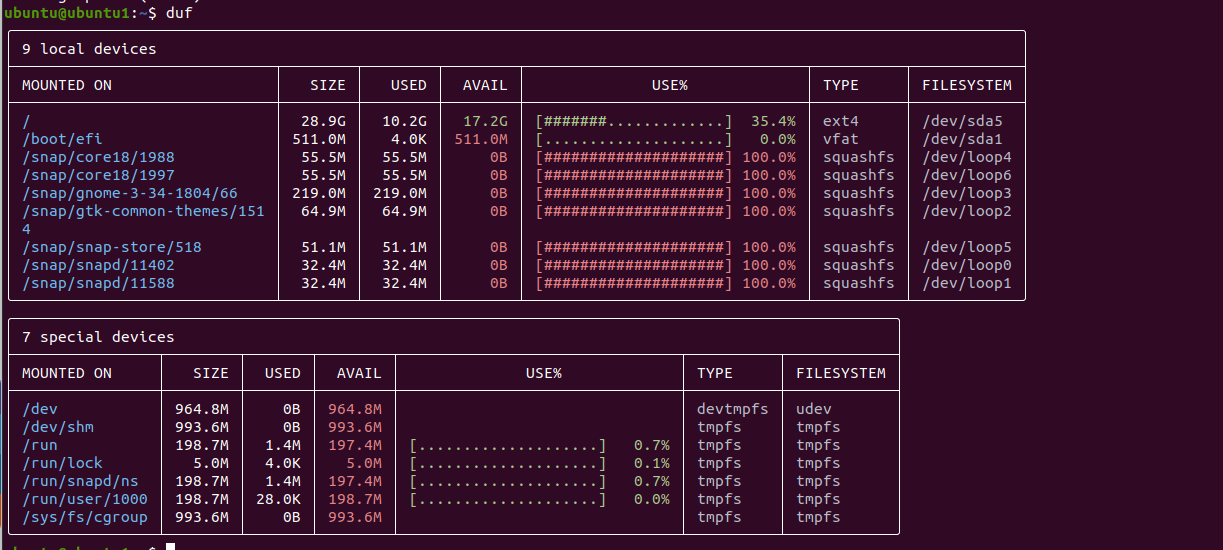
duf means Disk Usage/Free utility. It works on Linux and Unix-like systems, including Windows. It comes with the following features:

  • Easy to use
  • Colorful display
  • Adjust height and width as per your terminal resize movement
  • Sorting data as per our need
  • Filters and groups
  • JSON outputs and more

install duf on Ubuntu 20.04

Installing duf

Make sure you have a working Go environment, including a Golang compiler installed for source code installation. Open the terminal app and then use the git command:
git clone https://github.com/muesli/duf.git
cd duf
go build

How to install duf on Debian/Ubuntu Linux (pre built packages)

Use the wget command or curl command to download file:
wget https://github.com/muesli/duf/releases/download/v0.8.1/checksums.txt
wget https://github.com/muesli/duf/releases/download/v0.8.1/duf_0.8.1_linux_amd64.deb
sha256sum --ignore-missing -c checksums.txt

Checksum confirmation:

duf_0.8.1_linux_amd64.deb: OK

Install .deb Packages on your Debian or Ubuntu box:
sudo apt install ./duf_0.8.1_linux_amd64.deb

Example:

Reading package lists... Done
Building dependency tree       
Reading state information... Done
Note, selecting 'duf' instead of './duf_0.8.1_linux_amd64.deb'
The following NEW packages will be installed:
  duf
0 upgraded, 1 newly installed, 0 to remove and 0 not upgraded.
Need to get 0 B/1031 kB of archives.
After this operation, 2486 kB of additional disk space will be used.
Get:1 /tmp/duf_0.8.1_linux_amd64.deb duf amd64 0.8.1 [1031 kB]
debconf: delaying package configuration, since apt-utils is not installed
Selecting previously unselected package duf.
(Reading database ... 15411 files and directories currently installed.)
Preparing to unpack /tmp/duf_0.8.1_linux_amd64.deb ...
Unpacking duf (0.8.1) ...
Setting up duf (0.8.1) ...
[mai mult...]

How To: Check Ram Size From Redhat Linux Desktop System

You can use any one of the following command line tools to view the ram size under Red hat Enterprise Linux desktop or server based system:

  1. /proc/meminfo file –
  2. free command –
  3. top command –
  4. vmstat command –
  5. dmidecode command –
  6. Gnonome System Monitor gui tool –

Open a command-line terminal (select Applications > Accessories > Terminal), and then type the following commands:

$ cat /proc/meminfo

MemTotal:        8388608 kb
MemFree:         4033789 kB
Buffers:          133628 kB
Cached:          1735174 kB
SwapCached:            0 kB
Active:          1512812 kB
Inactive:        1024508 kB
Active(anon):    1170235 kB
Inactive(anon):    12566 kB
Active(file):     758121 kB
Inactive(file):  1136720 kB
Unevictable:        2388 kB
Mlocked:            2388 kB
HighTotal:       7400016 kB
HighFree:        4520172 kB
LowTotal:         789480 kB
LowFree:          511884 kB
SwapTotal:      15998968 kB
SwapFree:       15998968 kB
Dirty:               236 kB
Writeback:             0 kB
AnonPages:       1210488 kB
Mapped:           170524 kB
Shmem:             12424 kB
Slab:              65648 kB
SReclaimable:      46280 kB
SUnreclaim:        19368 kB
KernelStack:        3960 kB
PageTables:        10276 kB
NFS_Unstable:          0 kB
Bounce:                0 kB
WritebackTmp:          0 kB
CommitLimit:    20093716 kB
Committed_AS:    2906208 kB
VmallocTotal:     122880 kB
VmallocUsed:       72700 kB
VmallocChunk:      23036 kB
HardwareCorrupted:     0 kB
HugePages_Total:       0
HugePages_Free:        0
HugePages_Rsvd:        0
HugePages_Surp:        0
Hugepagesize:       2048 kB
DirectMap4k:       59384 kB
DirectMap2M:      851968 kB

The vmstat command can display memory statistics including additional information about processes, paging, block IO, traps, and cpu activity. Type the following command:
$ vmstat
$ vmstat -s

You can also use the dmidecode command for dumping a computer’s DMI (some say SMBIOS) table which can provide details about installed RAM and its speed:
# dmidecode --type memory
Sample outputs:

# dmidecode 2.10
SMBIOS 2.5 present.

Handle 0x0016, DMI type 16, 15 bytes
Physical Memory Array
	Location: System Board Or Motherboard
	Use: System Memory
	Error Correction Type: None
	Maximum Capacity: 64 GB
	Error Information Handle: Not Provided
	Number Of Devices: 8

Handle 0x0017, DMI type 17, 27 bytes
Memory Device
	Array Handle: 0x0016
	Error Information Handle: No Error
	Total Width: 72 bits
	Data Width: 64 bits
	Size: 2048 MB
	Form Factor: DIMM
	Set: 1
	Locator: DIMM1A
	Bank Locator: Bank1
	Type: DDR2
	Type Detail: Synchronous
	Speed: 667 MHz
	Manufacturer: 0000
	Serial Number: 00000000
	Asset Tag: Not Specified
	Part Number:                   

Handle 0x0018, DMI type 17, 27 bytes
Memory Device
	Array Handle: 0x0016
	Error Information Handle: No Error
	Total Width: Unknown
	Data Width: Unknown
	Size: No Module Installed
	Form Factor: DIMM
	Set: 1
	Locator: DIMM1B
	Bank Locator: Bank1
	Type: DDR2
	Type Detail: Synchronous
	Speed: 667 MHz
	Manufacturer:     
	Serial Number:         
	Asset Tag: Not Specified
	Part Number:                   

Handle 0x0019, DMI type 17, 27 bytes
Memory Device
	Array Handle: 0x0016
	Error Information Handle: No Error
	Total Width: 72 bits
	Data Width: 64 bits
	Size: 2048 MB
	Form Factor: DIMM
	Set: 1
	Locator: DIMM2A
	Bank Locator: Bank2
	Type: DDR2
	Type Detail: Synchronous
	Speed: 667 MHz
	Manufacturer: 0000
	Serial Number: 00000000
	Asset Tag: Not Specified
	Part Number:                   

Handle 0x001A, DMI type 17, 27 bytes
Memory Device
	Array Handle: 0x0016
	Error Information Handle: No Error
	Total Width: Unknown
	Data Width: Unknown
	Size: No Module Installed
	Form Factor: DIMM
	Set: 1
	Locator: DIMM2B
	Bank Locator: Bank2
	Type: DDR2
	Type Detail: Synchronous
	Speed: 667 MHz
	Manufacturer:     
	Serial Number:         
	Asset Tag: Not Specified
	Part Number:                   

Handle 0x001B, DMI type 17, 27 bytes
Memory Device
	Array Handle: 0x0016
	Error Information Handle: No Error
	Total Width: 72 bits
	Data Width: 64 bits
	Size: 2048 MB
	Form Factor: DIMM
	Set: 1
	Locator: DIMM3A
	Bank Locator: Bank3
	Type: DDR2
	Type Detail: Synchronous
	Speed: 667 MHz
	Manufacturer: 0000
	Serial Number: 00000000
	Asset Tag: Not Specified
	Part Number:                   

Handle 0x001C, DMI type 17, 27 bytes
Memory Device
	Array Handle: 0x0016
	Error Information Handle: No Error
	Total Width: Unknown
	Data Width: Unknown
	Size: No Module Installed
	Form Factor: DIMM
	Set: 1
	Locator: DIMM3B
	Bank Locator: Bank3
	Type: DDR2
	Type Detail: Synchronous
	Speed: 667 MHz
	Manufacturer:     
	Serial Number:         
	Asset Tag: Not Specified
	Part Number:                   

Handle 0x001D, DMI type 17, 27 bytes
Memory Device
	Array Handle: 0x0016
	Error Information Handle: No Error
	Total Width: 72 bits
	Data Width: 64 bits
	Size: 2048 MB
	Form Factor: DIMM
	Set: 1
	Locator: DIMM4A
	Bank Locator: Bank4
	Type: DDR2
	Type Detail: Synchronous
	Speed: 667 MHz
	Manufacturer: 0000
	Serial Number: 00000000
	Asset Tag: Not Specified
	Part Number:                   

Handle 0x001E, DMI type 17, 27 bytes
Memory Device
	Array Handle: 0x0016
	Error Information Handle: No Error
	Total Width: Unknown
	Data Width: Unknown
	Size: No Module Installed
	Form Factor: DIMM
	Set: 1
	Locator: DIMM4B
	Bank Locator: Bank4
	Type: DDR2
	Type Detail: Synchronous
	Speed: 667 MHz
	Manufacturer:     
	Serial Number:         
	Asset Tag: Not Specified
	Part Number:
[mai mult...]

How to Test Open Ports in Linux

Whether you are troubleshooting network connectivity issues or configuring a firewall, one of the first things to check is what ports are actually opened on your system.

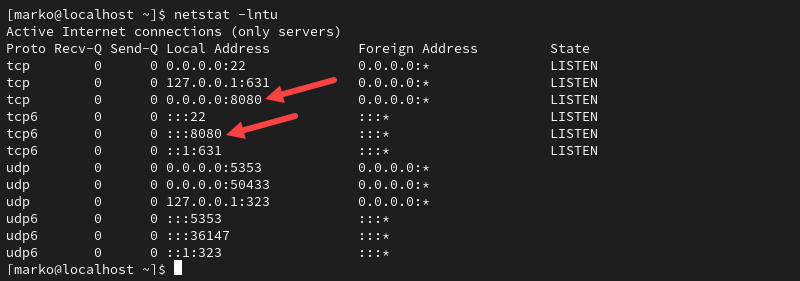
View the listening ports with the netstat command:

netstat -lntu

Viewing open ports with the netstat command.

The output above shows the port 8080 is opened.

List the open sockets with the ss command:

ss -lntu

The port appears as part of the socket.

Viewing open ports with the ss command.

Test the port by specifying its number to the nmap command.

nmap localhost -p 8080

Using the nmap command to see port status in linux.
Test the Port with the Netcat Utility

The Netcat tool features the nc command that you can use to test an open port. To do so:

1. Use a command such as echo to pipe output to Netcat and specify the port to listen to. The example below pipes a message to test port 8

echo “Testing port 8080” | nc -l -p 8080

2. Leave the command running and open another terminal window.

3. In that terminal window, use a command such as telnet to query the local socket.

telnet localhost 8080

If the port is open, the output of the telnet command contains the message piped to nc in step 1.

Using the telnet command to probe a port in Linux.

[mai mult...]

How to Open a Port in Linux

The port number is a virtual concept in computer networking that provides a network identifier for a service or application. The number is a 16-bit integer from 0 to 65535 that combines with the IP address to create a network communication socket.

Prerequisites

  • Administrative system access.
  • Access to the terminal.
Listing Open Ports

Before opening a port on a system, check if the port you need is already open. The simplest way to do this is to pipe the output of the netstat command to the grep command.

netstat -na | grep :[port-number]

The syntax above tells grep to look for a specific port number in the port list provided by netstat. For example, to check if port 8080 is available on the system, type:

netstat -na | grep :8080

If the port is closed, the command returns no output.

Alternatively, use the following netstat command to display a list of listening ports:

netstat -lntu

The -l option looks for the listening ports, -n provides numerical port values, while -t and -u stand for TCP and UDP, respectively.

Listing open ports in Linux.
Opening a Port in Linux

The correct procedure for opening a port depends on the Linux distribution and the firewall you are using. The following sections provide steps for the three most common scenarios:

  • The UFW firewall on Ubuntu-based distributions.
  • firewalld on CentOS and other RHEL-based distributions.
  • The iptables utility for the systems without UFW and Firewalld.
Ubuntu and UFW Based Systems

UFW (Uncomplicated Firewall) for Ubuntu allows you to open a port with a single command:

sudo ufw allow [port-number]

Opening a port in Ubuntu with UFW.

Alternatively, open the port used by a specific service without stating the port number:

sudo ufw allow [service-name]

Note: After you finish creating the rules, ensure UFW is active on your system by typing:

sudo ufw enable
CentOS and Other Systems with firewalld

The firewalld tool on CentOS, Fedora, and other related distributions, enables users to control port access on their system. The following command opens a specific port:

sudo firewall-cmd –zone=public –add-port=[port-number]/[protocol] –permanent

Opening a port on RHEL based systems with firewalld.

Note: The --zone=public argument is necessary only in multi-zone system configurations. By default, firewalld assigns all interfaces to the public zone.

Linux Distributions without UFW or firewalld

While installing a full-fledged firewall is the recommended way of maintaining system security, some Linux distributions still use the legacy iptables solution. The iptables utility allows configuring rules to filter IP packets using the Linux kernel firewall.

Use the following command to create an iptables rule for opening a port:

sudo iptables -A INPUT -p [protocol] –dport [port] -j ACCEPT

The command creates an IPv4 rule. To create an IPv6 rule, use the ip6tables command:

sudo ip6tables -A INPUT -p [protocol] –dport [port] -j ACCEPT

The port number is specified with the --dport option. The -p flag allows you to define the protocol (tcp or udp). For example, to create an IPv4 rule for the TCP port 8080, type:

sudo iptables -A INPUT -p tcp –dport 8080 -j ACCEPT

Make iptables Rules Persist on Debian-Based Systems

The rules created using iptables do not persist after reboots.

Follow the steps to restore iptables rules after a reboot on Debian-based systems:

  • Save the IPv4 rules you created:

iptables-save > /etc/iptables/rules.v4

  • Store any IPv6 rules in a separate file:

ip6tables-save > /etc/iptables/rules.v6

  • Install the iptables-persistent package:

sudo apt install iptables-persistent

This package automatically reloads the contents of the rules.v4 and rules.v6 files when the system restarts.

Make iptables Rules Persist on RHEL-Based Systems

RHEL-based systems store the iptables configuration in a different location. Type the commands below to save the IPv4 and IPv6 rules, respectively:

iptables-save > /etc/sysconfig/iptables

ip6tables-save > /etc/sysconfig/ip6tables

  • Ensure the iptables-services package is installed:

sudo dnf install iptables-services

  • Start the service:

sudo systemctl start iptables

  • Enable the service:

sudo systemctl enable iptables

  • Save the iptables rule:

sudo service iptables save

Saving the iptables configuration.

Restart the service to enforce the rule:

sudo systemctl restart iptables

Opening a port can be helpful for various reasons, such as allowing incoming traffic to access a specific service or application on your system.

[mai mult...]