How to Install Rocky Linux

Rocky Linux is an open-source Linux distribution developed by Rocky Enterprise Software Foundation. It is an enterprise OS intended to be a downstream, complete binary-compatible release that uses the Red Hat Enterprise Linux OS source code.

Step 1: Download the ISO Image

Using a browser of your choice, browse to https://rockylinux.org/download/ and, depending on your system and use case, select one of the available ISO image downloads:
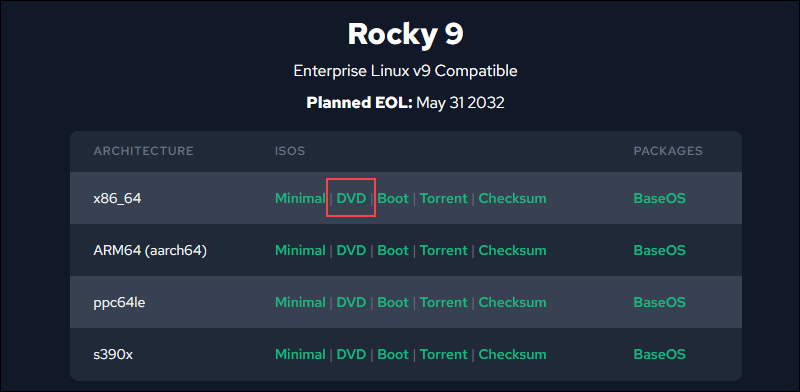
Downloading Rocky Linux 9 ISO image.

For this tutorial, we will install Rocky Linux on a 64-bit architecture. We have downloaded the DVD ISO image, which contains the BaseOS and AppStream repositories.

The Boot and Minimal versions are used when installing the OS from another source (such as an HTTP repository of the binary files) or to enter Rescue Mode.

Step 2: Create Bootable USB Drive

Depending on which system you will create the bootable USB drive, use one of the following tools:

Rufus on Windows

1. Browse to https://rufus.ie/en/# and download the latest Rufus version. For this tutorial, we will use the portable version:

Download Rufus portable version.

2. Open Rufus and insert a USB stick. The program automatically recognizes and selects it.

3. Click the SELECT button and select the Rocky Linux 9 ISO image you have previously downloaded.
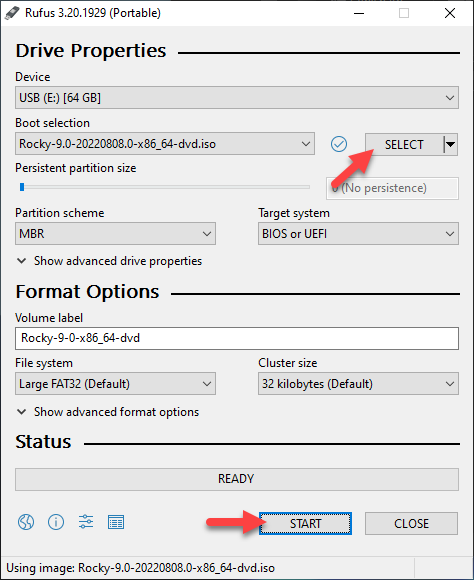
Creating a bootable USB drive in Rufus.

4. Click START to write the ISO image and create a bootable USB drive.

Startup Disk Creator on Ubuntu Linux

1. Click the Show Applications button, and in the search dialog type Startup Disk Creator.
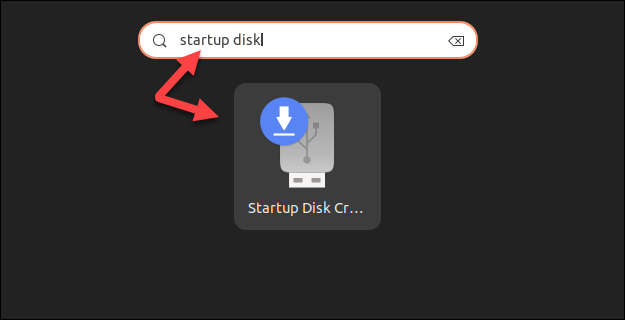
Opening Startup Disk Creator in Ubuntu.

2. In the Source disc image section, click Other. Select the Rocky Linux ISO image you have previously downloaded.

3. In the Disk to Use section, select your USB drive.

4. Click Make Startup Disk and wait for the process to complete.

Step 3: Boot up Rocky Linux from the USB

To boot up Rocky Linux from the USB, follow the steps below:

1. Insert the Rocky Linux USB drive.

2. Turn on the machine or restart the system. The USB drive should boot automatically. If it does, skip the next step.

If the USB doesn’t boot, manually select the USB boot device in the Boot Menu or BIOS/UEFI.

3. Access the boot menu by tapping the designated boot key for your machine as soon as the computer turns on. The key differs based on the machine vendor, so Google the one for your device.

4. Select the USB boot device using the arrow keys in the boot menu. The system starts loading the Rocky Linux installation menu.

Step 4: Install Rocky Linux

After booting to the installation menu, start the installation by selecting Install Rocky Linux 9.0.
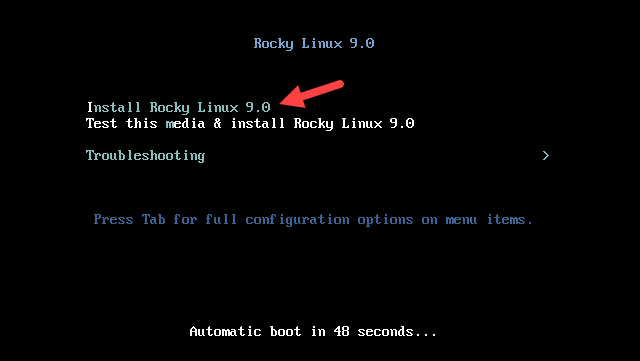
Rocky Linux 9 installation menu.
Choose Installation Language

Once the Rocky Linux Anaconda installer loads, the Welcome page prompts you to choose the language for the installation process. After selecting, press Continue.
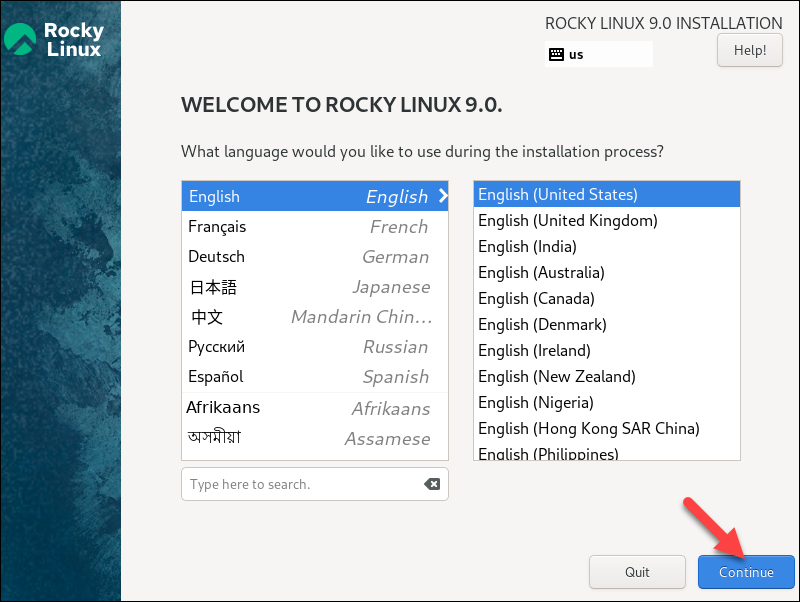
Selecting the installation language.
Installation Menu

The installation summary menu appears with crucial parameters that need to be configured before the installation.
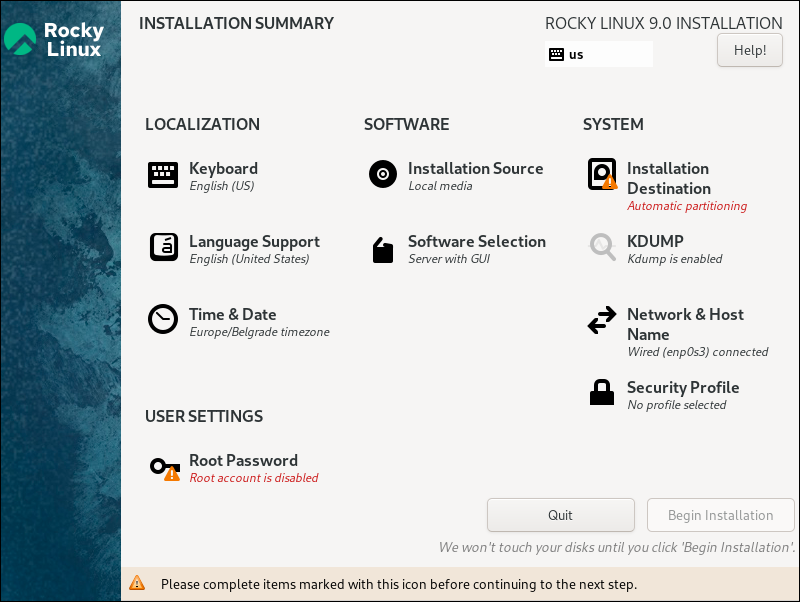
Rocky Linux installation summary menu with configurable parameters.

Select each item to configure the specified setting and click Begin Installation when finished. The sections below explain each of the configurable parameters.

Keyboard Layout Selection

Select the Keyboard option to add keyboard layouts. The default keyboard configuration depends on which language you selected. Click the + button to add a keyboard layout aside from the default one.

  • You can also test the keyboard in the textbox on the right to ensure it is the correct layout.
  • When finished, click Done to go back to the installation menu.
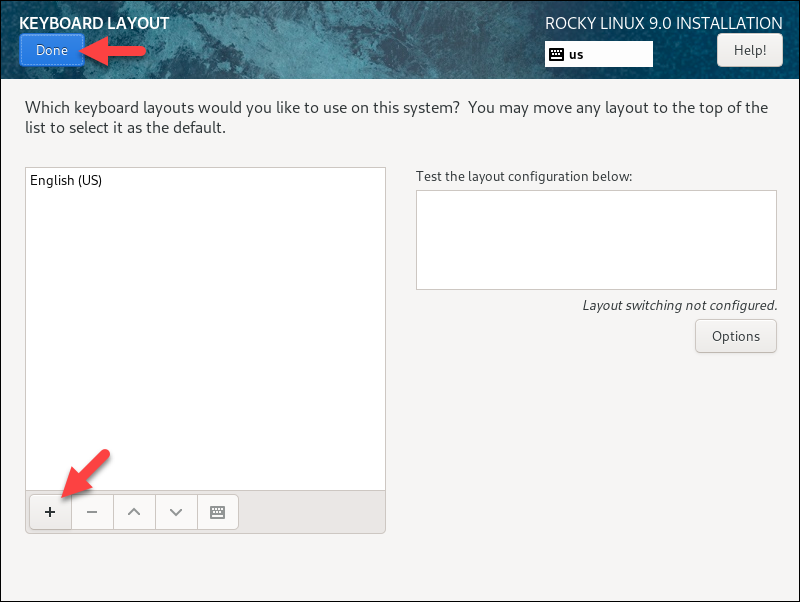
Adding keyboard layouts during installation.
  • Language Support
  • Select the Language Support menu item to install additional UI languages. When finished, click Done.
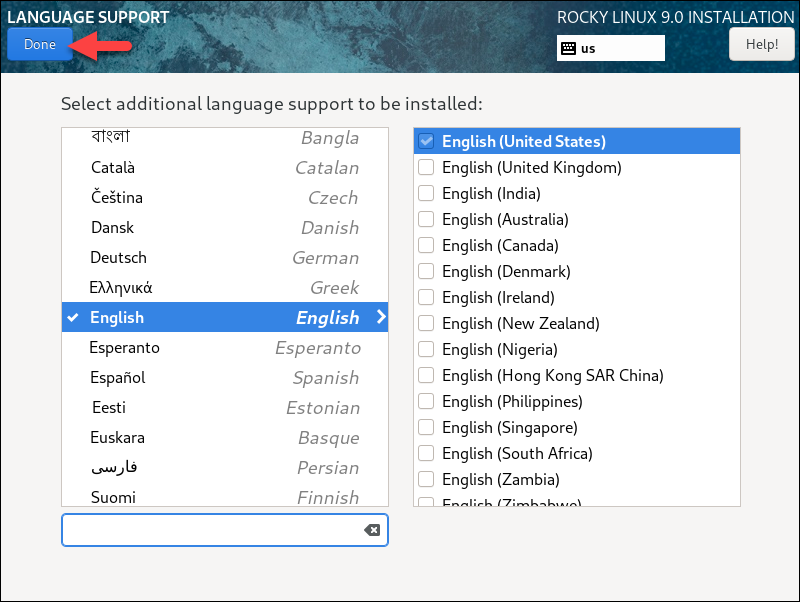
Selecting which language to use in the OS.
  • Time and Date

Select the Time & Date option to set up the time and date. The installer automatically detects the region and time zone if you have internet access. Alternatively, set the parameters manually by selecting the region and city from the dropdown menu and set the time and date in the bottom part of the screen.

Turn on the Network Time switch to keep the time and date synchronized with the internet time.
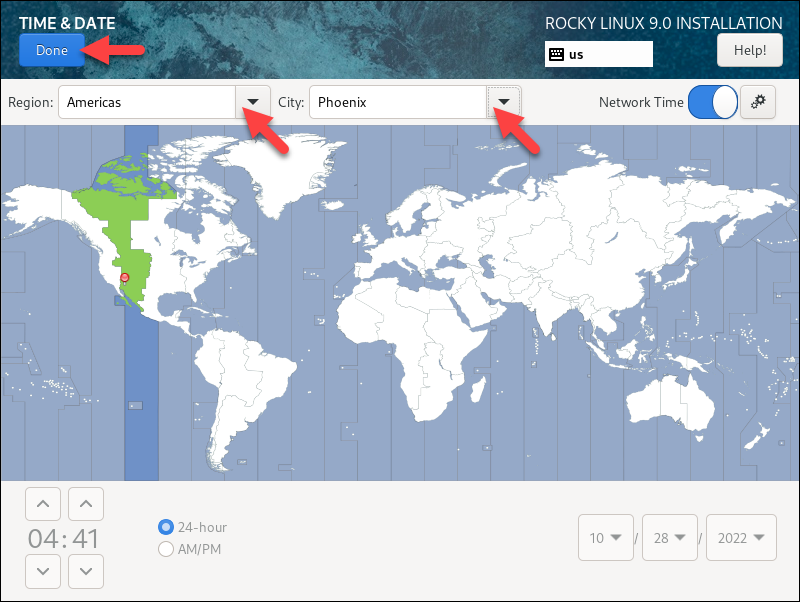
Setting the time and date during installation.

When finished, click Done to save the changes and go back.

Software Selection
  • Under the SOFTWARE section, click the Software Selection item to select which base environment and additional software to install.
  • Depending on your use case and base environment, choose between debugging tools, the DNS Name Server packages, FTP server tools, etc.
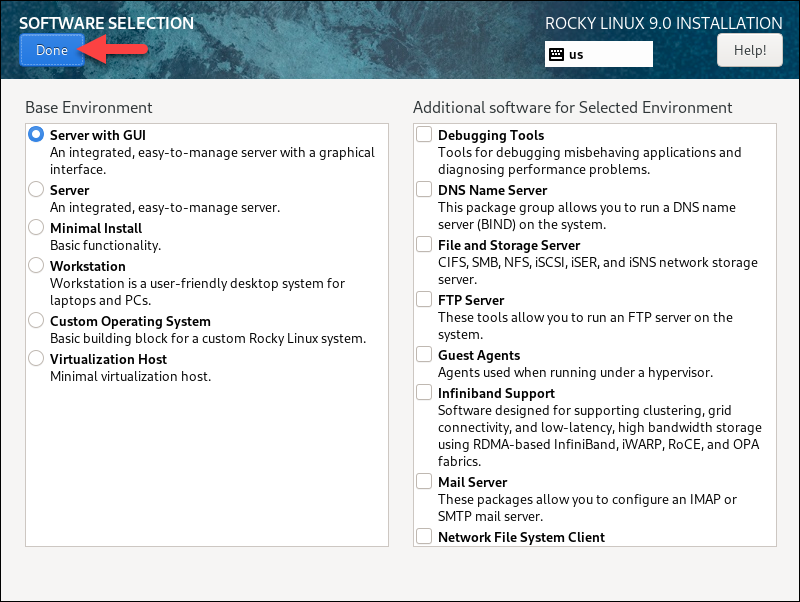
Selecting the Base environment and additional software for installation.

When finished, click Done to return to the installation menu.

Installation Destination

Under the SYSTEM section, click the Installation Destination item to select and partition the hard disk for the installation. Ensure that the disk on which you are installing Rocky Linux has a checkmark.
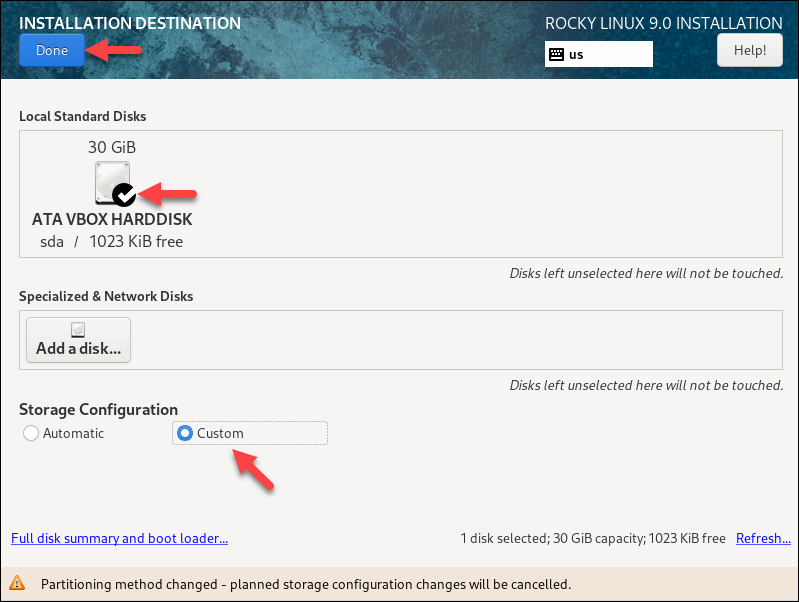
Choosing the destination drive and partitioning scheme.

Under Storage Configuration, choose whether to configure the storage automatically or if you want to create custom partitions. If you choose Custom, click Done, and the Manual Partitioning window appears.

Manual Partitioning

In the Manual Partitioning window, create the custom partitions for your OS and select a file system type.

1. In the dropdown menu, select Standard Partition as the partitioning scheme:
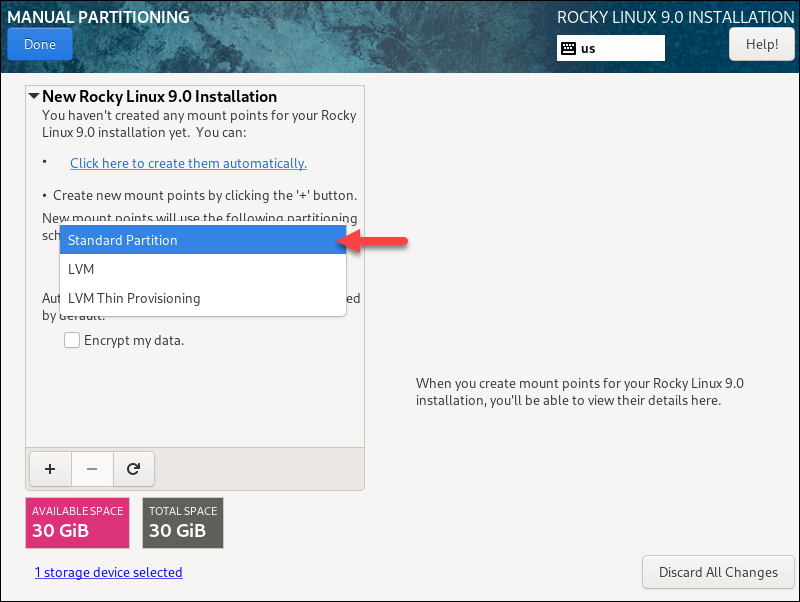
Selecting a custom partitioning scheme for Rocky Linux installation.

2. Click the + button to add a new partition.
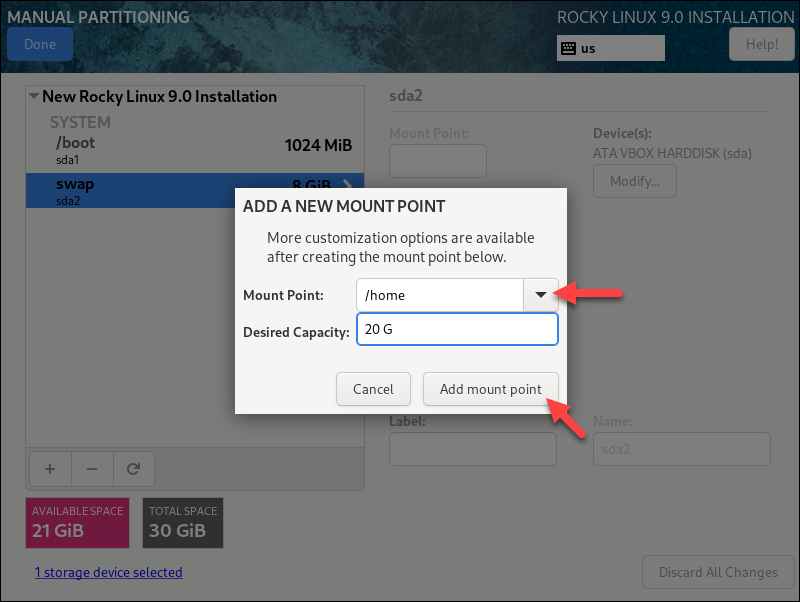
Creating custom partitions for Rocky Linux.

For this installation, we will create the following partitions:

  • /home – 20 GiB
  • /boot – 1 GiB
  • swap – 8 GiB

Add each partition by clicking the + button and specifying the size. Click the Add mount point button to create the partition.

3. When finished, click Done to exit the partition manager.

4. A window appears showing the summary of changes to be written to disk:
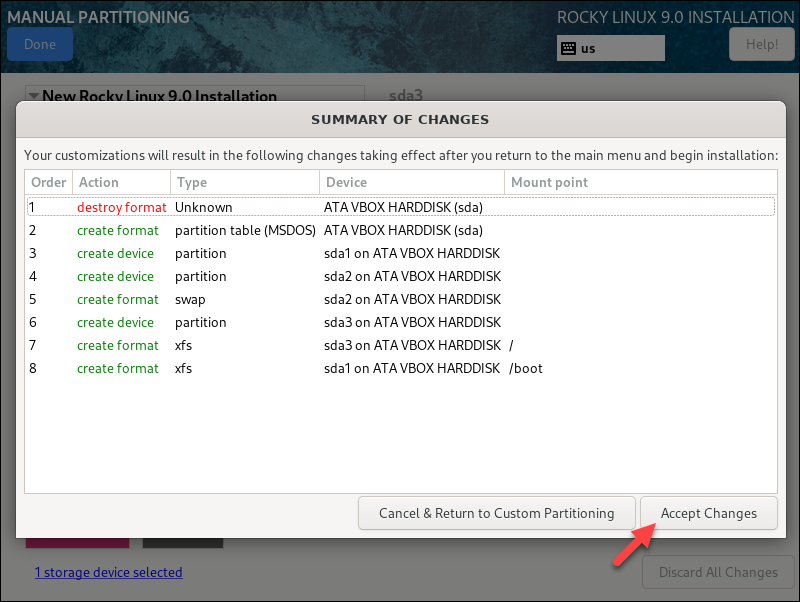
Summary of disk changes after creating custom partitions.

Click Accept Changes to proceed with the partitioning or Cancel to return and make changes to the partitions. When the partitioning finishes, the wizard returns to the installation menu.

Root Password

Under the USER SETTINGS section, click the Root Password item to set up an administrator password for the system. Enter the password and confirm it. Remote logins via SSH are disabled by default. Check the Allow root SSH login with password option to enable it.

The password strength indicator shows whether the password is strong enough. After setting up the password, click Done to return to the installation menu and begin the installation.
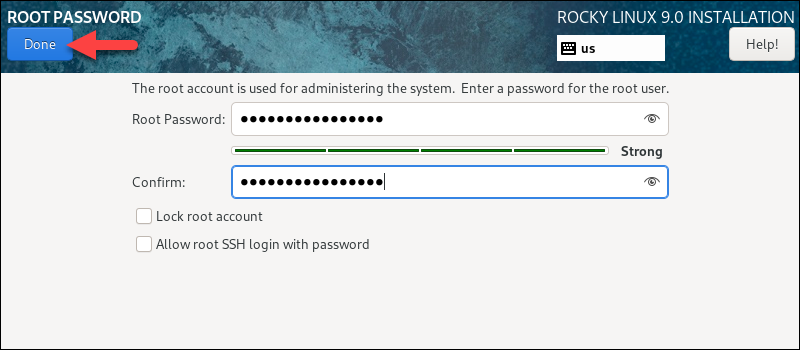
Creating a root password.
User Creation

Under USER SETTINGS, click the User Creation item to create a user for the OS. Enter a name, and choose a login username and password. Retype the password and check the password strength indicator.

  • To make the user a system administrator, check the Make this user administrator box.
  • When finished, click Done to save the changes.
Install Rocky Linux

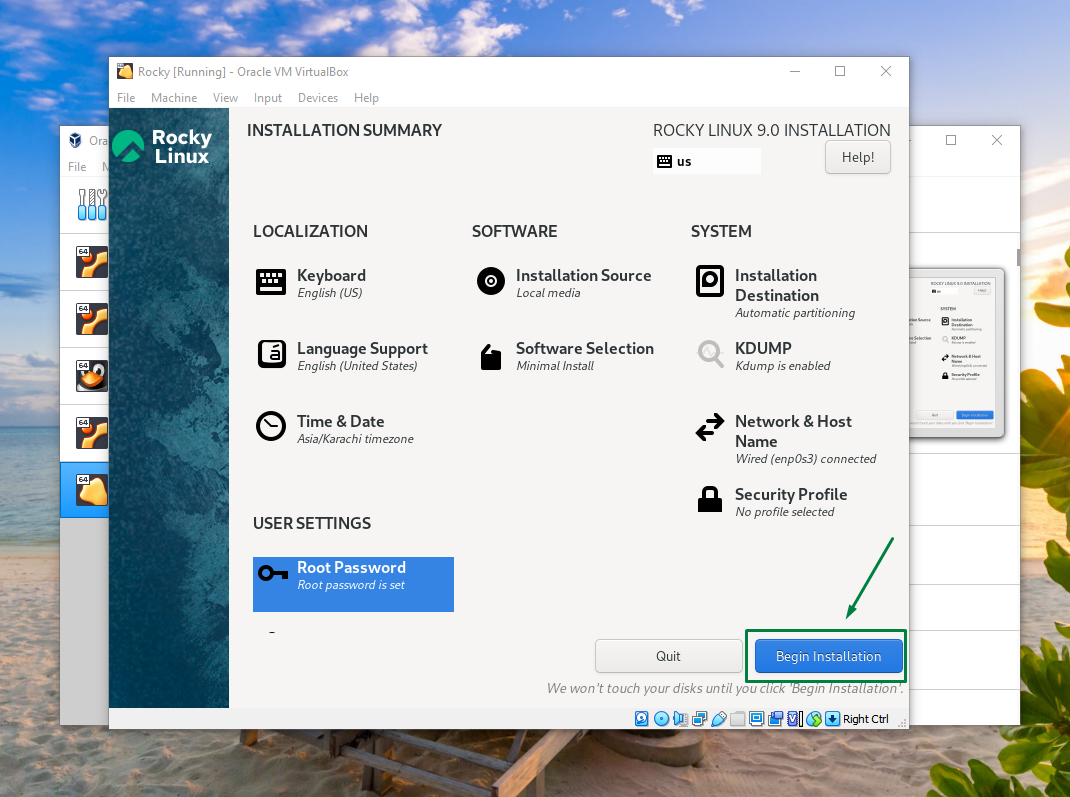
After configuring all the settings in the installation menu, click the Begin Installation button to start installing Rocky Linux.

Starting the installation of Rocky Linux 9.

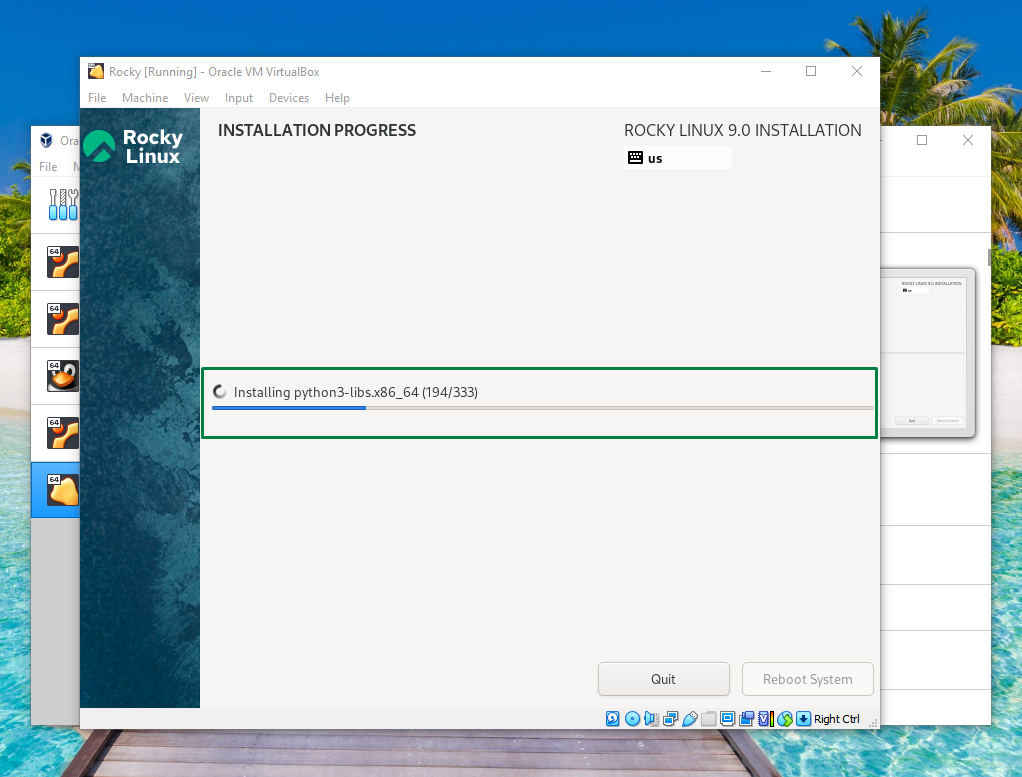
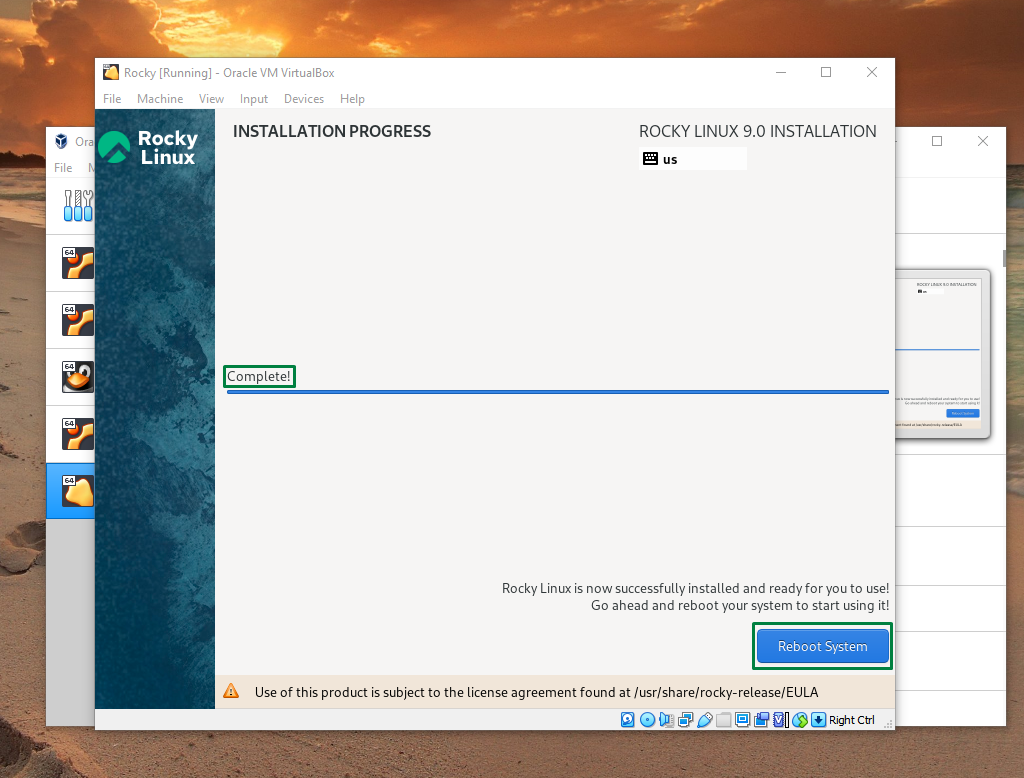
When the installation completes, take out the USB drive and click the Reboot System button to boot into the fresh Rocky Linux 9 installation on your machine:

Completing the Rocky Linux 9 installation.
  • After the system boots, a login screen appears with the user account(s) you have created.
  • Click the user you want to log in to and provide the password:

The installation is complete. You can start using Rocky Linux on your machine.

[mai mult...]

How to Install Rocky Linux on VirtualBox

Linux just like other operating systems is widely used especially when it comes to software development, coding, and some other similar applications. Rocky Linux is one of the Linux distributions, it is based on Cent-OS and is named Rocky after one of its co-founders.

Installing Rocky 9 Linux on VirtualBox

Rocky 9 comes with 10-year free support program and provides the opportunity to Linux users to migrate from other Linux distributions free of charge, here are some steps that one needs to follow to install this Linux on VirtualBox:

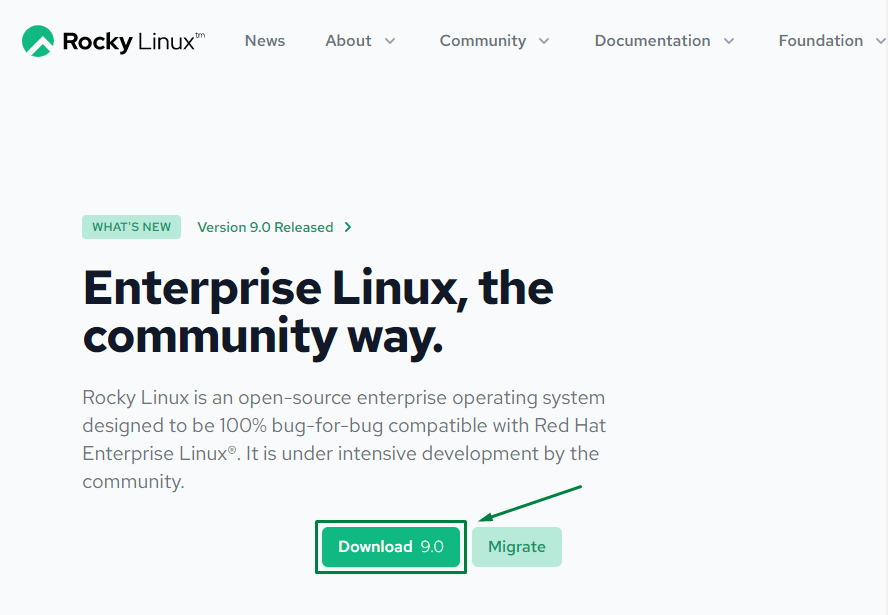
Step 1: Visit the official website of Rocky Linux and click on Download 9.0 to move download section:

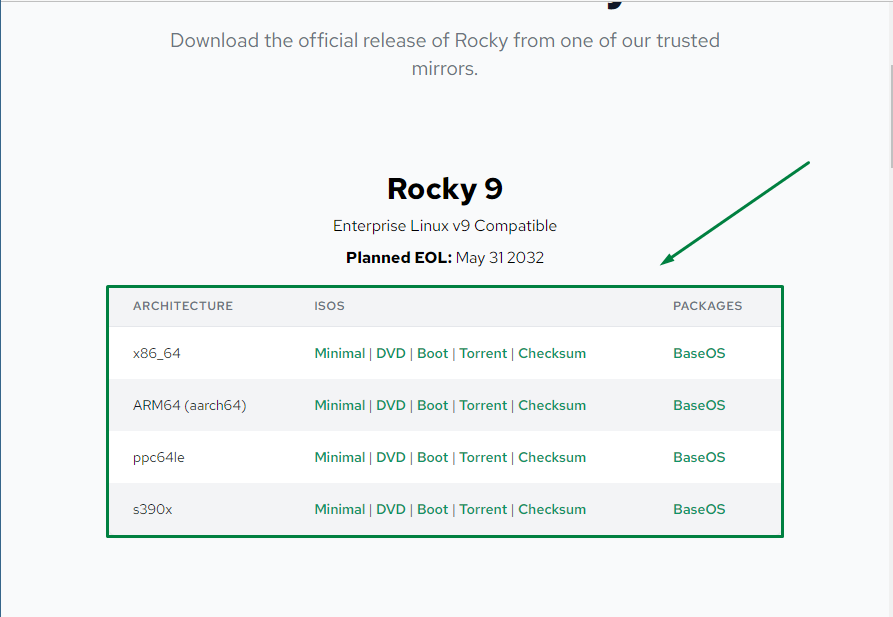
Step 2: Next, select the suitable architecture and download the torrent file do not go for the minimal option as it only comes with the terminal version of Rocky:

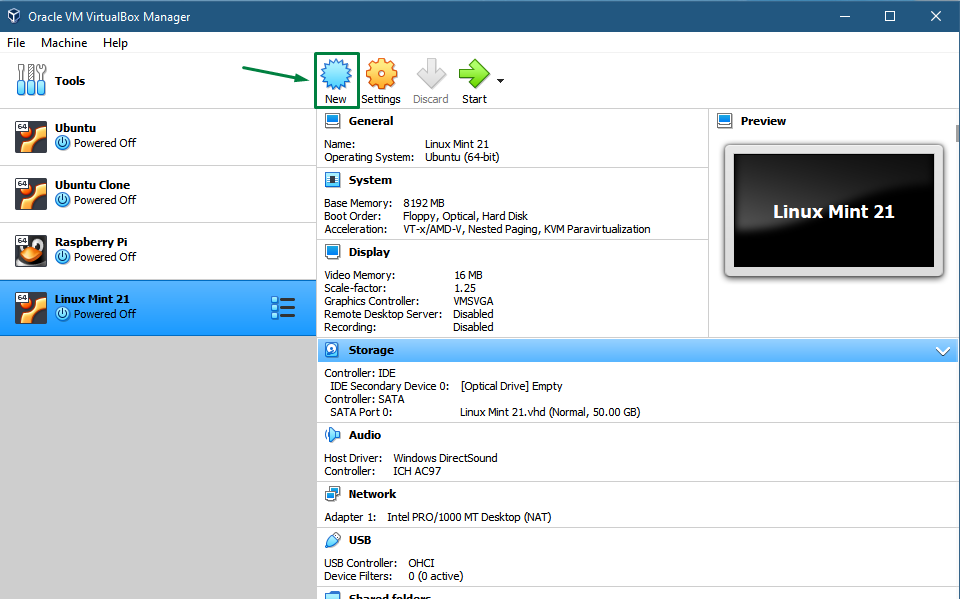
Step 3: Once the file is downloaded run the VirtualBox and click on New option from the top:

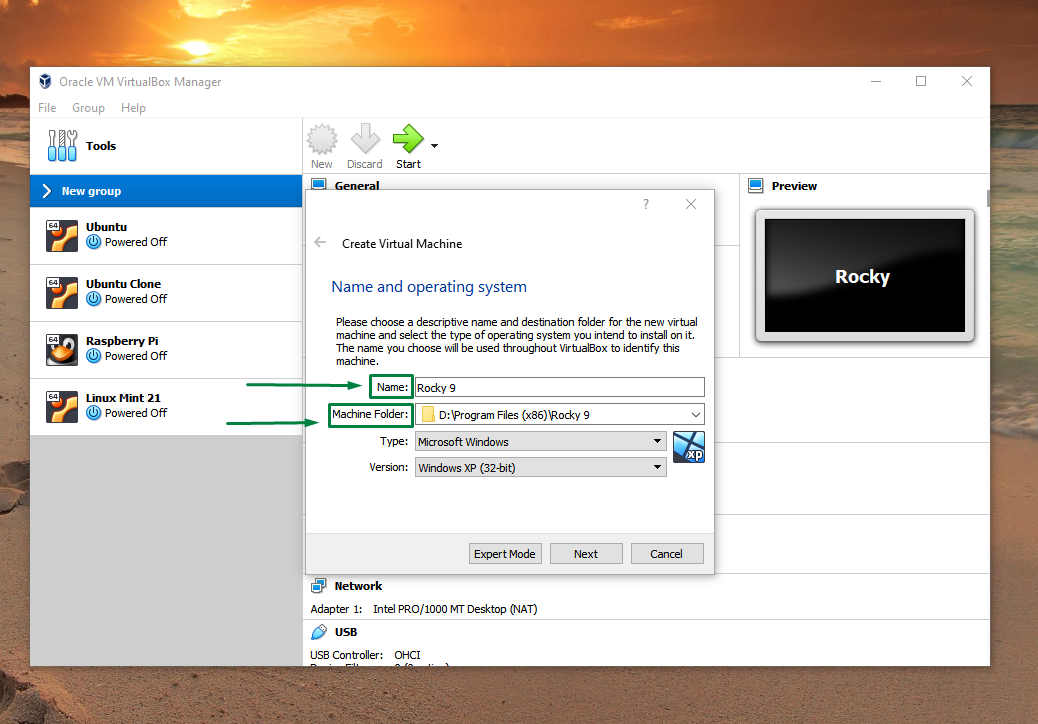
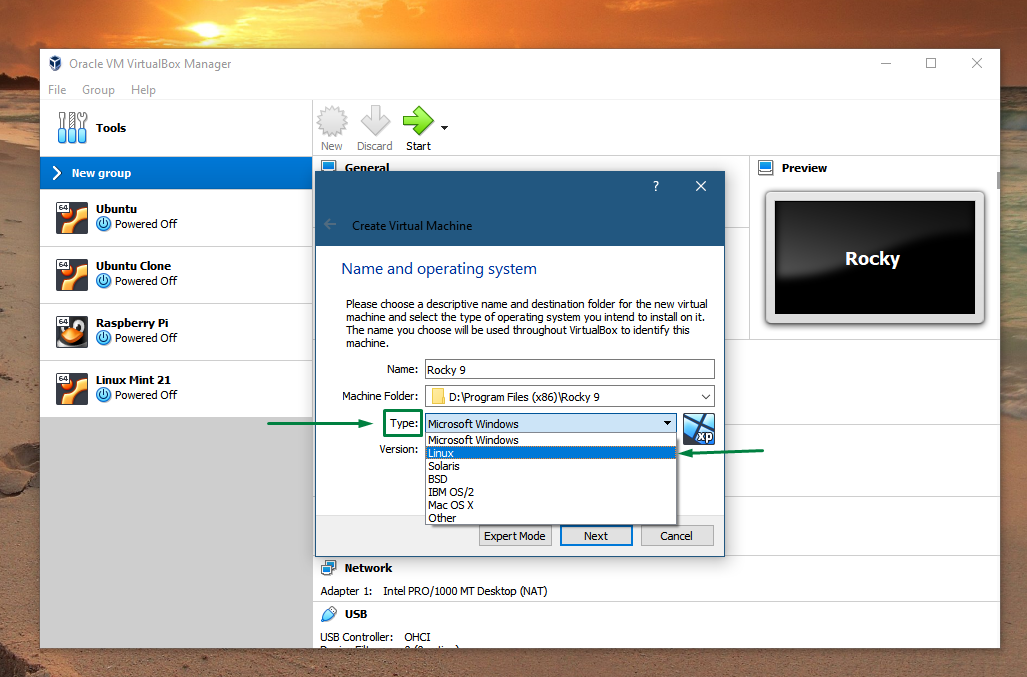
Step 4: Next Name your virtual machine and select the suitable directory under the Machine Folder:

Now select the Type of operating system that is Linux:

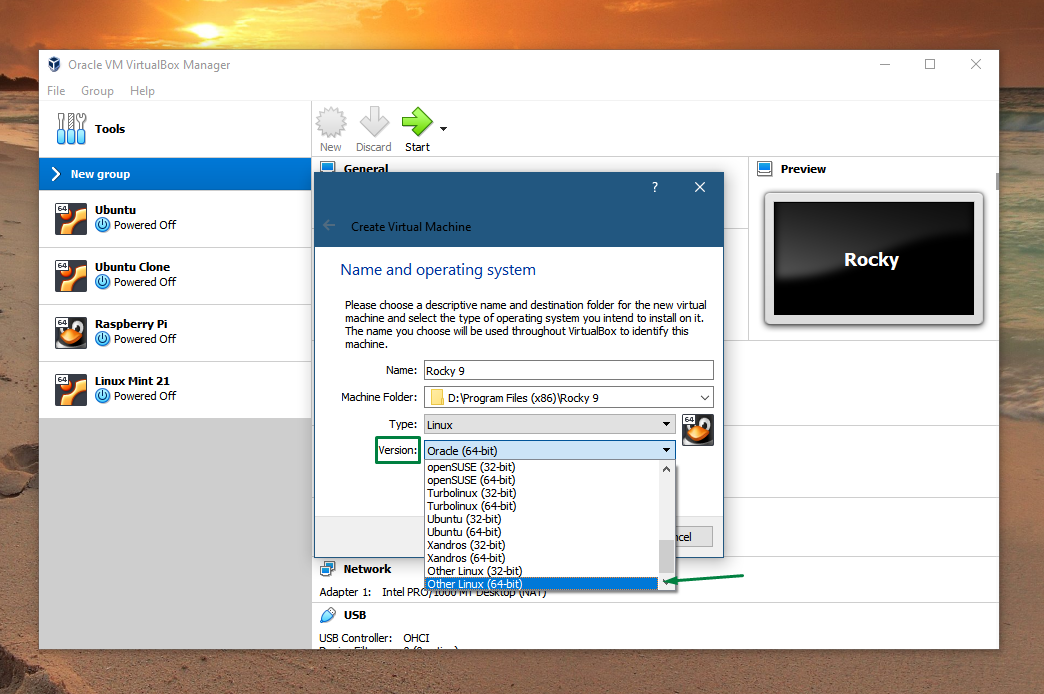
Step 5: Next select the version of operating system that is other Linux (64-bit):

Graphical user interface, application Description automatically generated

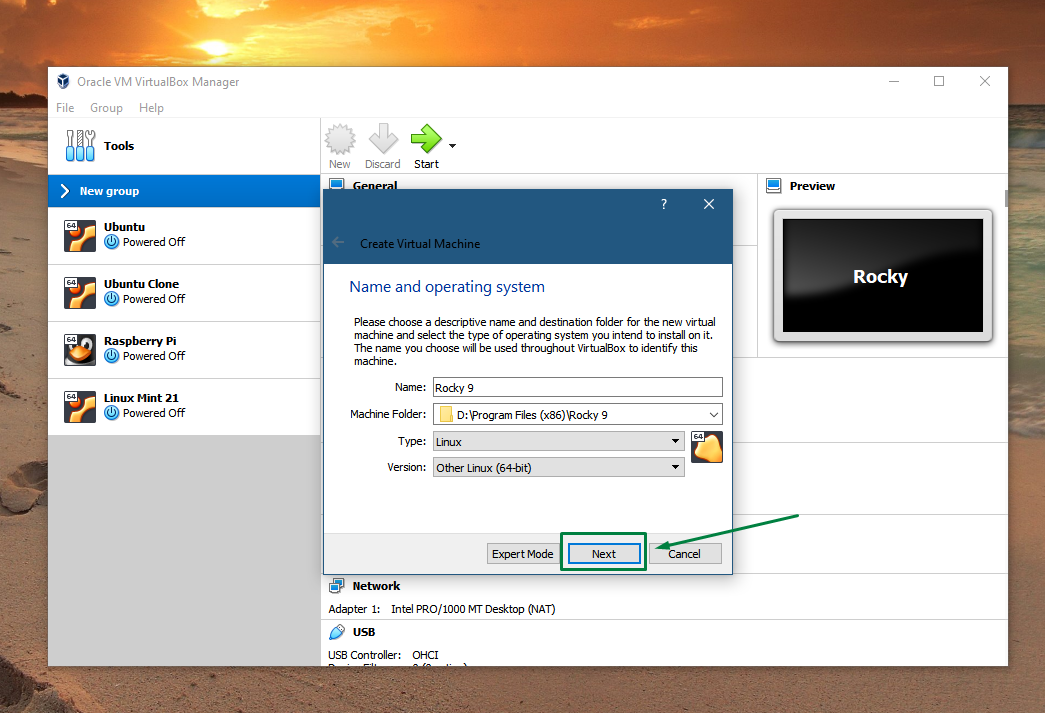
Once you have selected all the relevant information then click on Next:

Graphical user interface, application Description automatically generated

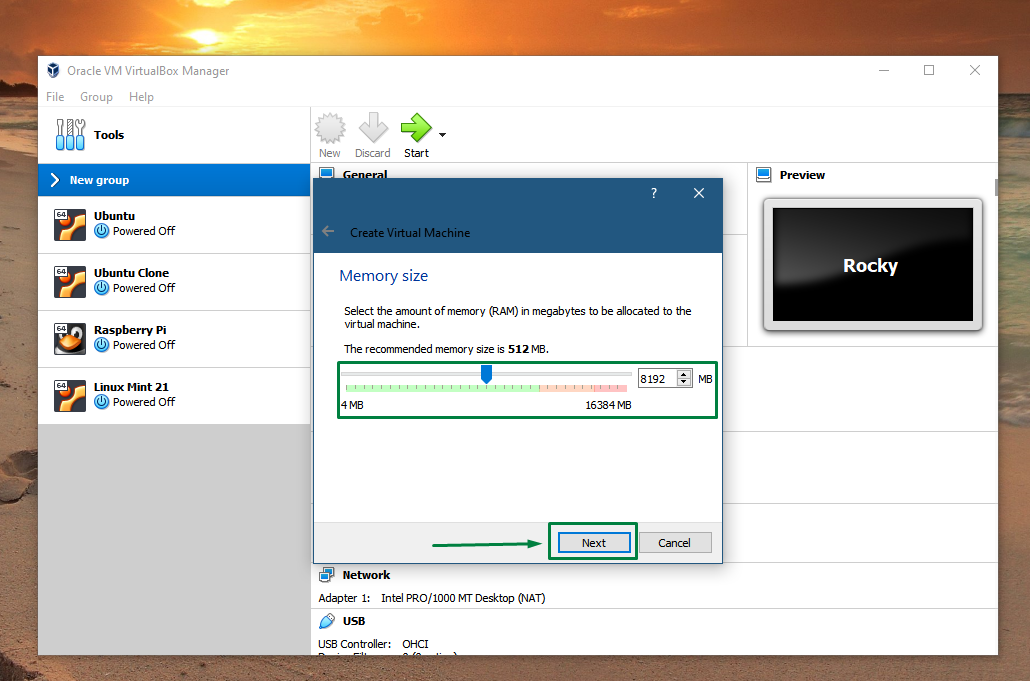
Step 6: Now assign the RAM for your virtual machine for instance I have given the RAM of 8GB:

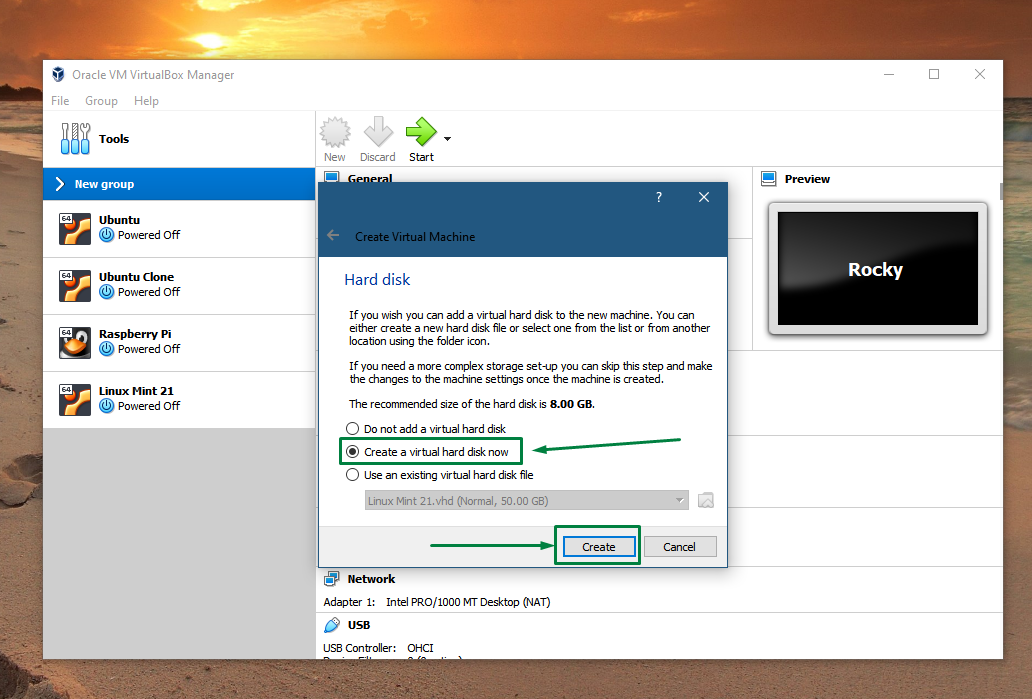
Step 7: Next, choose the type of hard disk for virtual machine by selecting Create a virtual hard disk now and after that click on the Create option:

Graphical user interface, application Description automatically generated

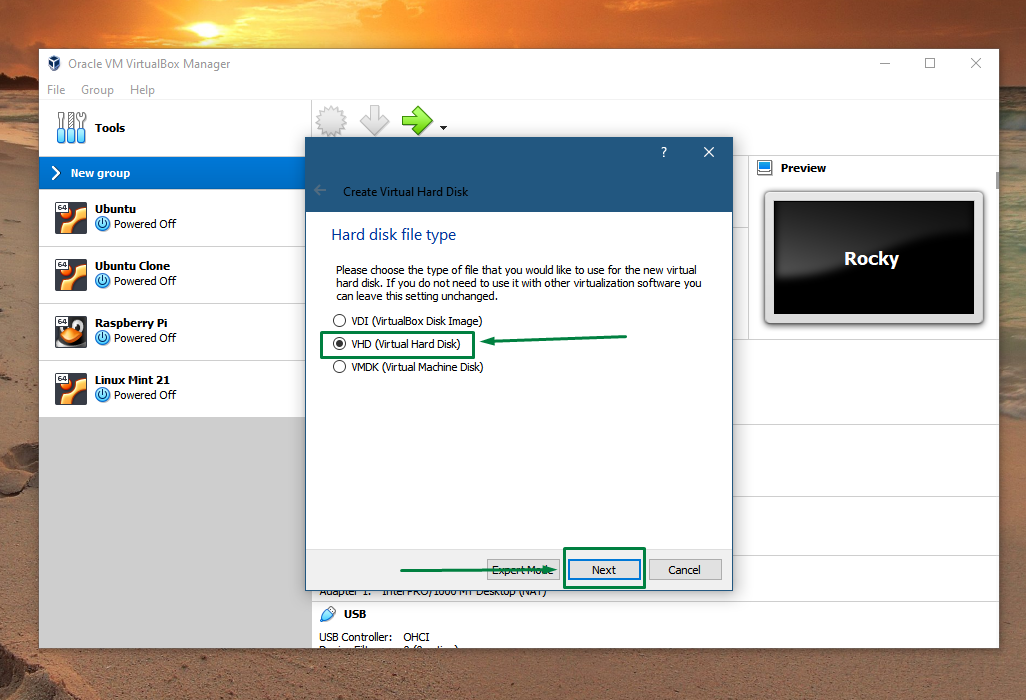
Step 8: Now select the VHD (virtual hard disk) as the file type and click on Next:

Graphical user interface Description automatically generated

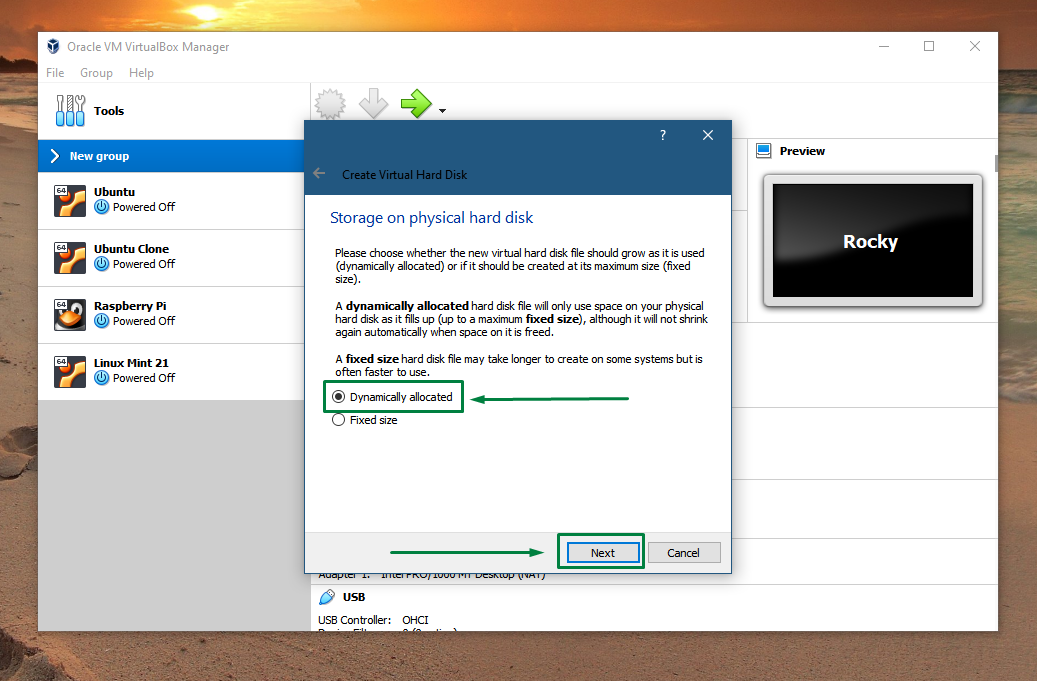
Step 9: Next, select the type of size of physical hard and for that select the Dynamically allocated option and then click on Next:

Graphical user interface, text, application Description automatically generated

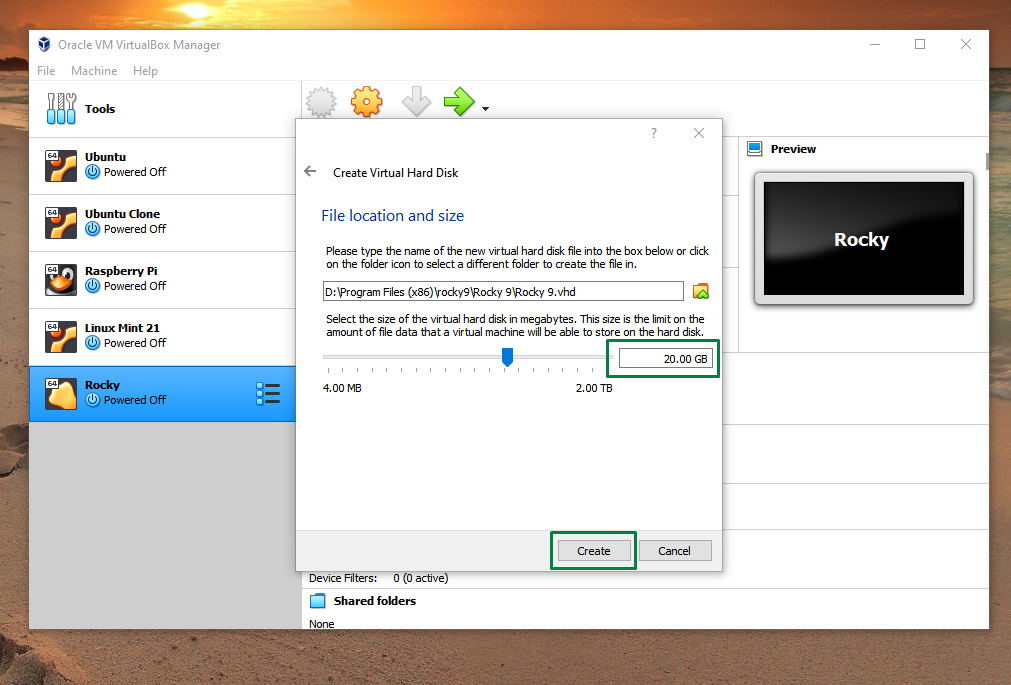
Step 10: Now allocate the storage size for the virtual machine and try to set it about almost 20GB in order to make the installation process run smoothly:

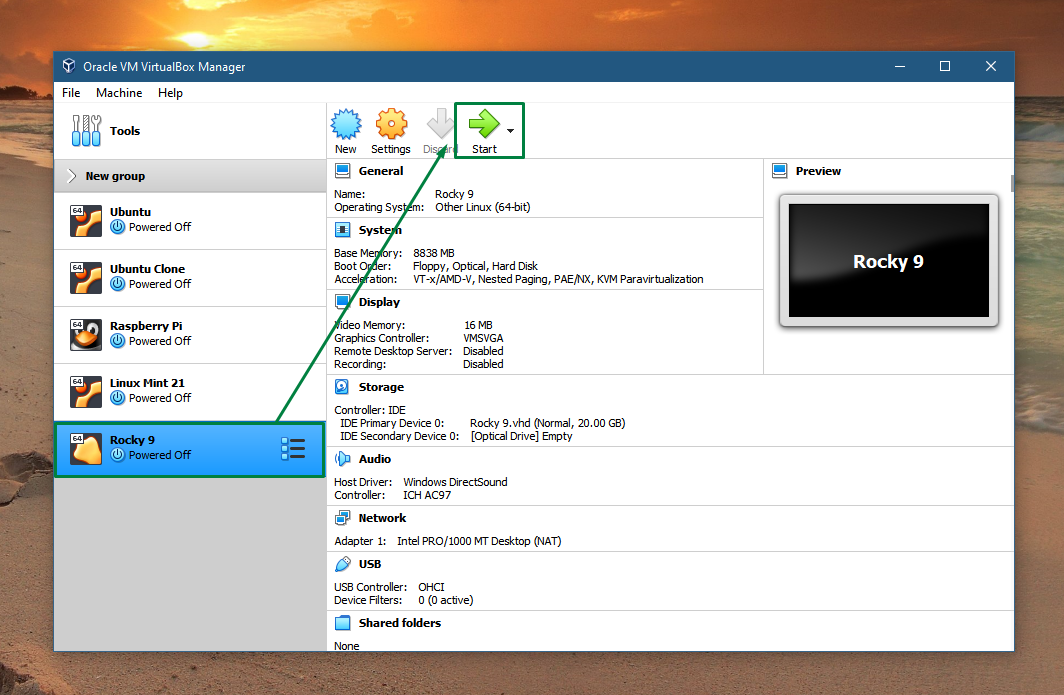
Step 11: Now the virtual machine is created so next click on Start button from the top:

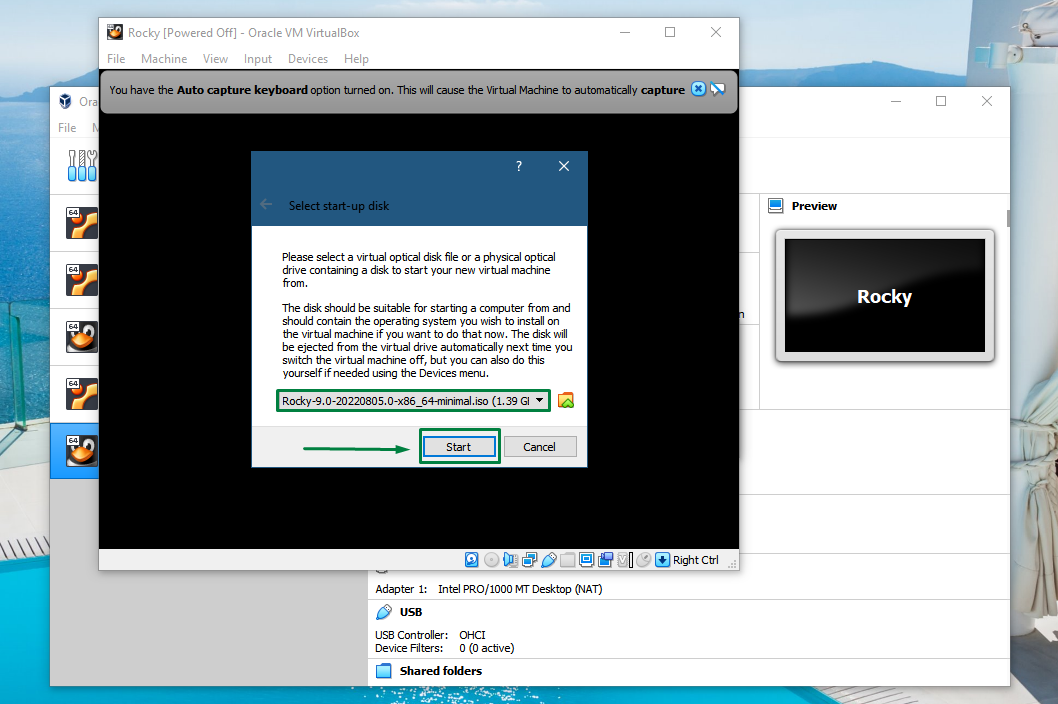
Step 12: First under the start-up disk click on the folder icon to select the disk image, from there in the Optical Disk Selector click on ADD and then select the downloaded file. After that click on Open and the respective file will be selected.

Step 13: Now click on Start to further move to the installation process:

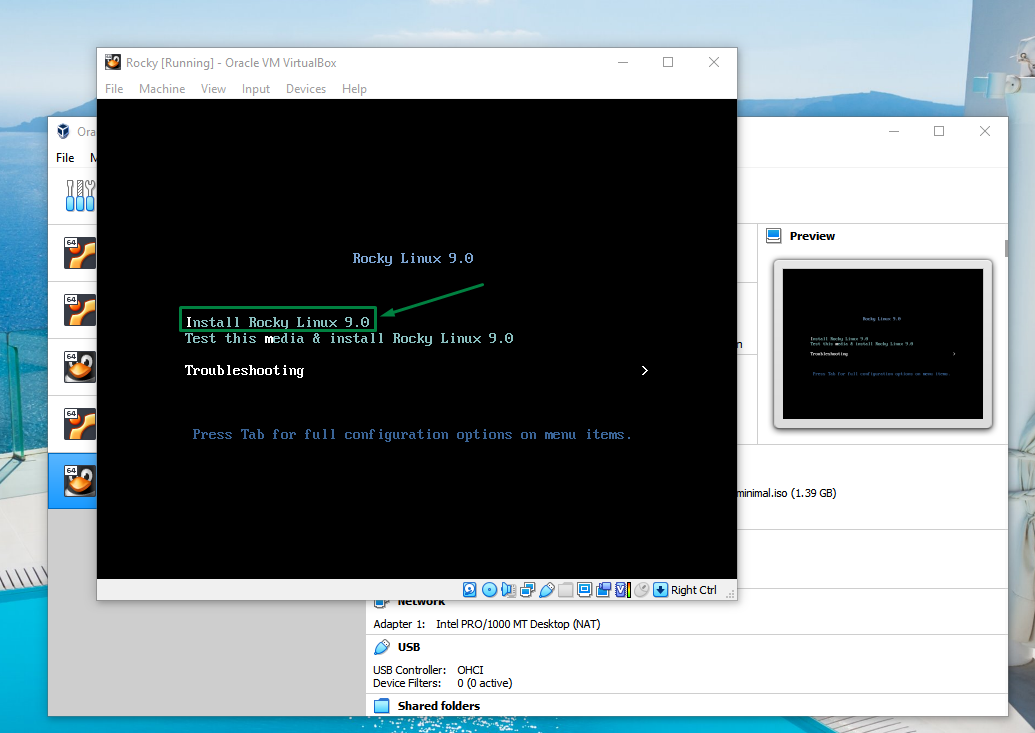
Step 14: Next, select the Install Rocky Linux 9.0 to begin the installation process:

A picture containing text, screenshot, monitor Description automatically generated

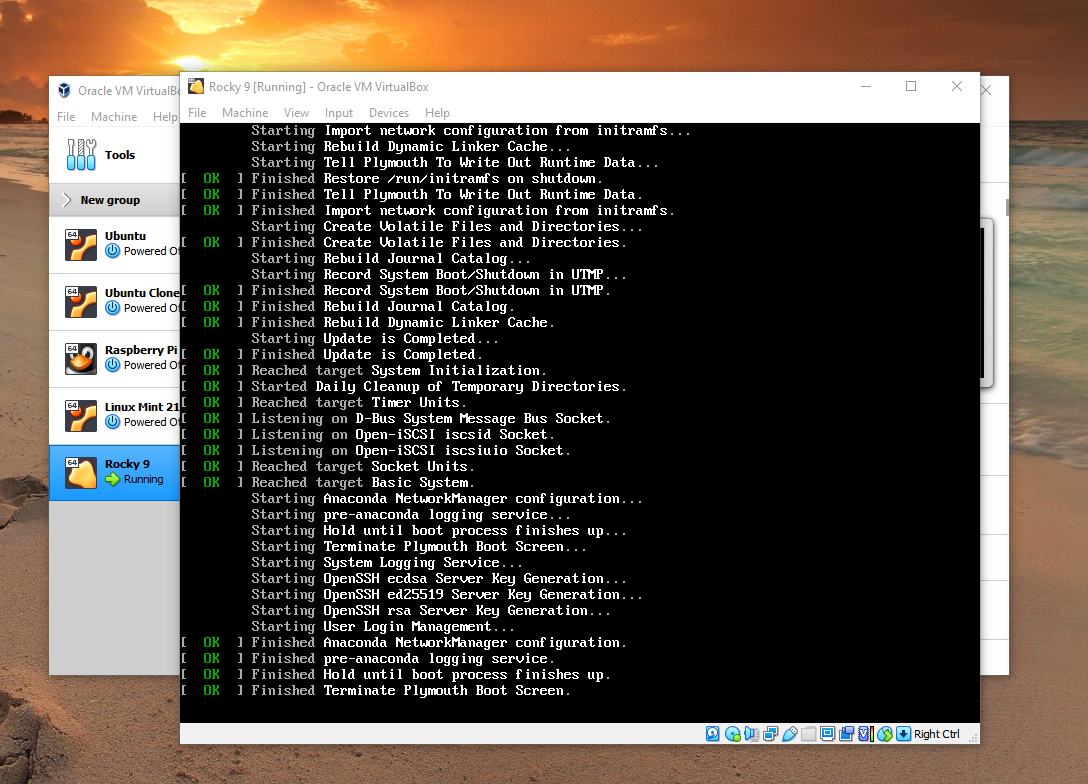
The installation process will start and take time:

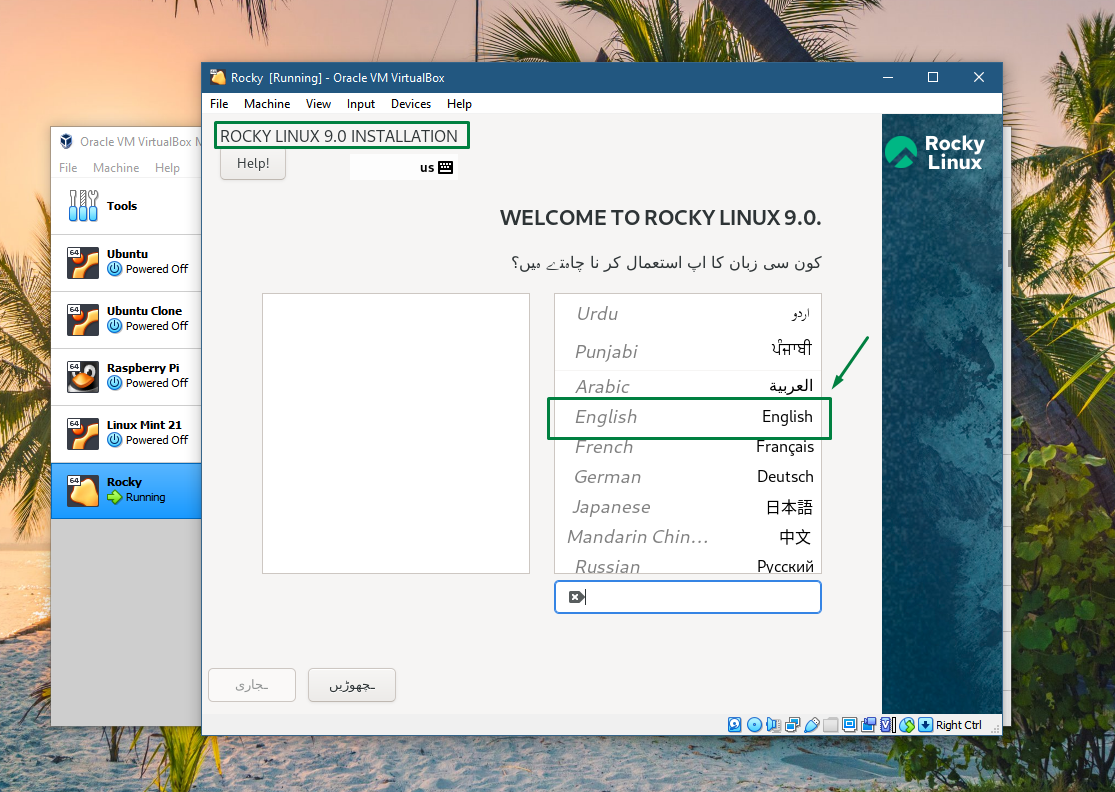
Step 15: Next, select the suitable language:

Graphical user interface Description automatically generated

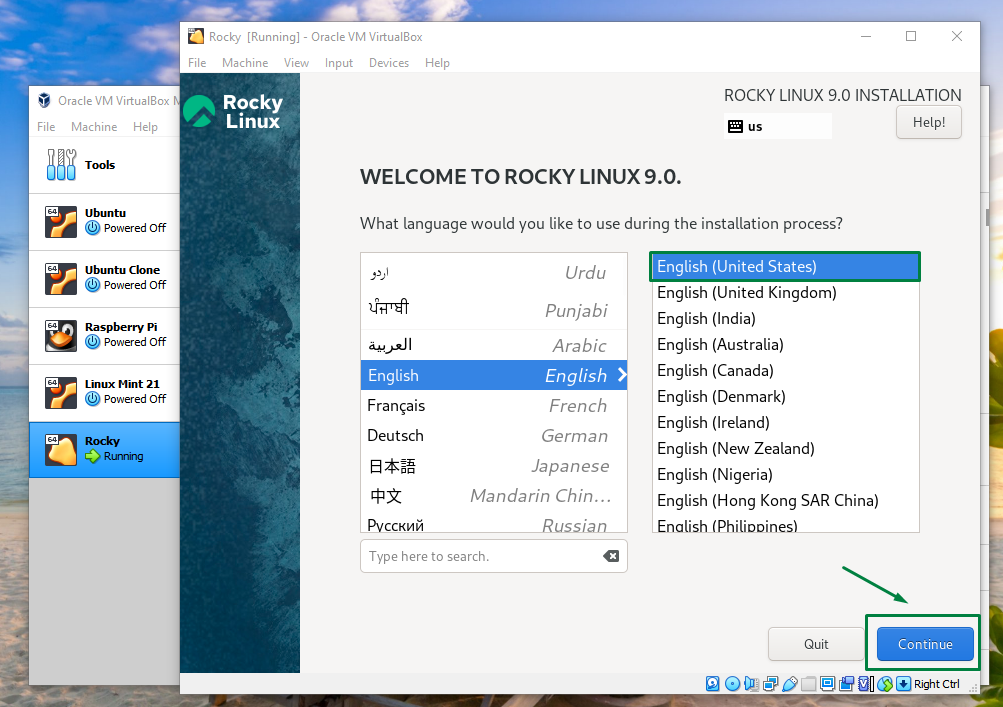
Once you have selected the language click on Continue:

Graphical user interface, text, application Description automatically generated

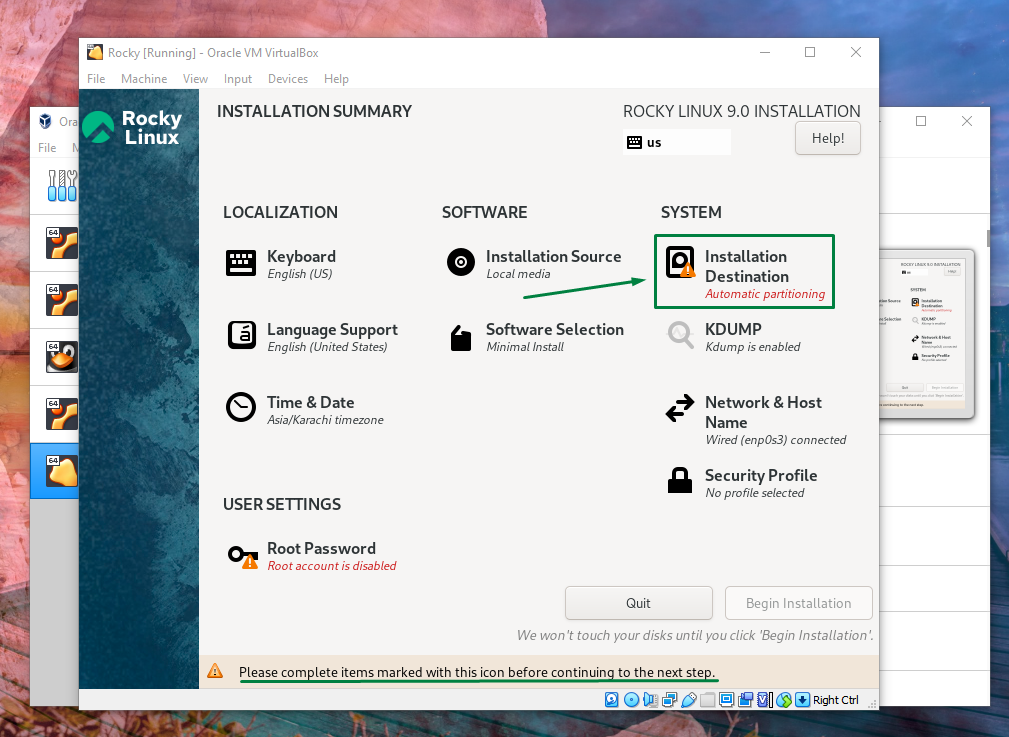
Step 16: Now complete the settings of the option that are highlighted one of which is the Installation Destination click on it:

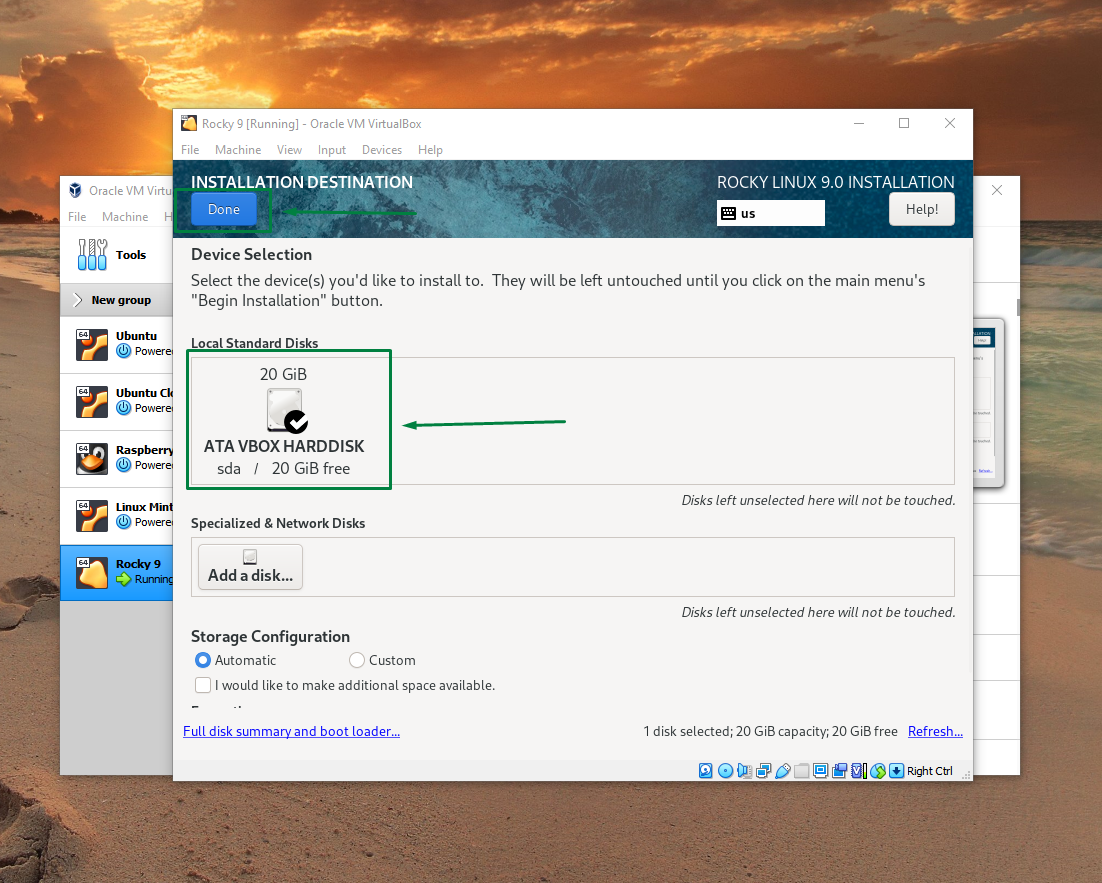
Next select the hard drive and keep the Storage Configuration to Automatic after that click on Done:

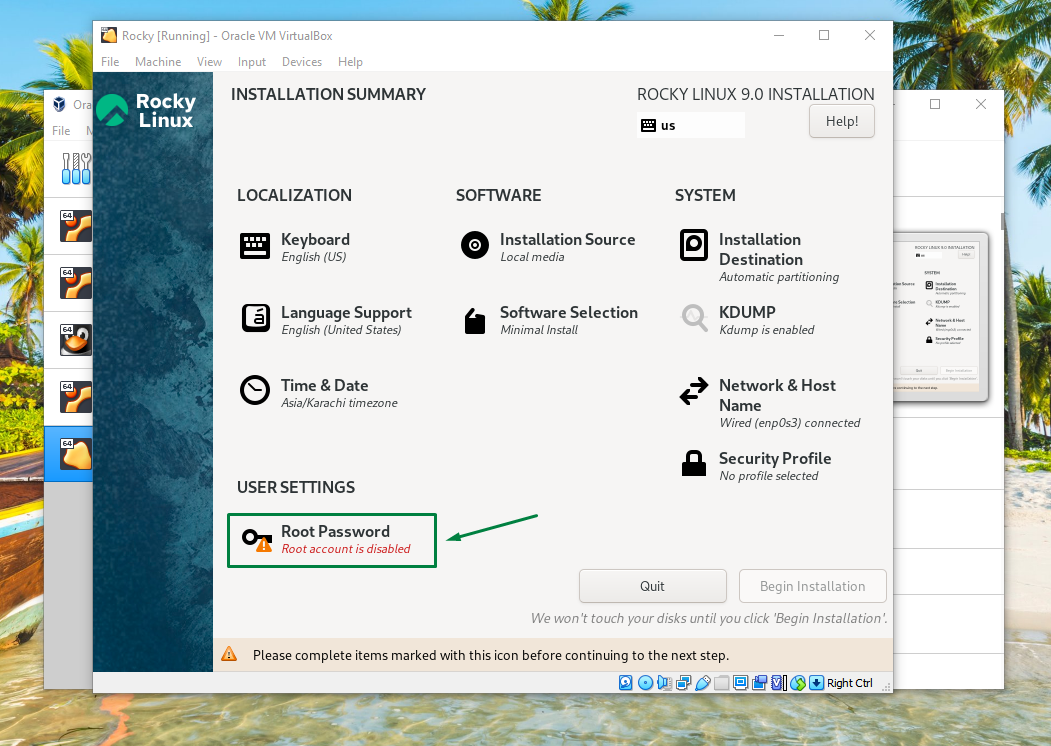
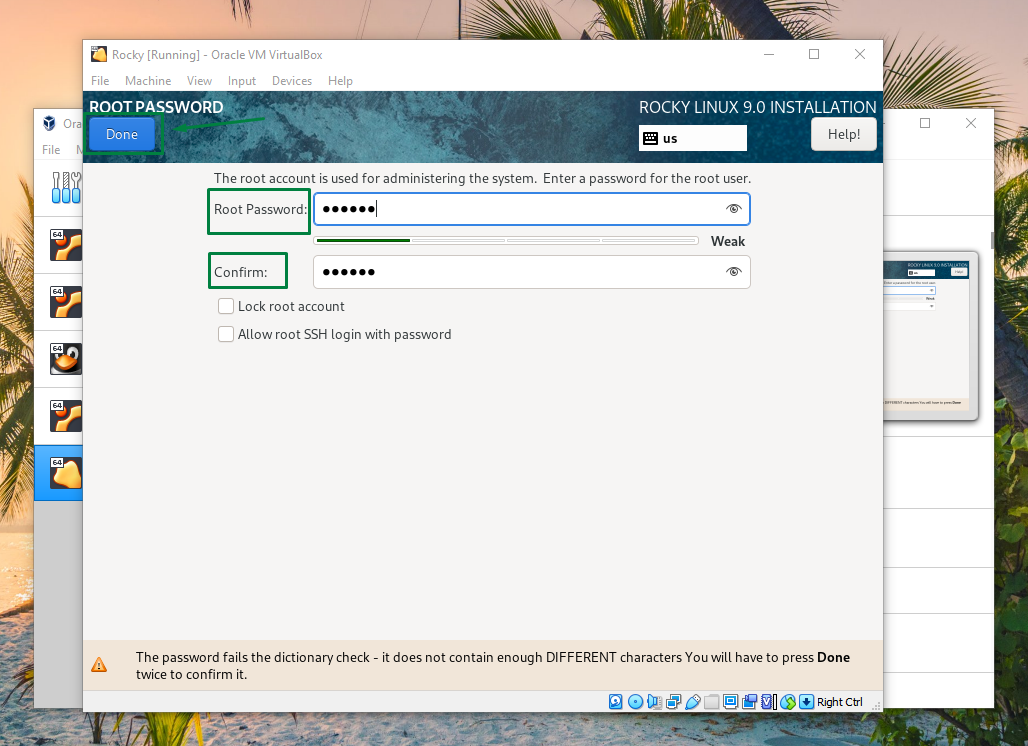
Step 17: The next option that is highlighted is the Root Password, click on it:

Graphical user interface, application Description automatically generated

Set the Root Password and click on Done:

Step 18: Now click on Begin Installation:

Graphical user interface, application Description automatically generated

The installation process will start, it might take some time, so wait:

When the installation is complete click on Reboot System:

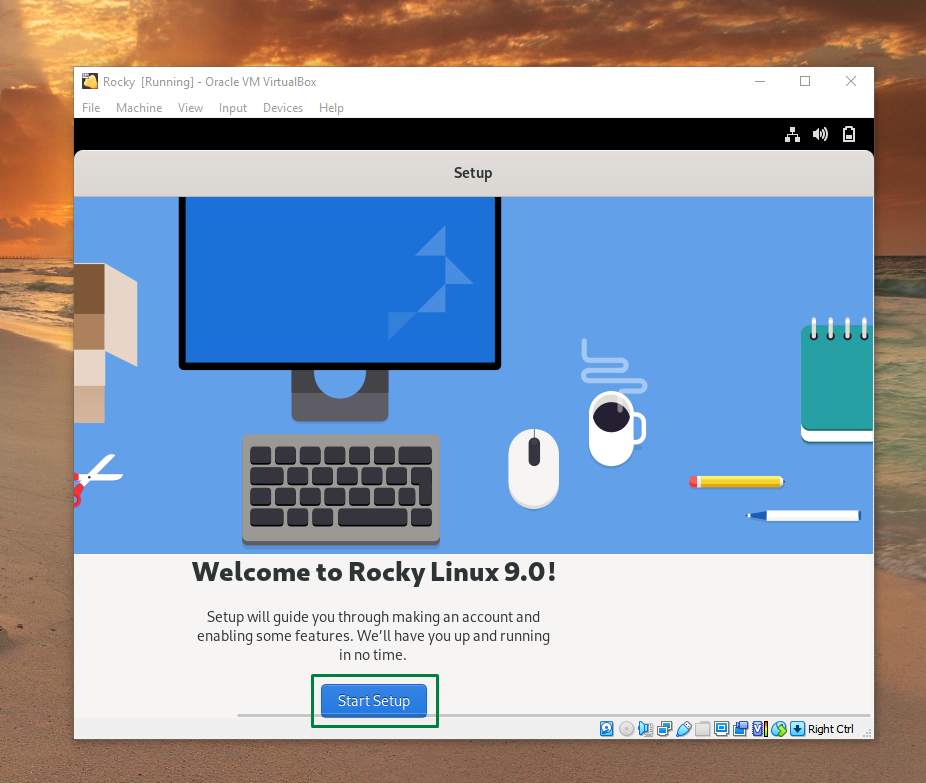
Step 19: Once the system is rebooted click on the Start setup:

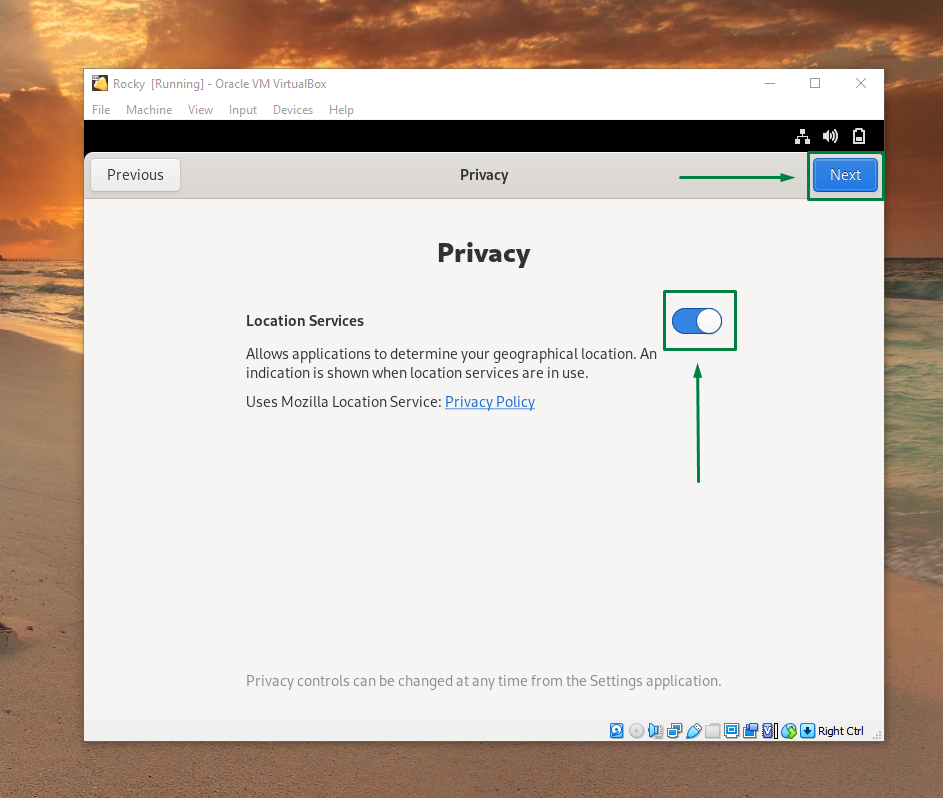
Step 20: Turn on the Location Services and click on Next to proceed further:

Graphical user interface Description automatically generated

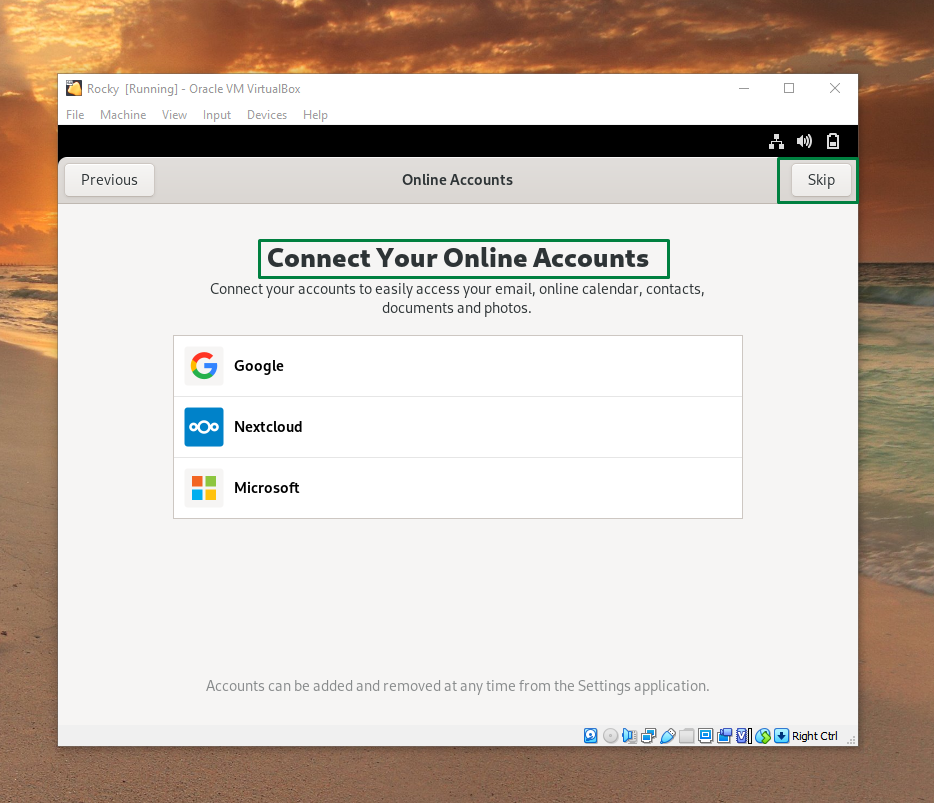
Step 21: Now add the any of your Online account or click on Skip:

Graphical user interface Description automatically generated

Step 22: Now set the Full Name and the Username and click on Next

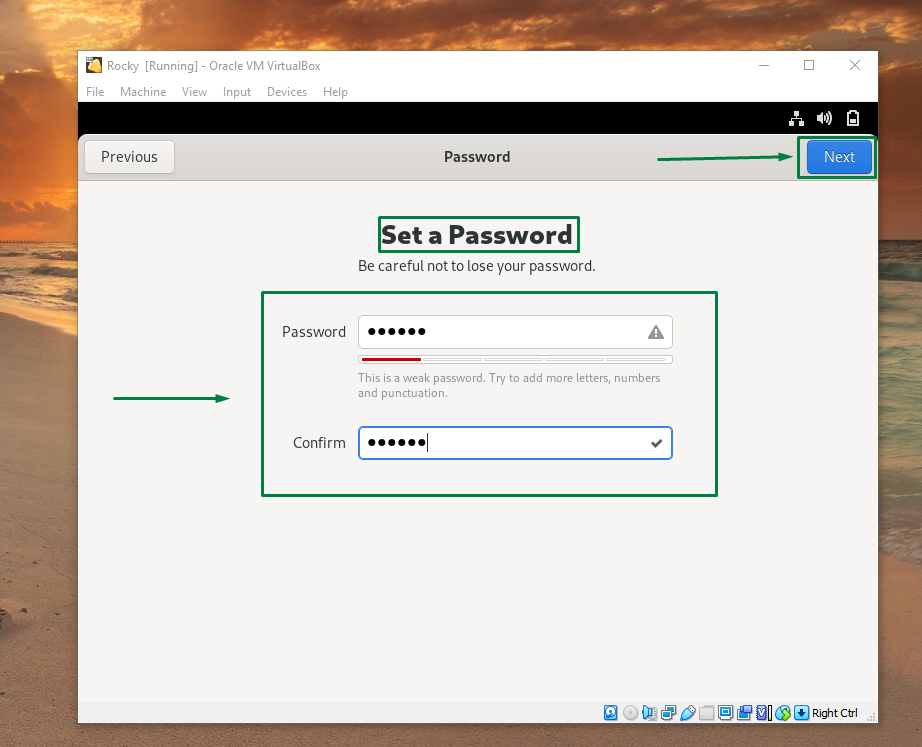
Step 23: Now Set a Password for your virtual machine and select Next:

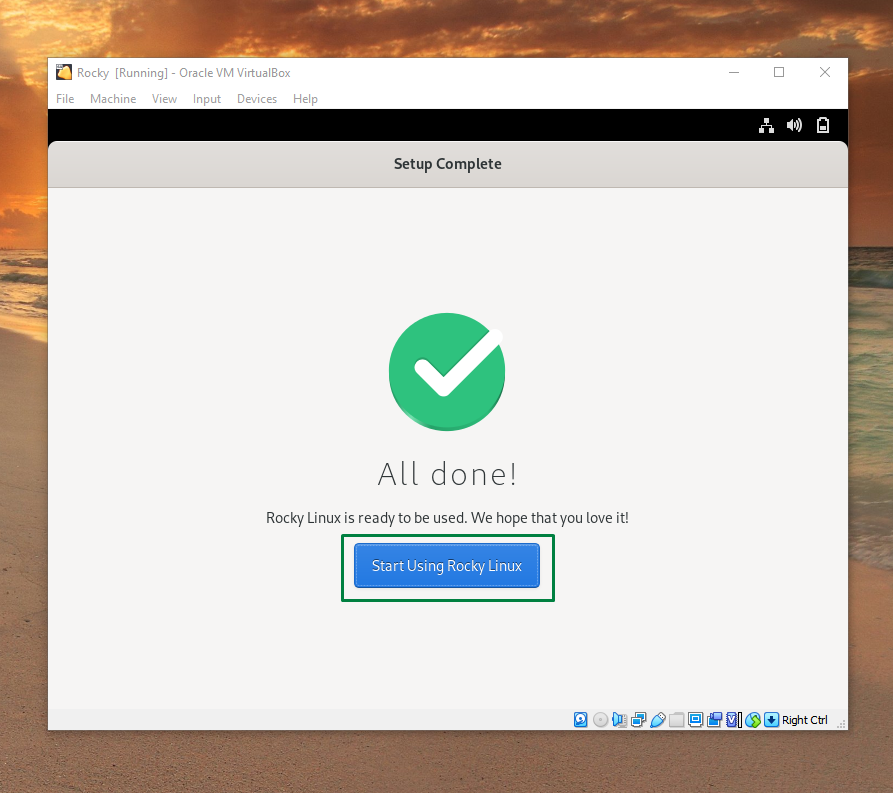
Now the setup is complete and then click on Start Using Rocky Linux:

Graphical user interface Description automatically generated

[mai mult...]

How to Install VirtualBox on Ubuntu

Oracle’s free and open-source offering VirtualBox is an excellent virtualization tool, especially for desktop operating systems. You can use virtualization software like VirtualBox for installing and using another operating system within a virtual machine. You can also use VirtualBox for installing another Linux distribution within your current Linux system.

The easiest way to install VirtualBox on Ubuntu is to search for it in the Software Center and install it from there.

VirtualBox in Ubuntu Software Center

You can also install it from the command line using this command:

sudo apt install virtualbox

However, if you check the package version before installing it, you’ll see that the VirtualBox provided by Ubuntu’s repository is quite old.

For example, the current VirtualBox version at the time of writing is 7.0, but the one in Software Center is 6.2. This means you won’t get the newer features introduced in the latest version of VirtualBox.

Install VirtualBox using deb file from Oracle’s website

If you want to use the latest version of VirtualBox on Ubuntu, the easiest way would be to use the deb file. Oracle provides ready-to-use binary files for VirtualBox releases. If you look at its download page, you’ll see the option to download the deb installer files for Ubuntu and other distributions.

You just have to download this deb file and double-click on it to install it. It’s as simple as that. However, the problem with this method is that you won’t get automatically updated to newer VirtualBox releases. The only way is to remove the existing version, download the newer version and install it again.

Install VirtualBox using Oracle’s repository

First, add the key for the repository. You can download and add the key using this single command.

wget -q https://www.virtualbox.org/download/oracle_vbox_2016.asc -O- | sudo apt-key add -

Important for Mint users

The next step will work for Ubuntu only. If you’re using Linux Mint or some other distribution based on Ubuntu, replace $(lsb_release -cs) in the command with the Ubuntu version your current version is based on. For example, Linux Mint 19 series users should use bionic and Mint 18 series users should use xenial. Something like this:

sudo add-apt-repository “deb [arch=amd64] http://download.virtualbox.org/virtualbox/debian bionic contrib“

Now add the Oracle VirtualBox repository to the list of repositories using this command:

sudo add-apt-repository "deb [arch=amd64] http://download.virtualbox.org/virtualbox/debian $(lsb_release -cs) contrib"

If you see an add-apt-repository command not found error, you’ll have to install the software-properties-common package.

Now that you have the correct repository added, refresh the list of packages available through these repositories and install VirtualBox.

sudo apt update && sudo apt install virtualbox-7.0
[mai mult...]

How to Install Windows 10 in VirtualBox in Linux

VirtualBox is open-source virtualization software from Oracle for creating virtual machines. With a virtual machine, you can run an operating system like an application inside your current operating system. It’s like a computer inside a computer.

These are called virtual machines because they’re basically emulating other operating systems, but they’re not really interacting with the computer system like a true operating system would.

Before installing Windows 10 in VirtualBox, let’s see what you need first:

  • An internet connection with good speed, or a Windows 10 ISO that you’ve already downloaded.
  • At least 4 GB of RAM. The more RAM you’ve got, the better.
  • Around 20 GB of free storage for installing Windows 10.
Step 1: Download Windows 10 ISO

First and foremost, you need to download a Windows 10 ISO. You can download Windows 10 32-bit or 64-bit, depending on your system.

Step 2: Install VirtualBox on Ubuntu and Linux Mint

It’s very easy to install VirtualBox on Ubuntu. All you need to do is to use the command below:

sudo apt install virtualbox
Step 3: Install Windows 10 in VirtualBox

Start VirtualBox. You should see a screen like the one below.

Installing Windows in VirtualBox

Name the VM anything you like. Also select the operating system and version. In this case I’ve chosen Windows 10 and 64-bit.

Screenshot_from_2016-02-15_23:20:11

Choose the RAM size. The recommended RAM size for 64-bit Windows 10 is 2 GB, while for 32-bit Windows 10 it’s 1 GB. But I suggest you have a little more than that for a smoother experience.

Choose RAm size for Windows virtualbox
Allocate 2-3 GB of RAM
Next is the size for the virtual machine. If you’re crunched on space choose the recommended size, otherwise make it a little more than the recommended size.

Vitualbox-Windows-Linux-3

For the format, go ahead with the VDI format.

VDI Windows Virtual Box

If you choose dynamic, the installed VM will grow beyond its allocated size later. If you’re not going to use Windows extensively, I suggest that you go with fixed size.

Vitualbox-Windows-Linux-6

Now it’s time to finalize the installation size. You can choose where to create the virtual disk. The default location (Home directory) works fine.

Vitualbox-Windows-Linux-7

Now’s the time to actually use the ISO. Click on Settings.

Setting Windows Virtual Machine

In here, go to Storage and add a new optical drive. I added this screenshot later because a few readers had difficulties finding it.

Add Windows 10 ISO as optical storage

Click Choose disk and point to the Windows 10 ISO.

Add Windows 10 in virtual box

Now you should see the Windows 10 ISO listed under Storage. Press OK.

Vitualbox-Windows-Linux-11

You should now be back at the main screen of Oracle VirtualBox. Now everything is ready. The next step is to install Windows 10. Click on Start from the main screen:

Install Windows 10 in VirtualBox in Linux

And finally the widnwos boot screeen.

Vitualbox-Windows-Linux-12

[mai mult...]

How to Change Default Applications in Ubuntu

As a beginner, you may need to know how to change any default application in Ubuntu and this is what I am going to show you in this tutorial.

There are basically two ways you can change the default applications in Ubuntu:

  • via system settings (valid for changing the default web browser, email client, calendar, music application, video player and image viewer)
  • via right-click menu (valid for applications other than the above mentioned ones)

1. Change default applications in Ubuntu from System Settings

Simply head to the System Settings:

System Settings Pop Os

In the System Settings, click on the Details option:

System Details Pop Os

Now, click on the “Default Applications” option as highlighted in the screenshot below:Default Applications Pop Os

As you can see, there are only a few kinds of default applications that can be changed here. You can change the default applications for web browsers, email clients, calendar apps, music, videos and photo here. What about other kinds of applications?

2. Change default applications in Ubuntu from right-click menu

Let’s say you have a markdown file (.md) which opens in Gedit text editor by default. But you want to use some other applications to open markdown files. Here’s what you need to do.

Right click on the file and then select Open with Other Application:

Changing Default Application Ubuntu via right click menu

If you don’t see your choice of application, click on the View All Applications:

Changing Default Application Ubuntu

Locate the desire application and select it:

Changing Default Application Ubuntu
  • This will open the file in your chosen application.
  • The thing here is that the file manager automatically recognizes your choice and the next time you double click on the file to open it, it will open it with the application you last chose.
Default Application Changed in Ubuntu

Keep in mind that this behavior is not applicable to web browser, music player, video player, email client, calendar and photo viewer. For that you need to use the first method.

[mai mult...]

How to recover deleted files in Linux using TestDisk

Have you ever gotten that horrible feeling? The one you get when you realize that you accidentally deleted files and it’s not even in the trash? Often it is immediately preceded by denial: I know I have another copy of it somewhere.

You need to install the TestDisk tool first. Most Linux distributions already have this tool in their official repository. In Ubuntu and other Ubuntu-based Linux distributions such as Linux Mint, elementary OS etc, you can use the command below to install TestDisk:

sudo apt install testdisk

Arch Linux users can install it from AUR. You can download it for other Linux distributions from the link below:

https://www.cgsecurity.org/wiki/TestDisk_Download

Run TestDisk in the terminal using the command below:

testdisk

When you open it, you’ll see something that looks like this. Be patient! The interface is actually straightforward but you do have to carefully read the text. Use the arrow keys to navigate and “enter” to select.

Now, at this point, if you’re lucky, you should see your drive. And you can proceed to the last steps. But let’s assume you’re not, that you have, say, a multi-boot machine. In this case, ownerships can get blurry, and Testdisk needs your permission to open them.

  • Select “sudo” and enter your password. Hit “enter” and “enter” again on the next screen to create another log file.
  • This time Testdisk displays all your drives. Arrow key to the drive in question and hit enter.

Testdisk has again selected the correct setting. This makes sense since a simple storage device is seldom partitioned. Again hit enter.

And finally, we have to do a little thinking to do. If you read the first screen, this program isn’t just for recovering deleted files. It’s a powerful disk utility. But if we remember what we’re trying to do the choice is fairly obvious: we’re not trying to fix a disk, we’re trying to recover a file. Select “Advanced” and hit “enter”.

Testdisk will scan for files and produce a list of deleted files highlighted in red. Arrow down to it and carefully read the choices at the bottom

.

Hit c to copy and thus recover the deleted file.

[mai mult...]
How to install YubiKey Manager GUI on Linux

One can use a hardware security key such as YubiKey for OTP or FIDO2 for additional security on Linux to protect disks, ssh keys, password manager, web applications and more. The YubiKey Manager is available as both GUI and CLI too. One can use it for finding information about YubiKey, such as:

  1. Seeing the serial number and firmware version of your YubiKey
  2. Configuring FIDO2 PIN, FIDO applications, the OTP application
  3. Manage YubiKey short and long slots
  4. Enable and disable interfaces.

Prerequisite

Be careful with a particular option such as reset, which will delete all FIDO config, and it will lock you down using remote services or ssh keys.

Visit this page to grab the latest AppImage. One can use the wget command or curl command to download both AppImage and verification signature file. For instance:
$ wget https://developers.yubico.com/yubikey-manager-qt/Releases/yubikey-manager-qt-1.2.4b-linux.AppImage \
https://developers.yubico.com/yubikey-manager-qt/Releases/yubikey-manager-qt-1.2.4b-linux.AppImage.sig

Step 2 – Verify YubiKey Manager for Linux using the gpg

Type the following gpg command to verify signature:
$ gpg --verify yubikey-manager-qt-1.2.4b-linux.AppImage.sig

Here is what I saw on my machine:

gpg: assuming signed data in 'yubikey-manager-qt-1.2.4b-linux.AppImage'
gpg: Signature made Wed 10 AUG 2022 11:32:21 AM IST
gpg:                using RSA key E6919ABF48C484E3CB7B71CB870B88256690D8DC
gpg: Can't check signature: No public key

Let us grab the RSA key E6919ABF48C484E3CB7B71CB870B88256690D8DC. Edit your gpg.conf, run:
$ vi ~/.gnupg/gpg.conf
Append / edit (at least set Keyserver):

keyserver hkps://keys.openpgp.org

Save and close the file. Then get the key:
$ gpg --recv-keys E6919ABF48C484E3CB7B71CB870B88256690D8DC
OR
$ gpg --keyserver hkps://keys.openpgp.org --recv-keys E6919ABF48C484E3CB7B71CB870B88256690D8DC

Step 3 – Installing YubiKey Manager

Now that you verified the downloaded file, it is time to install it. Simply copy file to /usr/local/bin directory or your ~/bin/ using the cp command. For example:

sudo cp -v yubikey-manager-qt-1.2.4b-linux.AppImage /usr/local/bin/
## OR  ##
mkdir -p ~/bin/ && cp -v yubikey-manager-qt-1.2.4b-linux.AppImage ~/bin/

Outputs:

'yubikey-manager-qt-1.2.4b-linux.AppImage' -> '/home/vivek/bin/yubikey-manager-qt-1.2.4b-linux.AppImage'

Next, set up executable permission using the chmod command:

sudo chmod -v +x /usr/local/bin/yubikey-manager-qt-1.2.4b-linux.AppImage
## OR  ##
chmod -v +x ~/bin/yubikey-manager-qt-1.2.4b-linux.AppImage

Outputs:

mode of ‘/home/vivek/bin/yubikey-manager-qt-1.2.4b-linux.AppImage’ changed from 0664 (rw-rw-r–)

[mai mult...]

How to install aws cli on Linux

The AWS CLI is an essential tool for developers and sysadmin to automate and interact with AWS cloud services. It is an open-source tool built on the AWS SDL for Python. As a result, you no longer need to use AWS Management Console. Instead, you can use Linux terminal and commands for managing AWS resources.

Installing AWS cli on Linux
  1. Open the terminal application.
  2. Then type command as per your Linux distro to install aws cli kit:
    1. Debian/Ubuntu Linux user, type:sudo apt install awscli
    2. Fedora Linux user, type:sudo dnf install awscli
    3. RHEL/CentOS/Rokcy/Alma Linux user, type (first, turn on ELEP repo and then):sudo dnf install awscli
    4. Alpine Linux user, type:apk add aws-cli
    5. Arch Linux user, type:sudo pacman -S aws-cli
    6. OpenSUSE/SUSE Linux user, type:sudo zypper in aws-cli
    7. Install AWS CLI version 1.x using PIP generic method:python3 -m pip install awscliDo you want AWS cli version 2? Try:python3 -m pip install awscliv2
      ~/.local/bin/awscliv2 --install
      Make sure you include ~/.local/bin/ in your $PATH. For example, here is how to set up PATH on your Linux:# Step #1. Set PATH variable #
      echo 'export PATH=$PATH:~/.local/bin' >>~/.bashrc
      # Step #2. Set bash alias too #
      echo 'alias aws="awsv2"' >>~/.bashrc
      # Step #3. Use the source command to load changes #
      source ~/.bashrc
  3. Once installed, find out AWS CLI version, run:aws --versionDepending upon your package manager and Linux distro, you may get the latest or older version. For instance, here is the output from my Ubuntu 20.04 LTS developer workstation:
    aws-cli/1.18.69 Python/3.8.10 Linux/5.13.0-35-generic botocore/1.16.19

    Here is outputs from v2:

    2.1.1
    AWS CLI v2 command: /home/ubuntu/.awscliv2/binaries/aws
    aws-cli/2.4.28 Python/3.8.8 Linux/5.13.0-37-generic exe/x86_64.ubuntu.22 prompt/off
  4. Next, you need to configure AWS cli with API keys. Log in to the AWS management console and grab API access keys if you don’t have any. Then configure it as follows:aws configure
  5. So far, you have installed AWS cli. Then configured access, and now it is time to test it. First, I will run the ‘aws s3 ls’ command to list your aws s3 resources:aws s3 ls
    Here is what I see when everything is configured correctly:

    2016-07-25 16:11:06 xyz-project-freenas
    2020-07-03 13:55:47 xyz-project-forum
    ....
    ..
A note about credentials file

Your aws CLI credentials are stored in plain text inside ~/.aws/ directory. Therefore, do not share ~/.aws/ directory and files. You can view it using the cat command:
cat ~/.aws/credentials
It is possible to store credentials in an encrypted format. The other option is to use and enable AWS Multi-Factor Authentication (MFA). It is a best practice that adds an extra layer of protection for your credentials.

[mai mult...]
How to convert JSON to CSV using Linux / Unix shell

What are JSON and CSV formats?

JSON is an acronym for JavaScript Object Notation. Often used in web apps, but it is not limited to JavaScript. One can use any programming language such as Perl, Python or CLI tools such as jq. CSV is an acronym for Comma-separated values. It is a text file you can use in spreadsheet apps, programming languages and many other apps.

Example of JSON format

Here the outputs of the df command in JSON format:

[
  {
    "fs": "/dev/mapper/vgubuntu-root",
    "type": "ext4",
    "size": "915G",
    "used": "135G",
    "avail": "734G",
    "usedpercentage": "16%",
    "mounted": "/"
  },
  {
    "fs": "/dev/nvme0n1p2",
    "type": "ext4",
    "size": "1.4G",
    "used": "378M",
    "avail": "939M",
    "usedpercentage": "29%",
    "mounted": "/boot"
  },
  {
    "fs": "/dev/nvme0n1p1",
    "type": "vfat",
    "size": "511M",
    "used": "30M",
    "avail": "482M",
    "usedpercentage": "6%",
    "mounted": "/boot/efi"
  }
]
Example of CSV format

The JSON outputs in CSV format (all values are separated by a comma , value):

/dev/mapper/vgubuntu-root,ext4,915G,135G,734G,16%,/
/dev/nvme0n1p2,ext4,1.4G,378M,939M,29%,/boot
/dev/nvme0n1p1,vfat,511M,30M,482M,6%,/boot/efi
Converting JSON to CSV using Linux / Unix shell

So how do you convert such input? The answer is to use jq or dasel command-line utilities.

Installing jq

Since jq is available in most common repos, I will use that one for my needs. Here is how to install jq on a Debian or Ubuntu Linux using the apt command/apt-get command:
sudo apt install jq
RHEL/Fedora/CentOS/Alma/Rocky Linux user try the dnf command:
sudo dnf install jq
Alpine Linux user try the apk command:
sudo apk add jq
SUSE or OpenSUSE Linux user try the zypper command:
sudo zypper in jq
macOS / OS X user install homebrew and then use the brew command:
brew install jq

Example – convert JSON to CSV under Linux

The syntax is as for df.json:
cat df.json | jq
Now let us extract the fs field, run:
cat df.json | jq '.[] | .fs'
How about both fs and type fields?
cat df.json | jq '.[] | .fs, .type'

To generate CSV file with , as separator use the following syntax:
cat df.json | jq '.[]| join(",")'
The join(",") joins the array of elements given as input, using the argument , as separator:

"/dev/mapper/vgubuntu-root,ext4,915G,135G,734G,16%,/"
"/dev/nvme0n1p2,ext4,1.4G,378M,939M,29%,/boot"
"/dev/nvme0n1p1,vfat,511M,30M,482M,6%,/boot/efi"

Pass the -r raw option to get rid of double quotes:
cat df.json | jq -r '.[]| join(",")'

How do I convert a JSON file to CSV?

Let us consider the following file displayed using the bat/cat commandcat bingbot.json
batcat bingbot.json

Sample config:

{
  "creationTime": "2021-11-10T10:00:00.121331",
  "prefixes": [
    {"ipv4Prefix": "157.55.39.0/24"},
    {"ipv4Prefix": "207.46.13.0/24"},
    {"ipv4Prefix": "40.77.167.0/24"},
    {"ipv4Prefix": "13.66.139.0/24"},
    {"ipv4Prefix": "13.66.144.0/24"},
    {"ipv4Prefix": "52.167.144.0/24"},
    {"ipv4Prefix": "13.67.10.16/28"},
    {"ipv4Prefix": "13.69.66.240/28"},
    {"ipv4Prefix": "13.71.172.224/28"},
    {"ipv4Prefix": "139.217.52.0/28"},
    {"ipv4Prefix": "191.233.204.224/28"},
    {"ipv4Prefix": "20.36.108.32/28"},
    {"ipv4Prefix": "20.43.120.16/28"},
    {"ipv4Prefix": "40.79.131.208/28"},
    {"ipv4Prefix": "40.79.186.176/28"},
    {"ipv4Prefix": "52.231.148.0/28"},
    {"ipv4Prefix": "51.8.235.176/28"},
    {"ipv4Prefix": "51.105.67.0/28"}
  ]
}

The final goal is to produce .CSV file as follows: for my WAF:

157.55.39.0/24,BingBot
207.46.13.0/24,BingBot
40.77.167.0/24,BingBot
13.66.139.0/24,BingBot
13.66.144.0/24,BingBot
52.167.144.0/24,BingBot
13.67.10.16/28,BingBot
13.69.66.240/28,BingBot
13.71.172.224/28,BingBot
139.217.52.0/28,BingBot
191.233.204.224/28,BingBot
20.36.108.32/28,BingBot
20.43.120.16/28,BingBot
40.79.131.208/28,BingBot
40.79.186.176/28,BingBot
52.231.148.0/28,BingBot
51.8.235.176/28,BingBot
51.105.67.0/28,BingBot

Commands

First type the following to get CIDR prefixes:
cat bingbot.json | jq '.prefixes[]'
Then pipe outputs to create new JSON to add a comment field:
cat bingbot.json | jq -r '.prefixes[] | {cidr: .ipv4Prefix, comment: "BingBot"}'
Finally, use the join() to make a .CSV file:
cat bingbot.json | jq -r '.prefixes[] | {cidr: .ipv4Prefix, comment: "BingBot"} | join(",")'
Save it:
cat bingbot.json | jq -r '.prefixes[] | {cidr: .ipv4Prefix, comment: "BingBot"} | join(",")' > bingbot.csv
Verify it:
cat bingbot.csv

[mai mult...]
Debian Linux Install GNU GCC Compiler and Development Environment

How do I install GNU/GCC compiler and related tools (such as make, debugger, man pages) collection under Debian Linux system using command line options?

You need to install the following packages on a Debian and Ubuntu Linux:
build-essential package. Installs the following collection to compile c/c++ program on Debian/Ubuntu Linux.

  1. libc6-dev – C standard library.
  2. gcc – C compiler.
  3. g++ – C++ compiler.
  4. make – GNU make utility to maintain groups of programs.
  5. dpkg-dev – Debian package development tools.

Basically, build-essential package contains an informational list of packages which are considered essential for building Debian packages including gcc compiler, make and other required tools. This package also depends on the packages on that list, to make it easy to have the build-essential packages installed.

Installation

Open the Terminal and then type the following apt-get command as root user or use the apt command:
$ sudo apt-get update
$ sudo apt-get install build-essential

OR
$ sudo apt update
$ sudo apt install build-essential

Sample outputs:

Reading package lists... Done
Building dependency tree       
Reading state information... Done
The following extra packages will be installed:
  dpkg-dev fakeroot g++ g++-4.7 gcc gcc-4.7 libalgorithm-diff-perl libalgorithm-diff-xs-perl libalgorithm-merge-perl libc-dev-bin libc6-dev libdpkg-perl
  libfile-fcntllock-perl libitm1 libstdc++6-4.7-dev libtimedate-perl linux-libc-dev make manpages-dev
Suggested packages:
  debian-keyring g++-multilib g++-4.7-multilib gcc-4.7-doc libstdc++6-4.7-dbg gcc-multilib autoconf automake1.9 libtool flex bison gdb gcc-doc gcc-4.7-multilib
  libmudflap0-4.7-dev gcc-4.7-locales libgcc1-dbg libgomp1-dbg libitm1-dbg libquadmath0-dbg libmudflap0-dbg libcloog-ppl0 libppl-c2 libppl7 binutils-gold glibc-doc
  libstdc++6-4.7-doc make-doc
The following NEW packages will be installed:
  build-essential dpkg-dev fakeroot g++ g++-4.7 gcc gcc-4.7 libalgorithm-diff-perl libalgorithm-diff-xs-perl libalgorithm-merge-perl libc-dev-bin libc6-dev libdpkg-perl
  libfile-fcntllock-perl libitm1 libstdc++6-4.7-dev libtimedate-perl linux-libc-dev make manpages-dev
0 upgraded, 20 newly installed, 0 to remove and 0 not upgraded.
Need to get 26.5 MB of archives.
After this operation, 67.6 MB of additional disk space will be used.
Do you want to continue [Y/n]? y
Get:1 http://mirrors.kernel.org/debian/ stable/main libitm1 amd64 4.7.2-5 [36.6 kB]
Get:2 http://mirrors.kernel.org/debian/ stable/main libc-dev-bin amd64 2.13-38 [224 kB]
.....
....
....
Setting up manpages-dev (3.44-1) ...
Setting up g++-4.7 (4.7.2-5) ...
Setting up g++ (4:4.7.2-1) ...
update-alternatives: using /usr/bin/g++ to provide /usr/bin/c++ (c++) in auto mode
Setting up build-essential (11.5) ...
Setting up libstdc++6-4.7-dev (4.7.2-5) ...
Verify installation

You can verify gcc compiler and make tool using the following syntax:
$ whereis gcc make
$ gcc -v
$ make -v

Sample outputs:

gcc: /usr/bin/gcc /usr/lib/gcc /usr/bin/X11/gcc
make: /usr/bin/make /usr/bin/X11/make /usr/share/man/man1/make.1.gz
...
..
gcc version 4.7.2 (Debian 4.7.2-5) 
...
..
GNU Make 3.81
..

Now, you should able to compile software, create Debian packages or simply write a code using C / C++ compilers.

How do I install dev man pages?

Type the following command:
$ sudo apt-get install manpages-dev
Sample outputs:

Reading package lists... Done
Building dependency tree       
Reading state information... Done
The following additional packages will be installed:
  manpages
Suggested packages:
  man-browser
The following NEW packages will be installed:
  manpages manpages-dev
0 upgraded, 2 newly installed, 0 to remove and 0 not upgraded.
Need to get 3,134 kB of archives.
After this operation, 5,042 kB of additional disk space will be used.
Do you want to continue? [Y/n] y
Get:1 http://archive.ubuntu.com/ubuntu xenial/main amd64 manpages all 4.04-2 [1,087 kB]
Get:2 http://archive.ubuntu.com/ubuntu xenial/main amd64 manpages-dev all 4.04-2 [2,048 kB]
Fetched 3,134 kB in 6s (500 kB/s)                                         
Selecting previously unselected package manpages.
(Reading database ... 22189 files and directories currently installed.)
Preparing to unpack .../manpages_4.04-2_all.deb ...
Unpacking manpages (4.04-2) ...
Selecting previously unselected package manpages-dev.
Preparing to unpack .../manpages-dev_4.04-2_all.deb ...
Unpacking manpages-dev (4.04-2) ...
Setting up manpages (4.04-2) ...
Setting up manpages-dev (4.04-2) ...

Verify installation by reading some man pages:
$ man ls
$ man printf

[mai mult...]