Change to dynamic IP address (DHCP) from Settings

To enable DHCP to obtain a TCP/IP configuration automatically on Windows 10, use these steps:

  1. Open Settings on Windows 10
  2. Click on Network & Internet
  3. Click on Ethernet or Wi-Fi
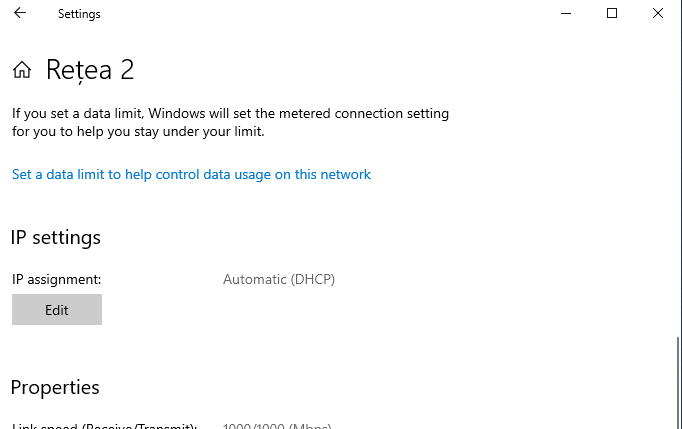
  4. Click the network connection
  5. Under the “IP settings” section, click the Edit button


6. Use the Edit IP settings drop-down menu and select the Automatic (DHCP) option


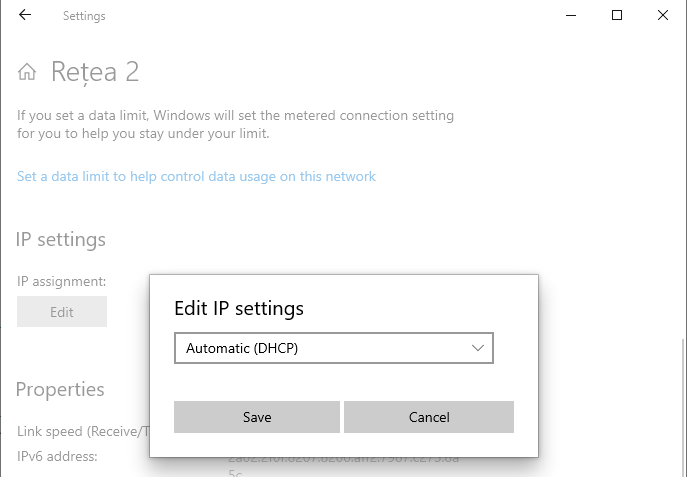
7. Click the Save button.

Once you complete the steps, the networking stack configuration will reset, and your device will request an IP address from the DHCP server (usually your router).

[mai mult...]

How do I set a static IP address in Windows?

To set a static IP address in Windows 7, 8, and 10:

  1. Click Start Menu > Control Panel > Network and Sharing Center or Network and Internet > Network and Sharing Center.
  2. Click Change adapter settings.
  3. Right-click on Wi-Fi or Local Area Connection.
  4. Click Properties.
  5. Select Internet Protocol Version 4 (TCP/IPv4).
  6. Click Properties.
  7. Select Use the following IP address.
  8. Enter the IP addressSubnet maskDefault gateway, and DNS server.
  9. Click OK.
    Your computer displays a static IP address.
[mai mult...]

How to fix ssh: connect to host port 22: Connection refused

The syntax for the SSH command is as follows:

ssh [options] [user@]hostname [command]

Here is a brief explanation of each part of the syntax:

  • ssh – This is the command to initiate the SSH connection.
  • [options] – This is an optional parameter that allows you to specify additional options to configure the SSH connection. For example, you can use the -p option to specify a non-standard SSH port.
  • [user@]hostname – This is the remote host that you want to connect to. You can optionally specify a username to use for the SSH connection. If you omit the username, the default username for your current session will be used.
  • [command] – This is an optional parameter that allows you to specify a command to run on the remote host after the SSH connection is established. If you omit this parameter, you will be dropped into an interactive shell on the remote host.

Here is an example of how to use the SSH command to connect to a remote host:

ssh username@example.com

This will initiate an SSH connection to the host example.com using the username username.

If you have already set up SSH keys, you will be logged in without being prompted for a password. If not, you will be prompted to enter your password.

Verify SSH server status

Ensure that the SSH server is running and accessible on the host you are trying to connect to. Log in to the host using an alternative method like remote desktop or console access, and check the SSH server’s status with the following command:

systemctl status ssh

If the SSH server is not running, start it using the appropriate command for your system. For example:

systemctl start ssh

Confirm SSH server port

By default, SSH servers listen on port 22. However, it’s possible that the SSH server on the host you’re trying to connect to is configured to use a different port.

  • To check which port the SSH server is using, you can follow these steps:
  • Log in to the server where the SSH server is running. You can use an alternative method like remote desktop or console access if you cannot establish an SSH connection.
  • Once you’re logged in to the server, open a terminal or command prompt.
  • Run the following command to view the SSH server’s configuration file:

sudo nano /etc/ssh/sshd_config

This command opens the SSH server configuration file in the Nano text editor. Look for the line that specifies the port number. It typically looks like this:

Port 22

  • If the port number is set to the default value of 22, it means the SSH server is using the default port. If a different port number is specified, take note of that number.
  • After noting the port number, press Ctrl+X to exit the Nano editor. You will be prompted to save the changes made to the file. If you did not make any changes, simply press N to exit without saving.
  • Remember, if the SSH server is using a non-standard port, you will need to specify that port when connecting to the server using SSH. For example:

ssh -p <port_number> <username>@<host>

If you do not have access to the server’s configuration file, you can also try checking the SSH server’s status and listening ports by running the following command:

sudo netstat -tuln | grep ssh

This command will display the active TCP/UDP connections and listening ports on the server. Look for the line that includes “ssh” to find the port number being used by the SSH server.

Verify network connectivity

Verifying network connectivity is an important step when troubleshooting the “ssh: connect to host <host> port 22: Connection refused” error. It helps determine if there are any network-related issues that might be preventing your SSH client from reaching the SSH server.

The ping command is a common tool used to test network connectivity between two devices. When you execute the ping <host> command, your computer sends a small network packet to the specified host, and if the host is reachable and responsive, it sends a reply back.

If the ping command returns a response from the host, it indicates that the network connection is working fine. In this case, the “ssh: connect to host <host> port 22: Connection refused” error is likely due to a different issue, such as the SSH server not running or a firewall blocking the SSH connection.

However, if the ping command fails to receive a response or shows that the host is unreachable, it suggests a network connectivity problem.

This could be caused by various factors, such as network configuration issues, routing problems, network outages, or firewall restrictions. To resolve the issue, you may need to troubleshoot the network components, check network settings, contact your network administrator, or consult with an IT professional.

Firewall blocking the connection
  • When encountering the “ssh: connect to host <host> port 22: Connection refused” error, one possible cause is a firewall blocking the SSH connection.
  • Firewalls are security measures that monitor and control network traffic, and they can be set up at different points within a network, including the SSH server or any intermediate network devices.
  • Firewalls often enforce rules that determine which network connections are allowed or blocked.
  • Determine if the firewall is on the SSH server itself or if it is located on an intermediate network device, such as a router or a dedicated firewall appliance.
  • If the firewall is located on an intermediate network device, such as a router, you need to configure it to permit SSH traffic to reach the SSH server. Again, consult the documentation or seek assistance from the network administrator to adjust the firewall rules accordingly.

As a troubleshooting step, you can temporarily disable the firewall(s) to determine if they are indeed the cause of the connection issue. This should only be done for testing purposes and should not be a permanent solution. Always exercise caution when making changes to firewall configurations.

[mai mult...]

How to disable the automatic saving of photos and videos from the Instagram application on the phone?

How to disable the automatic saving of photos and videos from the Instagram application on the phone?
  • Open the Instagram application from your phone.
  • Click on the profile picture in the lower right corner

  • Click on the 3 stripes on the right of the screen.

  • Go to Settings

  • Select the account

  • Then go to Original Posts

  • We disable all 3 columns

From now on, you will no longer take up space on your phone with photos and videos from Instagram.

[mai mult...]

How to extend your Samsung Galaxy battery life

1. Reduce display brightness level

High display brightness and long screen time-out setting will increase battery drain. One of the simplest way to prolong your device battery life is to reduce the screen brightness, and here’s how you can do it:

1) From the home screen > swipe down from the top to view the notification panel

2) Drag the brightness slider towards the left

3) At the same time, adjust the screen time-out setting > Tap the gear icon at the top > Select My Device tab > Select Display

4) Tap Screen timeout > Set your time-out preferences

Special Tip: Try setting your screen timeout to 30 seconds and display brightness to Auto.

2. Close, disable or uninstall unused Apps

Some apps may run background processes that deplete your battery. Once you’re ready to uninstall your unused apps, there are a few ways to go about it.

Fastest way to uninstall apps:

1) On your home screen > long-press on the app
2) Tap the Uninstall icon > Followed by OK

For more control over your apps:

1) Go to Settings > Apps.
2) Tap the overflow icon on the top right to sort apps by size or required permissions.
3) To uninstall, simply tap on the app name followed by the Uninstall icon.

Disable apps to increase battery life:

Unfortunately, some apps cannot be uninstalled on the certain Galaxy devices like Samsung Galaxy S9/S9+. However, you can disable the apps to increase battery life. To disable apps, simply follow either of the paths above and select Disable.

3. Turn off Always On Display (AOD) or set schedule

Always On Display or AOD uses AMOLED displays to show you certain information when your screen is “off”. It allows you to easily check basic information such as date and time without activating the display. Naturally, any activity that makes your screen turn on all the time will consume some power from your battery. You can choose to turn off AOD or set a time schedule for AOD to turn on/off.

To turn off AOD:  

1) Go to Settings > Lock screen and security > Lock screen and Always On Display
2) Turn off AOD by tapping on the AOD slider (circle will move to the left)

4. Toggle off WiFi, Bluetooth and GPS when not in use

Switch off Wi-Fi, Bluetooth and GPS if you don’t need them, as each regular checks for a signal uses power. You can switch each of these off by pulling down the notification panel (drop down menu) and tapping the relevant icon.

5. Turn on Power saving mode

Power saving mode conserves battery power by limiting mobile device CPU performance, reducing screen brightness, turning off the touch key light and vibration feedback. This mode differs slightly between devices but generally it will close all unnecessary apps and screens so that you can substantially increase your battery time. You can turn on Power saving mode manually, or you can set your device to go into Power saving mode automatically.

Go to Settings > Device maintenance > Battery.

6. Download the latest device software
  • Check your latest device software by going to Settings > About phone.
  • Upgrade your software using either FOTA (‘Firmware Over The Air’, i.e. wirelessly) or via Samsung Kies.
7. Check your device Signal bars

Check the number of bars that you normally see on your handset while at home or work. Using the handset in areas with very low signal uses a lot of power and should be avoided where possible.

8. Check how often your device synchronises data

If like most people, you have a number of apps on your device such as email or social media, these apps will frequently sync, or check for new emails or updates. Frequently syncing can reduce your battery life. Check the sync settings on your apps or email, and ensure they only sync as often as you need them to.

9. Avoid fully discharging your battery

On much older types of batteries, the advice used to be to discharge them completely. However, completely discharging the battery on modern smartphones devices may reduce its life. It’s best not to let your battery go under 20%.

10. Store your device properly

If you do not intend to use your device for some time and pack it away, ensure that it has at least 50% battery.  Minimise hot and cold exposure.

[mai mult...]

How to use Run as to start an application as an administrator in Windows

You can use Run as to start an application as an administrator if you want to perform administrative tasks when you are logged on as a member of another group, such as the Users or Power Users group.

Steps to start an application as an administrator

To use Run as to start an application as an administrator, follow these steps:

  1. Locate the application that you want to start in Windows Explorer, the Microsoft Management Console (MMC), or Control Panel.
  2. Press and hold down the SHIFT key while you right-click the executable file or the icon for the application, and then select Run as.
  3. Select The following user.
  4. In the User name and Password boxes, type the administrator account and password, and then select OK.

In  Windows 8 and Windows 10 start menu, it is possible to run a program or command with elevated privileges by simply right-clicking on the entry in the start menu or in the start menu search results and choosing Run as Administrator:

To launch a program with elevated rights via the Windows run dialog, follow the steps below:

1. Use windows key + R to launch the run dialog or Type run in windows search and select it.
2. Type in the name of the process you wish to launch with admin rights (for example, services.msc or cmd.exe, and then press (at the same time) ctrl + shift + Enter.

[mai mult...]

How to Gain Access to the System Volume Information folder

This procedure is to open the System Volume Information folder on the Windows XP computer.

  1. Click Start, and then click My Computer.
  2. On the Tools menu, click Folder Options.
  3. On the View tab, click Show hidden files and folders.
  4. Clear the Hide protected operating system files (Recommended) check box. Click Yes when you are prompted to confirm the change.
  5. Click OK.
  6. Double-click the System Volume Information folder in the root folder to open it.

[mai mult...]

How to set a partition as active

You can use Disk Management if you can boot into Windows and do the necessary changes to your partition:

  1. Click Start
  2. Click Control Panel
  3. Click System and Security
  4. Click Administrative Tools
  5. Double-click Computer Management
  6. Click Disk Management under the Storage tab from the left

    Select Disk Management from Storage

  7. Right-click on the partition you want to set as partition and click Mark Partition as Active
  8. Click Yes

Marking a partition as active on Windows Vista systems follows the same steps as the steps for Windows 7,8,10

  1. Open Command Prompt
  2. Once Command Prompt has loaded, type the following commands and press Enter after each:
    diskpart
    list disk
    select disk 0

    Where 0 is the disk listed by the list disk command.

  3. Type:
    list partition
  4. Press Enter
  5. Type:
    select partition 1

    Where 1 is your partition.

  6. Press Enter
  7. Type:
    active
  8. Press Enter

Example with images: 

After you type activate you need to press enter and it’s done.

[mai mult...]

How to boot into Safe Mode in Windows 10, 8.

In Safe Mode, your computer is running with non-core components disabled which makes it easier to fix potential errors or remove various software that, in normal conditions, can’t be fixed or removed. If you boot into Safe Mode, you can use various diagnostic tools:

  • System Restore
  • Various settings for your Windows version
  • Device Manager, where you can update and remove devices and drivers from your computer
  • Event Viewer
  • System Information, where you can view information about the hardware
  • Command Prompt
  • Registry Editor
For Windows 8 or Windows 10 to boot into Safe Mode, follow these steps if you can boot into Windows:
  1. Restart the computer
  2. Press F8 or Shift + F8 during the boot, but before the Windows logo appears

If F8 or Shift + F8 doesn’t work, go to Windows 8 – F8 key not working or follow the alternative instructions below:

  1. Boot into Windows
  2. Press the Windows and R keys to open Run or search run in windows and Type msconfig.
  3. Type msconfig
  4. Click the Boot Tab
  5. At the Boot options section, check the Safe Boot checkbox and the Minimal checkbox
  6. Click OK

example with images: 

Another method is the combination of Shift and Restart keys at the login window:

  1. Boot into Windows until the login screen appears, but do not login as a user. If you don’t have a login screen showing, boot into the system and click on Settings
  2. Press the Power button
  3. While holding the Shift key, click Restart
  4. At the Choose an option screen, select Troubleshoot
  5. Select Advanced options
  6. Select Startup Settings
  7. Click Restart
  8. Your computer may restart and open the Startup Settings screen automatically
  9. Press the F4 key to boot into Safe Mode.
[mai mult...]