How to schedule Automatic Shutdown in Windows 10

Sometimes you might want to schedule certain tasks, especially if you don’t have enough time to do them manually. If you want to learn more about scheduling on Windows 10, today we’re going to show you how to schedule shutdown on Windows 10.

If you can’t shut down your computer manually for some reason, you might want to schedule a shutdown. This is extremely useful if you leave your computer to do something during the night, or if you have to leave your computer for a few hours while you do some errands.

[mai mult...]
Fix ‘CPU and Disk 100% Usage’ on Windows 11

Your CPU or Disk usage staying at 100% can have several different causes, but there are only a handful of culprits that are confirmed to cause this type of behavior on Windows 11. Here’s a list of scenarios that are known to cause unreasonably high Disk & CPU usage on the latest operating system released by Microsoft:

  • Windows Search interference – The search function on Windows 11 that’s also tasked with indexing new files automatically is a prime suspect for this type of behavior, especially on low-end PCs. If you are willing to trade off file indexing for system stability, you can probably make the CPU and Disk usage go down considerably by disabling the Windows Search service via the Services screen.
  • Insufficient RAM to accommodate Sysmain – If you installed Windows 11 on a computer with low RAM capabilities, chances are Sysmain will force your OS to leverage VRAM in order to pre-load the most-used apps. This will put unnecessary pressure on your HDD which will cause unusually high usage of your disk drive.
  • Native Command Queuing freezes the HDD – It’s clear now that Windows 11 is quite inefficient in allowing traditional HDD drives to leverage native command queuing and will often cause unnecessary system freezes while the disk drive is stuck at 100% usage. To fix this, you’ll need to do a few registry modifications in order to disable native command queuing.

Now that we went over every potential cause that has the potential of keeping your CPU and Disk at 100% usage on Windows 11, let’s go over a couple of fixes that other Windows 11 users have successfully used to alleviate the problem:

Disable Windows Search

Just as with Windows 10, the number one culprit that likely produces these 100% disk usage issues is the search function. Apparently, the way the search function is designed to always index and keep track of new file entries will end up hogging all the system resources on low-end PCs – This affects both the CPU and traditional HDDs.

If the search function is indeed to blame for this particular issue and you’re actively using it, you’re not going to like the resolution. As of now, the only reliable way of stopping file indexing (caused by Windows Search) from hogging all your system resources is to disable the function altogether.

This is done via the Services screen – You’ll need to start by stopping the status of the service prior to modifying the Startup type.

IMPORTANT: Doing this modification essentially means that you’re giving up on the search function on Windows 11. Your operating system will no longer spend time automatically indexing the files that are stored on your PC. This might fix your disk usage problems, but it will also prevent you from using Windows Search again.

If you understand what this modification will do to your operating system and you are ready to enforce this modification, follow the steps below:

  1. Start by pressing Windows key + R key to open up a Run prompt. At the dedicated prompt that just appeared, type ‘services.msc’ inside the text box and press Enter to open up the Services screen.
    Opening the Services screen on Windows 11
  2. Once you’re inside the Services screen, move over to the right-hand side section of the page and scroll down through the list of services until you locate Windows Search.
  3. When you see it, right-click on it and click on Properties from the dedicated context menu.
    Accessing the Properties screen
  4. Inside the Properties screen of Windows Search, start by accessing the General tab using the ribbon menu at the top.
  5. Next, check the Service status and see if it’s currently Running – If it’s set to Running, click on the Stop button below and wait until the service is stopped in its tracks.
  6. After the Windows Search service is finally stopped, change the Status type above from Automatic (Delayed Start) to Disabled.
    Modifying the Windows Search behavior on Windows 11
  7. Once the Windows Search service has been stopped, open Task Manager (Ctrl + Shift + Esc) and see if the Disk and CPU usage has gone down.

If the problem is still persisting, move down to the next potential fix below.

Disable Superfetch (Sysmain)

If you already tried disabling Windows Search or you aren’t ready to enforce this compromise, one additional likely culprit that might hogg all your system resources and keep your CPU and Disk usage at 100% is Superfetch (Sysmain).

Note: The purpose of this service is to increase the performance of your operating system by preloading apps you frequently use into RAM before you need to use them.

While this sounds great in theory and works beautifully on medium & high-end PCs, the same cannot be said for low-end configurations – If you are using a PC with limited RAM (with low frequencies), Sysmain will only make things worse because it will switch the burden from your RAM to VRAM (virtual memory hosted on your HDD or SSD).

This will most likely keep your Disk usage at 100% as your PC struggles to pre-load your most frequently used apps. If you find yourself in this situation and you wish to alleviate the problem, the only tradeoff you can make is to prevent Sysmain from pre-loading your apps – This will serve the purpose of freeing up your system resources (especially your Disk Usage).

You can disable Sysmain via the Services screen. You’ll need to stop it first before modifying the Startup behavior.

  1. Open up a Run dialog box by pressing Windows key + R. Inside the newly appeared dialog box, type ‘services.msc’ and hit Enter to open up the Services screen.
    Opening the Services screen

    Note: If you are prompted by the User Account Control window, you’ll need to accept admin rights by clicking Yes.

  2. Inside the Services screen, use the menu on the right-hand side to find SysMain.
  3. When you find the correct service, right-click on it and click on Properties from the menu at hand.
    Accessing the Properties screen of Sysmain
  4. In the SystMain Properties screen, select the General tab from the menu at the top, then Stop the service using the dedicated button under Service status.
  5. Next, change the Startup type to Disabled before clicking on Apply to enforce the changes and make them permanent.
    Disabling Sysmain
  6. Once Sysmain has been effectively stopped, press Ctrl + Shift + Esc to open Task Manager and check if the Disk usage has gone down.

If the problem is still not yet fixed, follow the next method below for a different way of lowering your Disk usage on Windows 11.

Disable Native Command Queuing for your SATA AHCI Controller

If the first two methods were not effective in your case, let’s turn our attention to your SATA AHCI Controller driver and investigate either a built-in feature (Native Command Queuing) is not actually making your HDD perform worse than it should on Windows 11.

As it turns out, Windows 11 is quite inefficient at allowing HDDs to use native Command Queuing and this failure often results in the drive being stuck at 100%, rendering the PC in a prolonged frozen state. Fortunately, you can fix this issue by doing some Registry Modifications to your SATA AHCI Controller driver so that Native Command Queuing is disabled – This will make your disk drive slightly slower, but it will likely solve any underlying disk usage problem on Windows 10.

Important: This method is only recommended for PC configurations using traditional HDDs. We haven’t been able to confirm this particular issue occurring with SSDs and Ultrafast SSDs.

Follow the instructions below to disable native command queuing for your SATA AHCI Controller in order to bring down the disk usage on your Windows 11 computer:

  1. Press Windows key + R to open up a Run dialog box. Next, type ‘devmgmt.msc’ inside the dialog box that’s currently on screen and hit Enter to open up Device Manager. If you see the User Account Control window, grant administrative access by clicking on the Yes box.
    Opening Device Manager on Windows 11
  2. Once you’re inside Device Manager, scroll down through the list of devices and expand the drop-down menu associated with IDE ATA / ATAPI controllers.
  3. Next, right-click on your Standard SATA AHCI Controller driver and choose Properties from the context menu that just appeared.
    Accessing the Standard AHCI Controller driver properties

    Note: If you’re using a dedicated driver for your ATA / ATAPI controllers, the name of your controller might be different. For example, the name for Intel controller drivers is Intel(R) xxx Series Chipset Family SATA AHCI Controller.

  4. Once you’re inside the Properties screen, select the Details tab at the top, then change the drop-down menu of Property to Device Instance path.
  5. Next, right-click directly on the path under Value and hit Copy from the context menu.
    Copying the value to your clipboard
  6. Now that you have the correct path safely copied onto your clipboard, press Windows key + R key to open up a dialog box. Next, type ‘regedit’ and hit Ctrl + Shift + Enter to open up the Registry Editor with admin access.
    Opening the Registry Editor on Windows 11
  7. When you see the User Account Control prompt, click Yes to grant admin access.
  8. Once you’re inside the Registry Editor, use the navigation at the top to land in the following location:
    Computer\HKEY_LOCAL_MACHINE\SYSTEM\ControlSet001\Enum\PCI

    Note: You can either navigate to this location yourself or you can paste the location directly into the navigation bar to get there instantly.

  9. Once you’re inside the correct location, go to the navigation bar at the top, select the last part (PCI) and paste the path that you currently copied to your clipboard at step 5.
    Navigating to the location of SATA AHCI Driver Registry keys
  10. With the pat successfully pasted, hit Enter, then move back to the left-hand side many and expand the Device Parameters key.
  11. Next, expand the Interrupt Management key and select the MessageSignaledInterruptProperties key.
    Navigating to the correct location via Registry Editor
  12. Next, move over to the right-hand section of Registry Editor and double-click on MSISupported.
  13. Next, set the Base of MSISupported to Hexadecimal, then set the Value data to 0 to effectively disable native command queuing.
  14. Finally, close Registry Editor and restart your computer in order to allow the changes to take effect.
  15. After your computer boots back up, open up Task Manager (Ctrl + Shift + Esc) and see if the resource usage has gone down.
[mai mult...]

Windows 10 Stuck on “Repairing Disk Errors”

The ‘Repairing disk errors‘ screen is often associated with a systemic corruption issue a hardware issue or a software conflict that’s affecting the booting sequence. This screen typically appears after an unexpected system BSOD crash.

We’ve managed to identify a series of common scenarios that might be the end cause of this stuck screen. Check out a few potential scenarios that might cause this behavior:

  • OS File Corruption  – The most desirable culprit that might cause the repair function on Windows 10 to remain stuck on the Repairing Disk Error screen is an underlying OS file corruption issue affecting the CHKDSK utility. If you find yourself dealing with this issue, forcing an Automatic Repair operation from a Windows CD or USB drive should allow you to fix the issue. In more serious circumstances, you might need to go for a repair install or clean install procedure.
  • Software conflict / Incomplete installation – If you started to see this problem after your PC crashed during the installation of a pending update or driver, chances are you’re dealing with some kind of conflict that is affecting the booting sequence. If this scenario is applicable, you should use the System Restore utility via the Recovery menu to bypass the problematic screen.
  • Failing HDD / SSD Drive – If you’re dealing with a hardware issue, none of the fixes recommended in this article will be effective in your case. In this case, you’ll need to test the health of your HDD or SDD and order a replacement if a critical hardware issue is discovered.

To simplify things for you, we’ve created a couple of sub-guides that will hopefully help you get to the bottom of the ‘Repairing disk errors‘ screen:

[mai mult...]

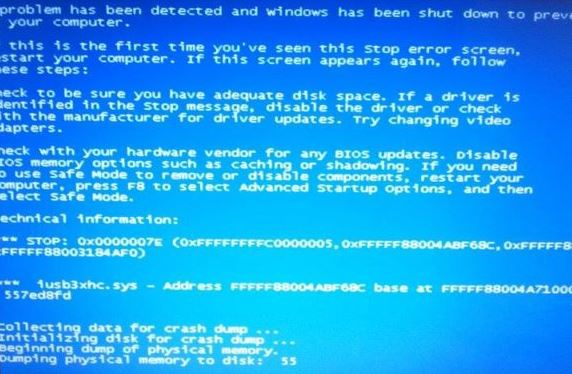
The iusb3xhc.sys blue screen error

The blue screen of death or BSOD is always an unwelcome sight. BSODs appear when Microsoft Windows encounters a critical error from which it can’t recover, usually the result of low-level software (or drivers) crashing or faulty hardware.

Blue screens are generally caused by problems with your computer’s hardware or issues with their hardware driver software. Sometimes, they can be caused by issues with low-level software running in the Windows kernel. Regular apps usually won’t be able to cause blue screens. If an app crashes, it will do so without taking the operating system out with it. A blue screen occurs when Windows encounters a “STOP Error.” This critical failure causes Windows to crash and stop working. The only thing Windows can do at that point is to restart the PC. This can lead to data loss, as programs don’t have a chance to save their open data.

When a blue screen occurs, Windows automatically creates a “minidump” file that contains information about the crash and saves it to your disk. You can view information about these minidumps to help identify the cause of the blue screen.

Blue screens also look a bit different, depending on what version of Windows you’re running. In Windows 7 and previous versions, the blue screen looked much like a terminal screen, displaying all manner of information. In Windows 8 and 10, blue screens are much simpler. That’s really not as big a deal as it sounds, though. Even in previous versions, blue screens tended to go by fast enough that reading that information was difficult, anyway. And there are easier ways to get all the details you need for troubleshooting.

What is causing the iusb3xhc.sys BSOD crashes?

What is causing the iusb3xhc.sys BSOD crashes

We investigated this particular issue by looking at various user reports and the repair strategies that are commonly being used to fix this particular error message. As it turns out, there are multiple causes that could lead to a BSOD of this kind. Here’s a shortlist of potential culprits that can cause constant iusb3xhc.sys blue screens:

Corrupted / Incompatible USB Host Controller drivers – As it turns out, this particular issue can also occur due to a corrupted or incompatible Host USB Controller driver. If this scenario is applicable, you should be able to resolve the issue by uninstalling the Host USB controller drivers via Device Manager and reinstalling them at the next system startup.

Intel Chipset drivers are not installed – Missing Intel Chipsets can also be a potential cause for this issue – especially if you’re using a motherboard that is designed to work with these drivers. In this case, you should be able to resolve the issue by using the Intel Support Assistant utility to install the missing firmware.

System file corruption – System file corruption is another possible cause that might lead to unexpected BSOD crashes related to the iusb3xhc.sys file. If this scenario is applicable to your particular case, you can resolve the issue by fixing the corrupted system file with a utility like DISM or SFC.

Overprotective security suite – Judging from various user reports, this particular issue can also be caused by an AV or firewall that is interfering with the host controller driver. In most cases, Karsperksly is singled out as a culprit capable of quarantining a dependency of the Host controller driver. In this case, you can resolve the issue by uninstalling the 3rd party security suite and removing any remnant files.

Cached memory issue – Another possibility is that you’re dealing with badly cached data regarding the usage of your memory. If this scenario is applicable, you will be able to resolve the issue simply by opening the case of your unit and taking out the CMOS battery.

[mai mult...]

How to fix the CACHE MANAGER error in Windows 10

Microsoft is always working on Windows 10 and it releases new features through Windows Update. In addition to new features, many bug fixes are released, and many updates are fixing different compatibility issues.  Since CACHE_MANAGER BSoD can be caused by outdated or incompatible hardware, it’s always good to keep your Windows 10 up to date with the latest updates.  By downloading Windows updates regularly you’ll reduce the chance for any incompatibility issues and BSoD errors, so we strongly advise you to update Windows 10 as often as you can.

3. Run the BSOD Troubleshooter

Open the Settings app and go to Update & Security section.   Select Troubleshoot from the menu on the left. Select BSOD from the right pane and click Run the troubleshooter.   Follow the instructions on the screen to complete the troubleshooter. Note: Windows 10 features a handy built-in troubleshooter that can help you with various issues, including BSOD errors. So, we can try it and see if we have any luck.

4. Update your drivers

Many BSoD errors are caused by outdated drivers that aren’t fully compatible with Windows 10. Searching for drivers on your own can be time-consuming.   Using an automatic driver updater will certainly save you from the hassle of searching for drivers manually, and it will always keep your system up to date with the latest drivers.  ⇒ Get DriverFix

5. Run the SFC scan Right-click on the Windows search and type cmd.

Press Enter: sfc/scannow  CACHE MANAGER Windows 10 error Wait until the process is done (it may take a while). If the solution is found, it will automatically be applied. Now, close the Command Prompt and restart your computer. Note: SFC is a command-line scanning tool that scans your computer for potential issues, and resolves them along the way. A lot of users have reported that the SFC scan can be useful when dealing with BSOD issues.

5. Run DISM

1. Standard way  Open Command Prompt as administrator.   Paste the following command and press Enter: DISM /Online /Cleanup-Image /RestoreHealth Wait until the scan is finished. Restart your computer and try updating again. 2. With the Windows installation media  Insert your Windows installation media. Open Command Prompt (Admin). In the command line, type the following commands and press Enter after each: dism /online /cleanup-image /scanhealth dism /online /cleanup-image /restorehealth

Now, type the following command and press Enter: DISM /Online /Cleanup-Image /RestoreHealth /source:WIM:X:SourcesInstall.wim:1 /LimitAccess Make sure to change an X value with the letter of the mounted drive with Windows 10 installation. After the procedure is finished, restart your computer. Note: And the final troubleshooting tool we’re going to try is DISM. This is perhaps the most powerful troubleshooter, as it deploys the system image all over again.  Need more details on how to use DISM in Windows 10? Find out how it’s done right here.

6. Uninstall problematic software/antivirus 

BSoD errors such as CACHE_MANAGER can be caused by both software and hardware, and in order to fix these errors, it’s recommended that you find the problematic software and remove it.  If this error started appearing recently, you might want to uninstall any recently installed software in order to fix it.  Your antivirus and firewall can be the most common cause for BSoD error, so in order to fix this issue, it’s advised that you temporarily uninstall your antivirus software.  Almost any antivirus program can cause these types of errors to appear, so make sure to uninstall any antivirus software that you have installed besides Windows Defender.  Few users reported that even after uninstalling certain antivirus software the CACHE_MANAGER error wasn’t fixed.  This is probably due to remaining antivirus files and registry entries, and in order to completely remove antivirus software you have to use the dedicated uninstaller tools.  Most antivirus companies host the uninstaller tools on their websites and you can download and use them for free.

7. Run chkdsk Open Command Prompt as administrator

When Command Prompt starts, enter the chkdsk /f /r C: and press Enter to run it. We have to mention that you’ll have to perform this scan for every hard drive partition so be sure to replace C with a matching hard drive letter.  chkdsk-cmd Note: CACHE_MANAGER BSoD error can be caused by your hard drive, so it’s recommended to perform a chkdsk scan.  8. Check your hardware   If you installed any new hardware recently make sure that you remove it or replace it. The newly installed hardware might not be fully compatible with your motherboard.  If you didn’t install any new hardware recently we suggest that you check your RAM since it’s the most common cause for BSoD errors.  To check your RAM you’ll need to use tools such as MemTest86+. Simply put the tool onto a USB flash drive and boot your computer from it. Let MemTest86+ run for a couple of hours.

If you have more than one RAM module installed, you might want to test them one by one until you find the faulty one.  In addition to faulty RAM, your hard drive can also cause CACHE_MANAGER BSoD error, so make sure that your hard drive is properly connected.  If both RAM and hard drives are working properly, make sure to check if other hardware is working correctly.  Blue Screen of Death errors such as CACHE_MANAGER BSoD error can be troublesome, but you can easily fix it by using some of our solutions.  In the worst-case scenario, you might have to replace your hard drive or try if your hard drive works on a different computer. Let us know what solutions worked best for you.

[mai mult...]

How To Fix The ‘Page Fault In Nonpaged Area’ Error In Windows 10

The Windows 10 error “Page Fault In Nonpaged Area” usually results in a BSOD and can be quite frustrating to troubleshoot. The error is caused by Windows not finding a file within memory that it expects to find. If you need to fix this error, well, this is how to do it. The root cause can be software or hardware, often an aborted Windows update or driver conflict from the software side or faulty RAM on the hardware side. Let’s check software first.

Fix Windows 10 error Page Fault In Nonpaged Area
If your error is typical, it will result in random BSOD crashes but between crashes, the computer will be usable. Let us use those moments to troubleshoot. First check the hard drive for errors.

  • Open a CMD window as an administrator
  • Type or paste ‘chkdsk /f /r’ and hit Enter.
  • Allow the process to complete.
  • Then perform a system file check.
  • Open a CMD window as an administrator.
  • Type or paste ‘sfc /scannow’ and hit Enter.
  • Allow the process to complete.

It might also be useful to check Windows updates and drivers as they are often the cause of Page Fault In Nonpaged Area errors.

  • Navigate to Settings, Update & security.
  • Click ‘Check for updates’ in the Windows update tab.
  • Allow the process to complete.
  • Navigate to Control Panel, Hardware and Sound, Device Manager.
  • Select hardware, right click and ‘Update Driver Software’. Make sure you check graphics and audio drivers as well as any third party webcam, printer and other drivers.
  • Reboot and retest.
  • If the BSOD still occurs, let us check the Windows page file.


  • Right click ‘This PC’ in Windows Explorer and select Properties.
  • Click ‘Advanced system settings’.
  • In the Advanced tab click Settings in the Performance box.
  • Click Change in the Virtual memory box and uncheck ‘Automatically manage paging files for all drives’.
  • Set a custom size for the page file.
  • Click Ok.
  • Reboot.

Finally, if none of those software methods work, it’s time to check your RAM. If your computer has multiple sticks of RAM, remove one and retest. If the fault persists, change the memory slot and retest. If the error keeps occurring, consider replacing your RAM.

[mai mult...]