
- Sign in to the computer as an administrator. If you don’t have an administrator account, see Manage user accounts in Windows to learn how to create one.
- In the Search box on the taskbar, type msconfig and select System Configuration from the list of results.

Important: If the computer is connected to a network, network policy settings might prevent you from following these steps. Only use the System Configuration utility to change the advanced boot options on the computer with guidance from a Microsoft support engineer. Using the System Configuration utility might make the computer unusable.
- On the Services tab of System Configuration, select Hide all Microsoft services, and then select Disable all. Select Apply.

- On the Startup tab of System Configuration, select Open Task Manager.

- On the Startup tab in Task Manager, for each Enabled startup item, select the item and then select Disable. (Keep track of which items have been Disabled. You will need to know this later)
- Close Task Manager.
- On the Startup tab of System Configuration, select OK. When you restart the computer, it will be in a clean boot environment. You can now try to troubleshoot your problem by trying the troubleshooting steps in the section, install, uninstall, or run application.
Warning: Your computer might temporarily lose some functionality while in a clean boot environment.
How to perform a clean boot on Win 11
- Sign in to the computer as an administrator. See Manage user accounts in Windows to learn more about configuring a user account as an administrator.
- Select Search, type msconfig, and then select System Configuration from the list of results.

Important: If the computer is connected to a network, network policy settings might prevent you from following these steps. Only use the System Configuration utility to change the advanced boot options on the computer with guidance from a Microsoft support engineer. Using the System Configuration utility might make the computer unusable.
- On the Services tab of System Configuration, select Hide all Microsoft services, and then select Disable all. Select Apply.

- On the Startup tab of System Configuration, select Open Task Manager.

- On the Startup apps tab in Task Manager, for each Enabled startup item, select the item and then select Disable. (Keep track of which items have been Disabled. You will need to know this later.)
- Close Task Manager.
- On the Startup tab of System Configuration, select OK. When you restart the computer, it will be in a clean boot environment. You can now try to troubleshoot your problem by trying the troubleshooting steps in the section,install, uninstall, or run on application
Warning: Your computer might temporarily lose some functionality while in a clean boot environment.
- Once you are done troubleshooting your problem and want to return your computer to a normal startup, follow the steps in the section, Reset the computer after the clean boot.
How to identify your device’s COM Port with Device Manager
On Windows 10 & 11, right-click on the Start button and select “Device Manager,” or find it using the search bar. The Device Manager shows all the devices connected to your PC, organized into categories.

To see all the COM ports on your PC, look for the section titled “Ports COM & LPT.” Your RS232 or RS232-USB device should appear here with its port number labeled “(COM#).”
- For PCs with higher Windows security settings, you may need to log in as an Administrator.
- The “Intel” port is not a usable COM port.
- If your RS232 device is connected to your computer via USB, you can try identifying the COM port by disconnecting and then reconnecting the cable while observing which item disappears and reappears correspondingly.
- If there is no “Ports COM & LPT” section, then you do not have any COM ports installed. For USB-connected RS232 devices (see below), it’s possible that you do not have the correct drivers installed for the device or adapter, or that the adapter is not working properly. To remedy this, try installing the driver or contacting the manufacturer.
If you are using an adapter or USB-connected RS232 device
- Many RS232 scales, balances, and other industrial devices connect to a USB port using a built-in RS232-to-USB converter/adapter. This converter usually comes with a driver that converts the PC’s USB port into a virtual RS232 COM port, typically with a port number above COM 3.
- If you switch the USB port that the adapter is connected to, Windows may assign a different COM port number to it. To avoid this, we recommend keeping the adapter connected to the same USB port. If you need to change the COM port number, go to the Windows Device Manager, right-click the COM port and select “Properties.” Then, navigate to “Port Settings” > “Advanced” and change the COM port number to an available one.
- If a driver update is available for your adapter, you can apply it here by right-clicking on its COM port and selecting “Update Driver”.
What is DDoS Attack?
A DDoS attack is essentially the legitimate use of an online service taken too far. For example, a website may be capable of handling a certain number of requests per minute. If that number is exceeded, then the website’s performance is degraded, or it may be rendered completely inaccessible. This overload may be caused by an attack or even legitimate use, such as an e-commerce site being overwhelmed on Black Friday or a ticket sales platform going down when sales for a popular event are opened.
DDoS attacks are capable of overwhelming a target at various levels. For example, a web application may have a maximum number of requests that it can handle. Alternatively, the server that it is running on may have a limit on the amount of simultaneous connections that it can manage. A corporate network likely has bandwidth restrictions that could be overwhelmed by an attacker. Exceeding any of these thresholds will result in a Dos attack — or a DDoS attack if the attack uses multiple IP addresses — against the system.
Types of DDoS Attacks
DDoS attacks are an evolving threat, and a variety of techniques can be used to carry them out. Some examples of common DDoS threats include:
- Amplification Attacks: Some services, such as DNS, have responses that are much larger than the corresponding request. In DDoS amplification attacks, attackers will send a request to a DNS server with their IP address spoofed to the IP address of the target, causing the target to receive a large volume of unsolicited responses that eat up resources.
- Bandwidth Saturation: All networks have a maximum bandwidth and throughput that they can maintain. Bandwidth saturation attacks attempt to consume this bandwidth with spam traffic.
- Cloud Resource Exploitation: Scalability is one of the hallmarks of cloud computing. By exploiting this fact, DDoS attackers can perform large-scale attacks against a target system.
Cybercriminals are increasingly performing “degradation of service” attacks in which a target is sent a lower volume of traffic that decreases the accessibility of the service without knocking it completely offline. These attacks have become popular because they are more difficult for an organization to detect than a full-scale DDoS attack.
DDoS Threats
DDoS attacks pose a serious threat to companies of all sizes and in all industries. Some of the potential impacts of a successful attack include:
- Financial Losses: A successful DDoS attack can cause decreased productivity, downtime, and potential violation of SLAs as well as costing money to mitigate and recover.
- Operational Disruption: A DDoS attack may render an organization unable to perform core operations, or it may degrade customers’ ability to access its services.
- Reputational Damage: DDoS attacks may cause churn as customers choose competitors if they can’t reach an organization’s website or distrust its ability to provide products and services.
In recent years, the threat of DDoS attacks has grown significantly. One contributor is the greater availability of DDoS attack tools, making it easier for anyone to carry out an attack. Also, botnets have grown more popular and powerful, enabling them to perform record-breaking attacks to take down websites or entire networks. As DDoS attacks grow more common, larger, and more sophisticated, they are increasingly difficult and costly for an organization to mitigate.
What is MAC filtering and how to disable it
To enable MAC address filtering, you need to you know your router’s admin login, as this enables you to log in to the WiFi router console. Once logged in as an admin, you can configure your MAC address whitelists and blacklists.
To locate your router’s username and password, check the back of your router. It should be listed there. If, however, you don’t have easy access to your router or the credentials aren’t listed there, check the master list of router logins to find your system’s username and password. You can reset you’re router password if necessary.
Once you’re logged in, you will likely see connected devices in the admin console. Most modern routers display the physical address of devices there. Then, you can go into the router’s settings and enter the MAC addresses where they belong. Though each router will have a slightly different procedure for entering and finalizing MAC address filters, this is the general process that you’ll follow.
- To configure filtering on a Linksys router once you’ve reached the router’s settings, go to Wireless > Wireless MAC Filter.
- To configure filtering on a Netgear router once you’ve reached the router’s settings, go to Advanced > Security > Access Control.
- If you have a D-Link router, navigate to Advanced > Network Filter.
Again, the process for disabling media access control address filtering will vary by router or system. However, the general process for disabling MAC address filtering is as follows:
- Sign into your router’s administrator page using your router’s username and password
- Check the MAC filter settings and select Allow as the default mode
- Select all devices from the list of exceptions, which is the whitelist
- Delete the list.
Once you disable MAC filtering, your router will no longer sort traffic based on permitted and denied addresses.
[mai mult...]How to add new user account on Mac
Adding a new user account on a Mac allows multiple users to have their own customized environment:
- Open System Preferences:
- Click on the Apple menu in the top left corner and select “System Preferences.”
- Go to Users & Groups:
- In the System Preferences window, click on “Users & Groups.”
- Unlock the Settings:
- Click the lock icon in the bottom left corner and enter your administrator password to make changes.
- Add a New User:
- Click the “+” button below the list of users.
- Choose Account Type:
- Select the type of account you want to create (Standard, Administrator, Managed with Parental Controls, or Sharing Only).
- Enter User Information:
- Enter the new user’s full name, account name, and password.
- Optionally, you can add a password hint.
- Create the Account:
- Click “Create User” to add the new account.
- Set Up the Account:
- Log out of your account and log in to the new user account to set it up.
- Follow the setup assistant to configure the user’s preferences.
- Customize User Settings:
- Customize the new user’s desktop, applications, and other settings as needed.
- Set Up Parental Controls (if applicable):
- If the account is for a child, set up parental controls by selecting the user and clicking “Open Parental Controls”.
- Manage Accounts:
- Return to “Users & Groups” to manage user accounts, change passwords, or delete accounts as needed.
How to reset network settings on Mac
The first way to reset a Mac’s network settings is to delete your Wi-Fi connection and then add it again.
Macs running macOS Ventura (13) and earlier will select System Preferences > Network > Wi-Fi connection > – (Minus) sign > Apply.
- Click the Wi-Fi icon in menu bar.
:max_bytes(150000):strip_icc():format(webp)/001_reset-network-settings-on-mac-5184072-8a2df70ce23140b4840713440a0b7006.jpg)
-
Choose Wi-Fi Settings.
You can also get to this area from Apple icon > System Settings > Network > Wi-Fi.
:max_bytes(150000):strip_icc():format(webp)/002_reset-network-settings-on-mac-5184072-82054f43a0e64b3bbf42514fba247325.jpg)
-
Select Details beside the network to forget.
-
:max_bytes(150000):strip_icc():format(webp)/003_reset-network-settings-on-mac-5184072-a10316d0d1fa4b5e85f2b1516cdaece4.jpg)
-
Choose Forget This Network at the bottom left.
-
Click Remove to confirm the deletion. Make sure that you have your Wi-fi login information. You will need to re-enter it after the next step.
-
Finally, re-add your Wi-fi connection from the Wi-Fi menu.
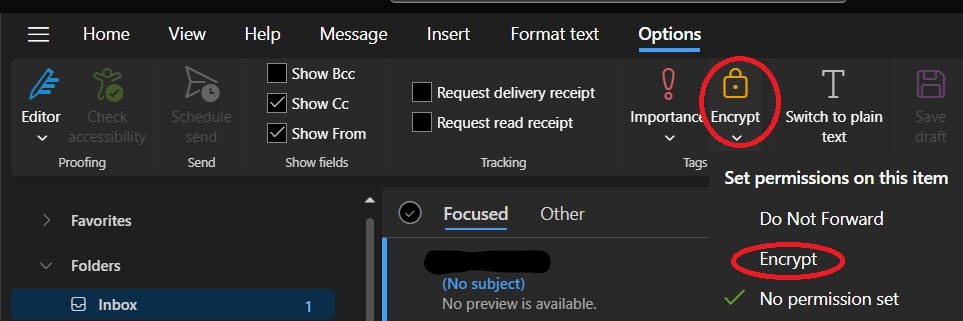
How to send an encrypted mail in outlook?
- Create a New Email
- Select Options from the Ribbon
- Click Encrypt (or Permissions)
- Choose Encrypt-Only or another option from the dropdown menu
Outlook on the Web (OWA)
- Create a new message
- Select Options from the Ribbon
- Select Encrypt, and then Encrypt or another option from the dropdown menu
Outlook client for Mac
- Create a new email
- Select the Encryption option from the message toolbar
- If you don’t see the option of Encryption, select the three dots to add items to your toolbar
- Drag the Encryption button to your toolbar and then hit Done.
How to check if your computer is using all CPU cores?
To determine if your computer is effectively utilizing all CPU cores, you can use several methods depending on your operating system:
Windows:
1> Task Manager:
- Right-click on the taskbar and select “Task Manager” or press Ctrl * Shift * Esc
- * Go to the “Performance” tab
- * Under “CPU,” you should see a graph showing usage for each core. If all cores are active, you’ll see activity across multiple graphs (one per core)
- 2> Resource Monitor:
- * Open “Resource Monitor” by searching for it in the Start menu
- * Navigate to the “CPU” tab
- * Look at the “CPU Usage” section to see how much of each core is being utilized.
- macOS:
- 1> Activity Monitor:
- * Open “Activity Monitor” (usually found in Applications > Utilities)
- * Click on the “CPU” tab
- * You’ll see a graph displaying CPU usage. Each core is represented separately. If all cores are in use, you’ll see activity across multiple cores.
- Linux (using command-line tools):
- 1> htop:
- * Install htop if it’s not already installed (sudo apt install htop on Debian-based systems).
- * Launch htop from the terminal.
- * You’ll see a detailed view of CPU usage, including individual core usage.
- 2> top:
- * Run top in the terminal.
- * Press 1 (the number one) to display individual CPU core usage.
- Checking in all cases:
- * Activity Indicators: Most monitoring tools will show real-time activity for each core. If you see spikes or sustained usage across multiple cores, it indicates that your system is utilizing all available CPU cores.
- * CPU Load: A high overall CPU load (close to 100% across all cores) during intensive tasks like rendering, compiling, or running multiple applications simultaneously suggests that all cores are actively used.
By using these methods, you can effectively determine if your computer is utilizing all CPU cores and monitor how they are being utilized. This information is particularly useful for ensuring that your system is performing optimally under heavy computational loads.
[mai mult...]How to add an Email Account to Microsoft Outlook?
Add an Email Account to Outlook (New Outlook)
- Select View settings from the View tab
- Select Email accounts under Accounts
- Select Add Account and then type in your email address and click Connect.

4. If requested, enter your account password and click Done.
Add an Email Account to Classic Outlook
1. Go to File > Add Account

2. Click Connect after entering your email address.

3. If asked, reenter your password and choose OK > Finish to access your Outlook email account.
Link Email Account in Windows
Microsoft enables you to link your iCloud, Google, Yahoo,Outlook, and Office 365 accounts in Windows.
1. Navigate to Settings > Accounts > Email & accounts. Then, choose Add account.

2. Microsoft enables you to connect your Office 365, Google, Yahoo, and iCloud accounts. Select the service you wish to add, then enter your username and password to sign into the account.

3. Windows will display the data that the Mail, Contacts, and Calendar Windows programs require access to. To allow the required permissions, click the Agree button.
