Cum putem afla furnizorul unui numar de telefon folosind Python
Pentru a afla furnizorul de servicii de telefonie al unui numar de telefon urmam pasii de mai jos:
[mai mult...]Soluții pentru problemele tale IT

Pentru a afla furnizorul de servicii de telefonie al unui numar de telefon urmam pasii de mai jos:
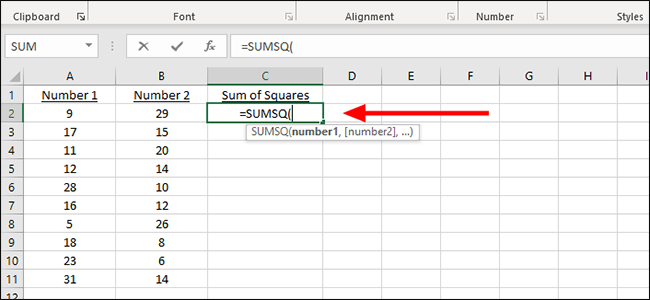
[mai mult...]Start a new column anywhere in an Excel spreadsheet and label it. It’s here that we’ll output the solution of our squares. The squares don’t have to be next to each other, nor does the output section; it can be anywhere on the page.

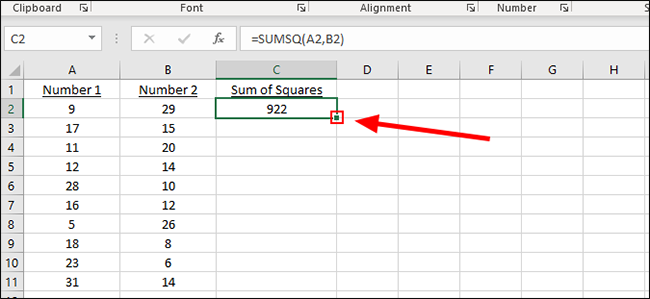
Type the following formula into the first cell in the new column: =SUMSQ(
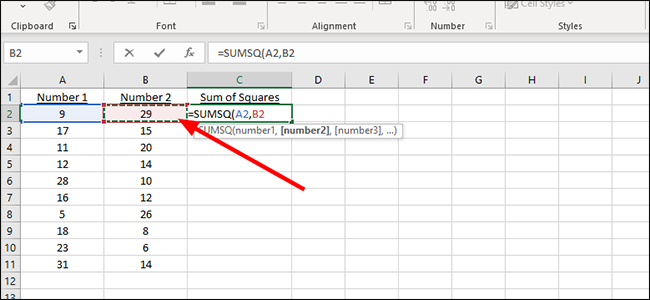
From here you can add the letter and number combination of the column and row manually, or just click it with the mouse. We’ll use the mouse, which autofills this section of the formula with cell A2.

Add a comma and then we’ll add the next number, from B2 this time. Just type in B2 to the formula, or click the appropriate cell to autofill it.
Close the parenthesis and press “Enter” on the keyboard to display the sum of both squares. Alternatively, if you can keep going here, adding additional cells by separating each with a comma within the formula.
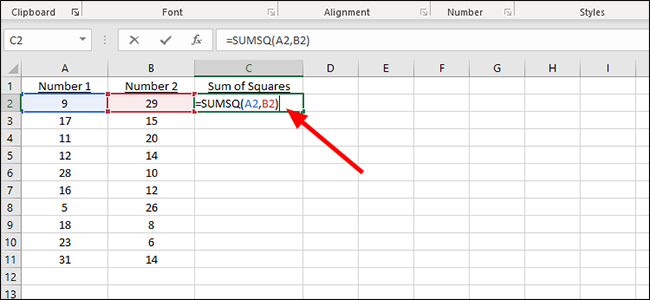
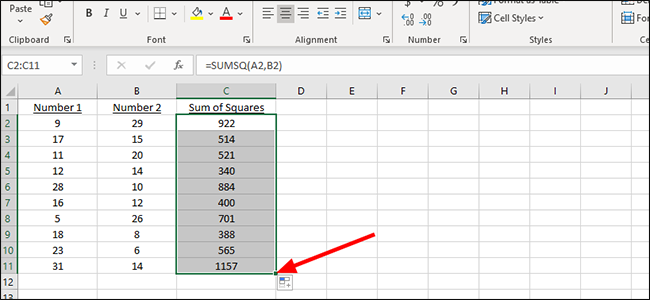
To apply the formula to additional cells, look for the small filled square in the cell that contains the solution to our first problem. In this example, it’s C2.
Click the square and drag it down to the last row of number pairs to automatically add the sum of the rest of the squares.
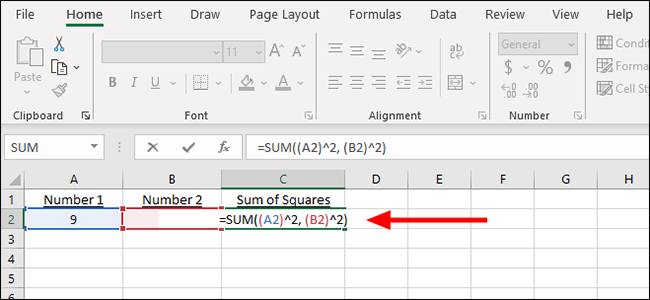
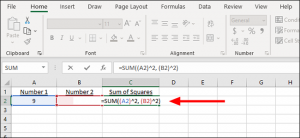
In our “Sum of Squares” column we created in the previous example, C2 in this case, start typing the following formula:
=SUM((A2)^2,(A3)^2)
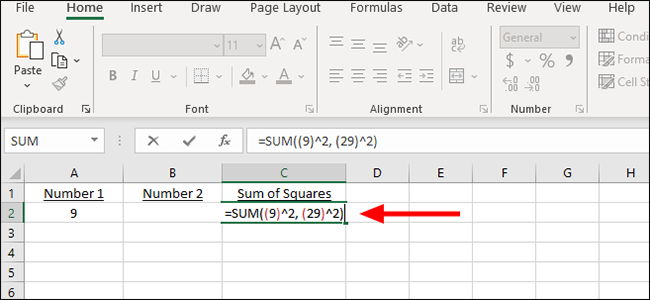
Alternatively, we can just add the numbers instead of the cells to the formula, as either way gets us to the same place.
That formula looks like this:
=SUM((9)^2, (29)^2)
You can alter these formulas as needed, changing the cells, adding additional numbers, or finding the sum of squares that aren’t even in your workbook, for example. And while it’s easier to follow along with the above tutorial, using the SUMSQ formula, to find the solution for multiple squares, it’s often easier to just type out a quick formula like this if it’s not something you’ll be repeating throughout the workbook.
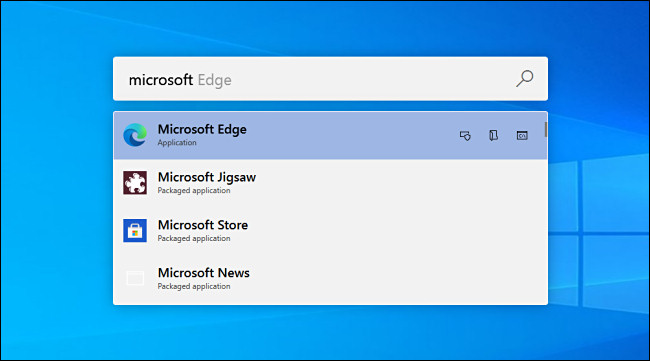
[mai mult...]On a Mac, a system-wide search and launch feature called Spotlight is only a shortcut away with Command+Space. Thanks to PowerToys, Windows 10 can have a similar search and run bar as well when you hit Alt+Space. Here’s how to set it up.
With a PowerToys module called PowerToys Run, you can press Alt+Space and see a quick pop-up search bar appear from anywhere in Windows 10. Once it appears, you can search for applications and documents and run or open them quickly. To get this handy search bar, you’ll need to install PowerToys, a free collection of Windows 10 utilities from Microsoft.
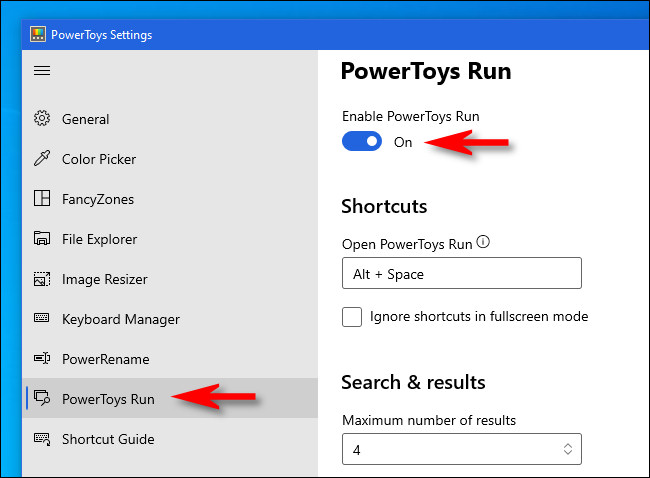
Once PowerToys is installed, launch PowerToys Setup and select “PowerToys Run” in the sidebar. Then make sure that “Enable PowerToys Run” is switched on.
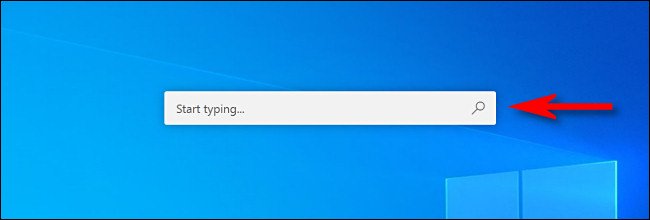
After that, close PowerToys Setup and try out your new search bar. Press Alt+Space and a minimalist search bar will appear in the center of your screen.
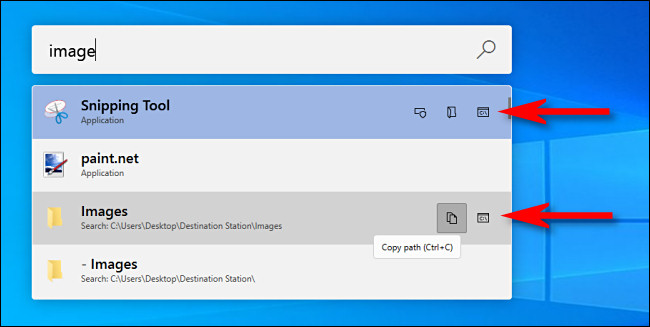
Once you type in a search, you can hit Enter to immediately launch (or open) the first result, or you can choose from the results in the list with your mouse or cursor keys and hit Enter.

You can also use several “power user” buttons that appear beside each result to perform certain handy actions. Here’s what they do.
But don’t just think of PowerToys Run as a glorified search bar. You can also use the PowerToys Run box as a replacement for the Windows+R “Run” dialog. Just pull up the box with Alt+Space, type a command, and hit Enter, and the program will run instantly.

It’s just one more way that PowerToys delivers a more convenient and powerful Windows 10 experience. If you like PowerToys Run, it’s worth taking the time to explore other PowerToys features. New ones are often added to the suite over time.
[mai mult...]Laptop-urile oferă puterea unui PC, dar uneori doriți un desktop pentru un ecran mai mare, o tastatură mai mare și un mouse puternic. Iată cum să vă transformați laptopul într-un pseudo desktop.
[mai mult...]Renewing your IP address often fixes minor glitches and connectivity issues. Your Mac will ask your DHCP server—often your Wi-Fi router—for a new IP address and connect using either the same one or a new one, depending on the details your router provides.
[mai mult...]With a focus on privacy, you might not want those you’re communicating with on Signal to know you’ve looked at their text message. Fortunately, you can turn off read receipts and disable the indicator that shows that you have seen their communication.
Read receipts, a popular feature on other messaging apps like WhatsApp and iMessage, appear as white indicator bubbles on messages that you send in Signal. If you turn off read receipts and block the person on the other end from seeing that you’ve read their message, you lose the ability to see if they’ve read your message.
[mai mult...]