Cum schimbam partitia in Command Prompt folosind comanda CD
De obicei pentru a schimba o partitie in CMD folosim comanda litera partitiei (de exemplu D) urmata de :.

Dar putem ajunge la acelasi rezultat folosind si comanda change directory (cd).

Soluții pentru problemele tale IT

De obicei pentru a schimba o partitie in CMD folosim comanda litera partitiei (de exemplu D) urmata de :.
Dar putem ajunge la acelasi rezultat folosind si comanda change directory (cd).
By taking control of your microphone settings, you’re not just affecting the sound – you’re shaping how listeners perceive you and your content. It’s a simple step that can take your voice from background noise to center stage.
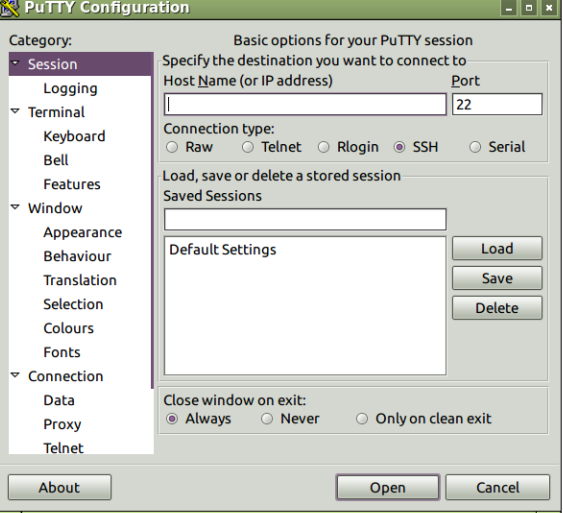
Before connecting to a serial port, you must start PuTTY as a superuser (or as root user) using following command. This command opens the putty configuration dialog box.
$ sudo putty
In the above dialog box:
Steps 1-3 opens a new window to receive serial data from the DRIVE platform.
[mai mult...]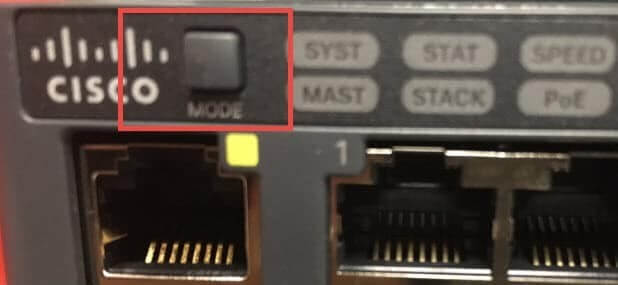
The following will be prompted :
Using driver version 1 for media type 1 Base ethernet MAC Address: 4c:30:2d:81:ef:80 Xmodem file system is available. The password-recovery mechanism is enabled. The system has been interrupted prior to initializing the flash filesystem. The following commands will initialize the flash filesystem, and finish loading the operating system software: flash_init boot switch:
2. Run the following command to initialize the flash file system: Switch:flash_init
switch: flash_init
Initializing Flash…
mifs[2]: 10 files, 1 directories
mifs[2]: Total bytes : 1806336
mifs[2]: Bytes used : 612352
mifs[2]: Bytes available : 1193984
mifs[2]: mifs fsck took 1 seconds.
mifs[3]: 0 files, 1 directories
mifs[3]: Total bytes : 3870720
mifs[3]: Bytes used : 1024
mifs[3]: Bytes available : 3869696
mifs[3]: mifs fsck took 0 seconds.
mifs[4]: 5 files, 1 directories
mifs[4]: Total bytes : 258048
mifs[4]: Bytes used : 9216
mifs[4]: Bytes available : 248832
mifs[4]: mifs fsck took 0 seconds.
mifs[5]: 5 files, 1 directories
mifs[5]: Total bytes : 258048
mifs[5]: Bytes used : 9216
mifs[5]: Bytes available : 248832
mifs[5]: mifs fsck took 1 seconds.
— MORE —
mifs[6]: 566 files, 19 directories
mifs[6]: Total bytes : 57931776
mifs[6]: Bytes used : 28429312
mifs[6]: Bytes available : 29502464
mifs[6]: mifs fsck took 21 seconds.
…done Initializing Flash.


  3.  Delete the config.text file from the flash directory:
switch: del flash:config.text
Are you sure you want to delete “flash:config.text” (y/n)?y
File “flash:config.text” deleted
And Finally, Delete the vlan.dat file from the flash directory and reboot the system
switch: del flash:vlan.dat
Are you sure you want to delete “vlan.dat” (y/n)?y
File “flash:vlan.dat” deleted
To reboot the system:
switch: boot
Loading "flash:c2960s-universalk9-mz.122-58.SE2.bin"…
— System Configuration Dialog —
Enable secret warning
———————————-
In order to access the device manager, an enable secret is required
If you enter the initial configuration dialog, you will be prompted for the enable secret
If you choose not to enter the intial configuration dialog, or if you exit setup without setting the enable secret,
please set an enable secret using the following CLI in configuration mode-
enable secret 0 <cleartext password>
———————————-
Would you like to enter the initial configuration dialog? [yes/no]:
% Please answer 'yes' or 'no'.
| Configure Cisco switch | |
|---|---|
| Execution mode | Script execution mode |
| Description | This Configlet is used to configure Cisco switch along with basic configuration commands |
| Configlet content | configure terminal hostname cisco_switch_x interface vlan ip address 172.16.29.10 255.255.0.0 exit enable secret P@$$w0^d username admin privilege 15 password P@$$w0^d ip default-gateway 172.16.29.1 show ip route ip route 172.16.29.59 255.255.0.0 show running-config interface fastethernet 0/1 description Development VLAN duplex full exit exit write memory |
The above table shows how the configuration commands will appear on Network Configuration Manager’s Configlet command tab.
[mai mult...]Step 1: Use an external emulator such as Telnet or a PuTTY to login to the switch.
Switch# configure terminal
Switch(config)#
Step 2: Provide a hostname for the switch to function in a particular network environment
The provided hostname should be unique within the network in order to facilitate easier identification of the switch. It is also advisable to adhere to any naming standards in order to easily categorize the devices with names.
Switch(config)#hostname <switch_name>
Switch(config)#hostname Cisco_switch_x
Step 3: Configure IP address management
To enable remote connectivity to the switch via SSH or Telnet, it is necessary to configure the IP address. Any VLAN can be selected for configuring the IP. Please utilize the following commands:
Switch(config)#interface vlan1
Switch(config-if)#ip address<ipaddress><mask>
Switch(config-if)#ip address 172.16.29.10 255.255.0.0
Step 4: Configure an administration password (enable secret password)
Configuring an administrative password for the privileged exec mode is essential to restrict access. Without this password, anyone with console credentials will have the ability to configure the switch.
Switch(config)#enable secret <password>
Switch(config)#enable secret P@$$w0^d
Note: This password will have to be given before entering into config mode once it is configured.
Step 5: Configure and change default switch credentials
Changing the default password of the switch is crucial, as it is widely known. To modify the password for an existing user, follow the commands provided below:
Switch(config)# username admin privilege 15 password <PASSWORD>
Switch(config)# username admin privilege 15 password P@$$w0^d
We can also create a new set of credentials as given above with desired privileges.
Step 6: Configure default gateway
In order to enable remote accessibility of the switch, it is necessary to configure the default gateway. Ensure that the provided default gateway is within the same network as the device (network router IP can be provided as gateway IP).
Switch(config)# ip default-gateway <IP-address>
Switch(config)# ip default-gateway 172.16.29.1
Switch# show ip route
Step 7: Configure password for console, Telnet, and aux ports
To establish a secure connection, it is essential to restrict access to the switch through all input ports.
For line console, enter below commands,
Switch(config)# line con 0
Switch(config-line)# password p@$$w0^d
Switch(config-line)# login
Switch(config)# exit
For line vty, enter below commands,
Switch(config)# line vty 0 4
Switch(config-line)# password p@$$w0^d
Switch(config-line)# login
Switch(config)# exit
For line aux, enter below commands,
Switch(config)# line aux 0
Switch(config-line)# password p@$$w0^d
Switch(config-line)# login
Switch(config)# exit
Step 8: Configure static route
In the absence of entries in the dynamic routing table or when there is no specific route available, the switches are capable of forwarding packets via the configured static route.
Switch(config)# ip route <dest_IP_address> <mask>
Switch(config)# ip route 172.16.29.59 255.255.0.0
Switch# show running-config
Step 9: Configure interface description
We can configure interface description using below commands
Switch(config)#interface fastethernet 0/1
Switch(config-if)#description Development VLAN
Step 10: Set Duplex mode
The duplex mode governs the data transmission between the switches and the endpoint. When set to full duplex, the switch is capable of both sending and receiving data from the endpoint simultaneously.
Switch(config-if)#duplex full
Step 11: Save the configuration
Switch#write memory
Building configuration… [OK]
Switch#