
Soluții
How to stress test Raspberry Pi 4 in Windows 11
On the Windows platform, Raspberry stress tests can be performed using various methods. However, the most convenient one involves performing the same by accessing the Raspberry Terminal application through a Windows Subsystem for Linux (WSL).
1] Updating and installing the necessary applications
In Raspberry Pi 4, software applications are generally installed, updated, or removed using the Advanced Packaging Tool (APT). Before installing the application on the system, the package list needs to be updated to ensure the latest resources are being used.
Run the following command after opening the Raspberry terminal application:
sudo apt – get update
Sudo, or (Super User Do) is a command-line utility in Linux that allows users to run commands with super-user or administrative privileges by providing access to the root directory of the OS.
Once the APT is updated, let’s install the prerequisite software for the Stressberry applications in time.
Install Atlas:
Atlas is a library that helps Stressberry communicate with the sensors on Pi. It helps Stressberry communicate with the system hardware to execute instructions and collect the data it needs from the censors.
To install, the below-mentioned command can be entered in the terminal prompt:
sudo apt-get install libatlas-base-dev
Here is the meaning of all the options in the above command:
sudo: command to gain administrative or super-user privileges
apt-get install: Install a particular application package using APT.
libatlas: Library or package containing the programming functions or utilities of the Atlas application.
base: Core version of the library
dev: acronym of development
Instal Cairo:
To publish the stress test results, Stressberry depends on another application, Cairo, which provides graphics libraries to represent the test results visually.
sudo pip3 install cairocffi
pip3: is the package installer for Python 3, and
cairocffi: Python package for the Cairo Graphics Library, ensuring the installation of libraries and dependencies of the Cairo package in the Python 3 environment.
Install PyQt5:
To create the visual interface, Stressberry relies on the application PyQt5. Hence, installing it before Stressberry ensures that the tools needed for Stressberry’s visual interface are in place.
sudo apt-get install python3 -pyqt5
python3: Specifies the version of Python for which the package needs to be installed.
pyqt5: Libraries for creating desktop applications with a graphic user interface (GUI).
Read: How to update WSL Kernel on Windows
2] Install Stressberry
After installing all the prerequisites, Stressberry can then be installed by typing the below-mentioned command on the terminal
sudo apt install stress
followed by
sudo –H pip3 install –U stressberry
The first command installs the stress package on the system. Once installed, stress can be used as a command to impose the system’s load for the stress test.
The second command installs or upgrades the Python package Stressberry, wherein
-H: Ensures that the super user’s home directory is used for executing the command to avoid any potential permission issues for the generated files or changes in configuration as a result of installing the said package.
-U: Make sure that the latest version of the Stressberry is installed or upgraded in case any older version is already installed on the system.
Read: How to set up a Raspberry Pi module with default settings
3] Stress-tests execution
After completing the installation process, Stressberry can be started up through the below-mentioned command,
sudo stressberry –run out.dat
While running the application, this command records the CPU temperature and stores it in the file named out.dat, in the home directory.
Read: Best Raspberry PI4 ideas for Science Project
4] Record and display results
The program initially runs the CPU with minimum load to cool it down and then idles it for a while before stressing it with maximum load. After running it with a maximum load of about 5 minutes, the program releases the load and records the cool down.
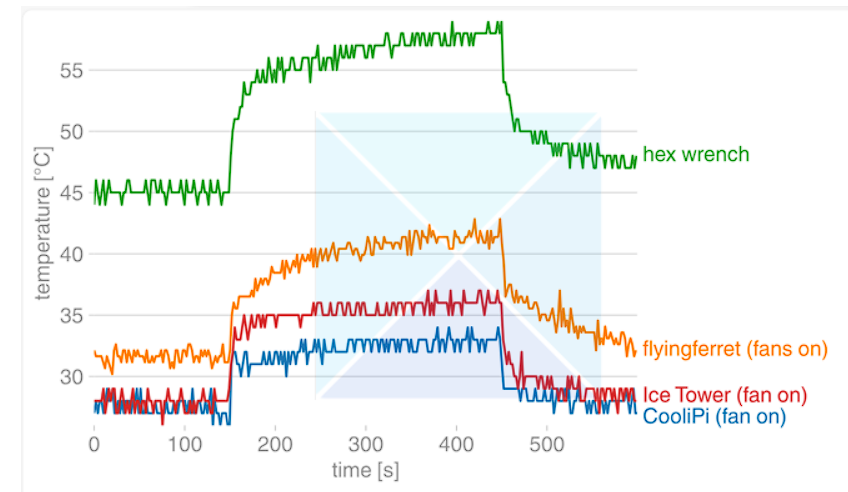
The results of the test are recorded in the file out.dat. However, the results can also be published through a graph using the following command
sudo stressberry -plot out.dat
Cum instalam Windows 11 fara conexiune la internet
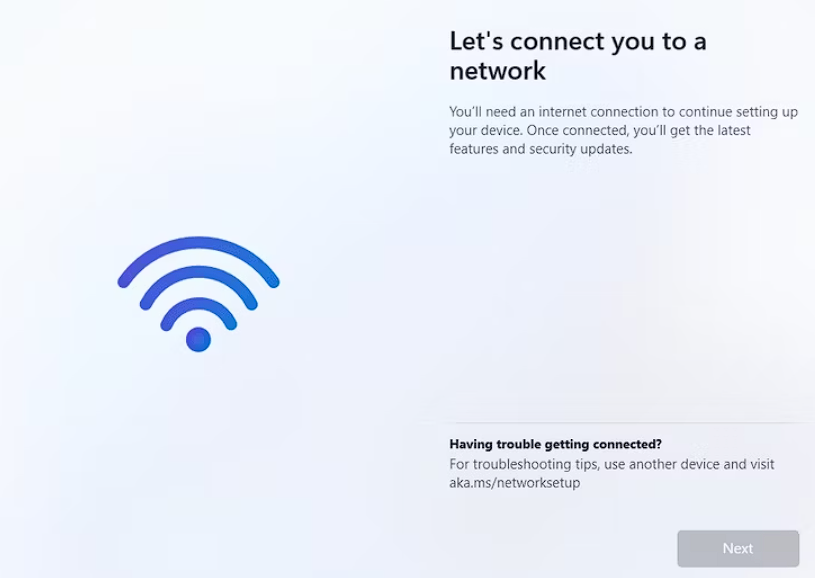
Windows 11 necesită o conexiune activă la internet pentru a descărca actualizări esențiale și pentru a crea un cont în timpul procesului de instalare. Cu toate acestea, instalarea se va bloca la ecranul “Let’s connect you to a network” (Să vă conectăm la o rețea) dacă nu aveți o conexiune la internet.
- Verificați conexiunea dvs.
Pe ecranul “Let’s connect you to a network” (Să vă conectăm la o rețea), veți vedea numele conexiunilor disponibile. Cu toate acestea, dacă nu vă puteți conecta la niciuna dintre ele, fie că este vorba de Wi-Fi sau de conexiunea prin cablu, probabil că există o problemă cu conexiunea în sine.
Pentru a confirma că problema este legată de Wi-Fi, nu de computerul Windows, încercați să vă conectați smartphone-ul sau un alt dispozitiv la Wi-Fi și verificați dacă puteți accesa internetul de pe acesta. Dacă internetul nu funcționează nici pe acel dispozitiv, atunci se confirmă faptul că problema persistă la Wi-Fi-ul dvs. Soluția, în acest caz, este să reporniți routerul. Puteți chiar să vă contactați furnizorul de servicii de internet pentru asistență suplimentară.
Dacă folosiți o conexiune prin cablu, asigurați-vă că acesta nu este deteriorat și că este conectat în siguranță la ambele capete. Încercați să deconectați și să reconectați cablul pentru a vedea dacă acest lucru vă ajută.
Dacă totul eșuează, vă puteți conecta PC-ul Windows la internet folosind hotspotul mobil. Cu toate acestea, dacă hotspotul mobil nu se afișează nici pe ecranul de configurare a rețelei Windows, atunci acest lucru sugerează o problemă mai profundă cu setările de rețea ale computerului dumneavoastră, cu driverele sau cu alte componente interne.
Deoarece în prezent sunteți offline, va trebui să instalați Windows 11 fără o conexiune la internet. După ce instalarea Windows este finalizată, va trebui pur și simplu să reporniți computerul, iar la repornire, Windows va putea să se conecteze din nou cu driverele de rețea.
- Folosiți Promptul de comandă pentru a ocoli cerința de internet
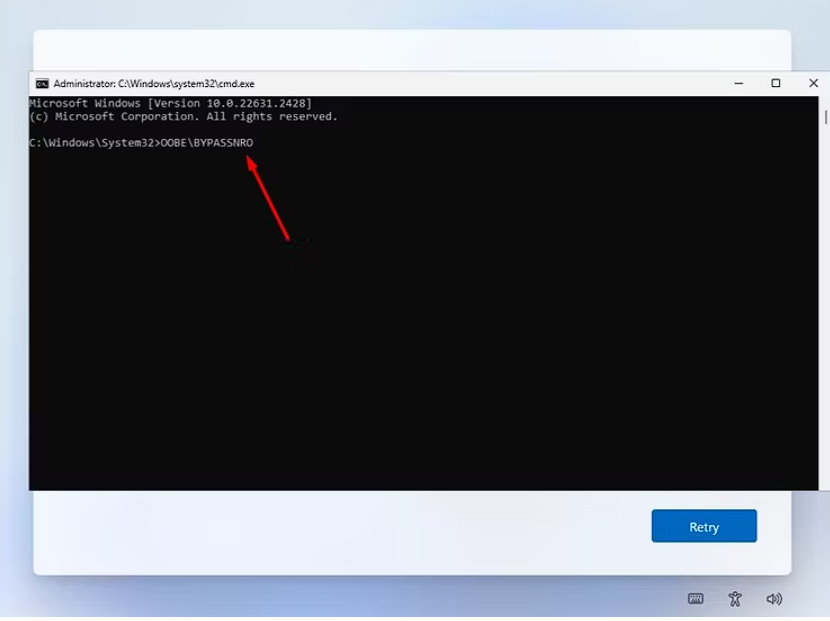
Atunci când întâlniți ecranul “Let’s connect you to a network” (Să vă conectăm la o rețea), puteți executa comanda “OOBE\BYPASSNRO” în Command Prompt pentru a ocoli cerința de conectivitate în timpul procesului de instalare a Windows 11. Pentru a realiza acest lucru, apăsați Shift+F10 pentru a lansa Command Prompt în timp ce vă aflați pe ecranul “Let’s connect you to a network”.
În fereastra Command Prompt, tastați OOBE\BYPASSNRO și apăsați Enter.
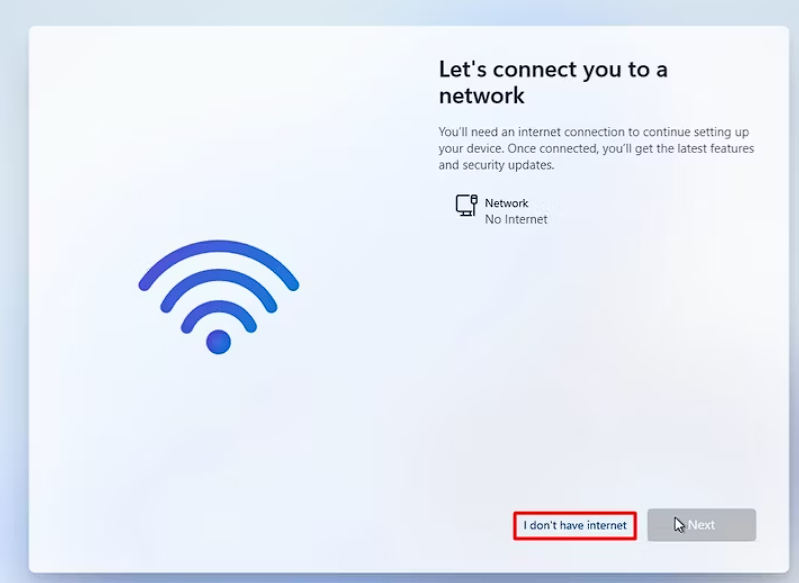
Calculatorul va reporni apoi, solicitându-vă să selectați din nou regiunea și aspectul tastaturii. După aceea, veți ajunge la ecranul de configurare a rețelei. Totuși, de data aceasta, veți avea la dispoziție opțiunea “Nu am internet”, pe care puteți face clic pentru a continua procesul de instalare a Windows 11 fără o conexiune la internet.
Un lucru important de reținut aici este faptul că veți sfârși prin a crea un cont de utilizator local în loc de un cont Microsoft atunci când încercați să instalați Windows 11 fără o conexiune la internet. Cu toate acestea, puteți trece oricând la un cont Microsoft mai târziu.
- Încheiați procesul de conectare la rețea
Fluxul conexiunii de rețea este un proces esențial al Windows care detectează și configurează conexiunile de rețea de pe computerul dumneavoastră. Acest proces se execută în timpul instalării Windows 11 și se asigură că computerul dvs. are o conexiune la internet pentru descărcarea actualizărilor critice.
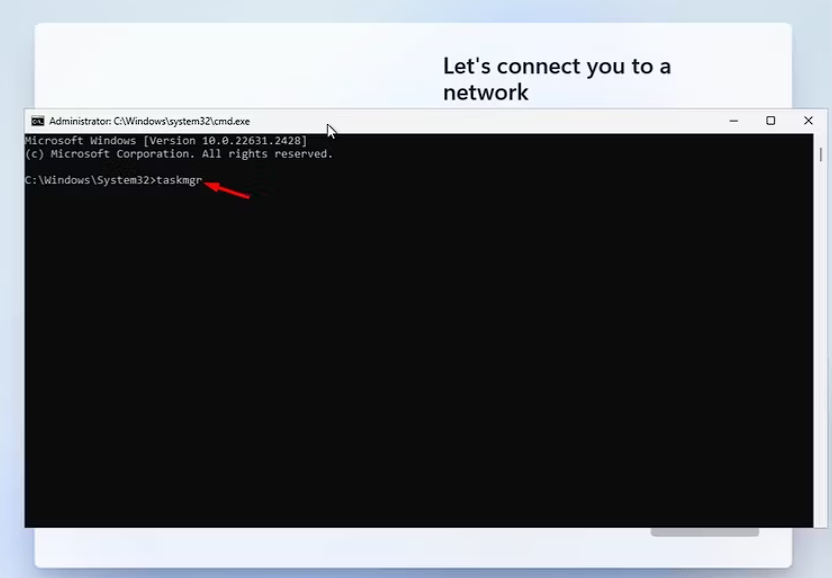
Cu toate acestea, dacă preferați să nu instalați actualizări în timpul instalării Windows și doriți să finalizați instalarea fără internet, puteți dezactiva procesul fluxului de conectare la rețea utilizând Task Manager. Pentru a face acest lucru, apăsați Shift+F10 pentru a lansa Command Prompt în timp ce vă aflați pe ecranul “Let’s connect you to a network” (Să vă conectăm la o rețea).
În fereastra Command Prompt, tastați taskmgr și apăsați Enter. Astfel, se va deschide fereastra Task Manager.
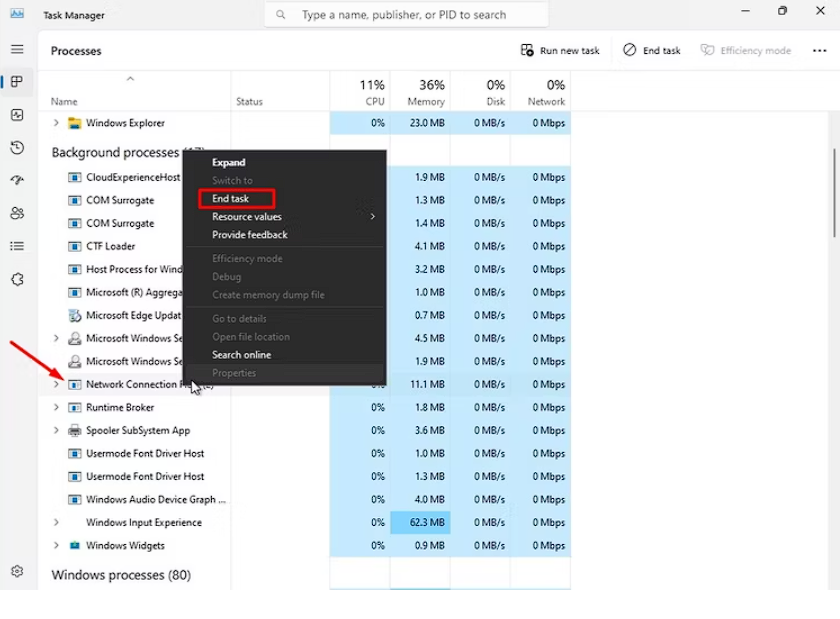
În Task Manager, faceți click dreapta pe procesul “Network Connection Flow” din fila Processes și selectați “End task” din meniul contextual.
Tastați exit în fereastra Command Prompt și apăsați Enter.
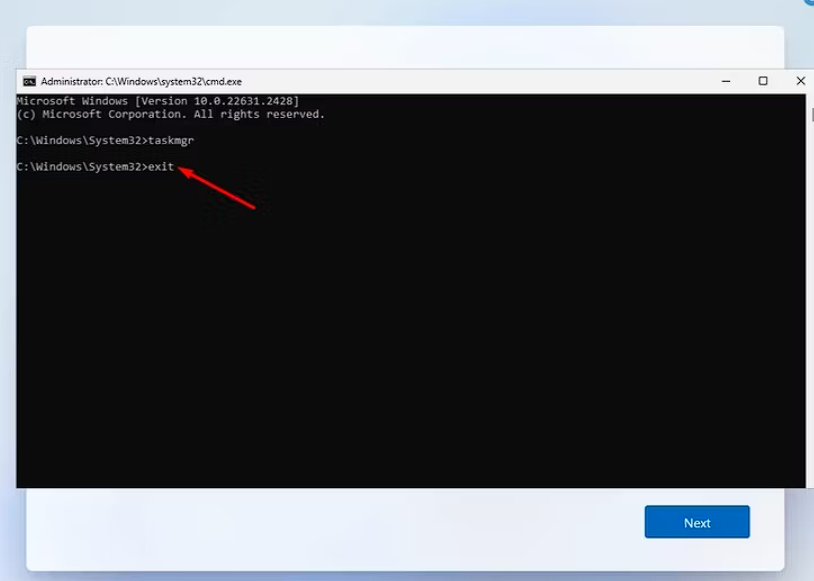
După aceea, ecranul “Let’s connect you to a network” (Să vă conectăm la o rețea) va dispărea și veți putea continua instalarea fără conexiune la internet.
Astfel, ați trecut cu succes de ecranul “Let’s connect you to a network”. Puteți proceda mai departe cu instalarea Windows 11 fără complicații legate de rețea. După finalizarea instalării, ar trebui să luați în considerare descărcarea unor aplicații gratuite, dar esențiale, pentru a vă îmbunătăți fluxul de lucru.
[mai mult...]How to update everything on your PS5
- To check for updates your PS5, open the Settings and go to System > System Software > System Software Update and Settings. If an update is available, select “Update System Software.”
-
To update your PS5 games, highlight the game in your library and press the Options button on the controller, then select “Check for Updates.” To update your PS5 controller, open the Settings and go to Accessories > Controller (General). If an update is available, select “DualSense Wireless Controller Device Software.”
- Keeping your PlayStation 5 up to date ensures a smooth gaming experience on Sony’s ninth-generation console. It pays to know how to manually trigger updates, whether it’s the system software, games, or controller.
Configurare setari de retea imprimanta HP LaserJet E52645
Ce setari sunt necesare pentru a adauga o imprimanta HP LaserJet E52645 intr-o retea locala?
[mai mult...]