Soluții

How to split a PDF File on Windows 11

The easiest built-in way to create a new PDF using chosen pages from an existing PDF is by using Microsoft Edge. Although this is a web browser, it allows you to view and work with PDF files.

To start the process, launch File Explorer (press Windows+E) and find the PDF you want to split. Right-click the file and choose Open With > Microsoft Edge.

When the PDF is open in Edge, from the tool list at the top, click “Print” (the printer icon), or press Ctrl+P. Note that you aren’t actually printing anything.

"Print" highlighted in Edge.

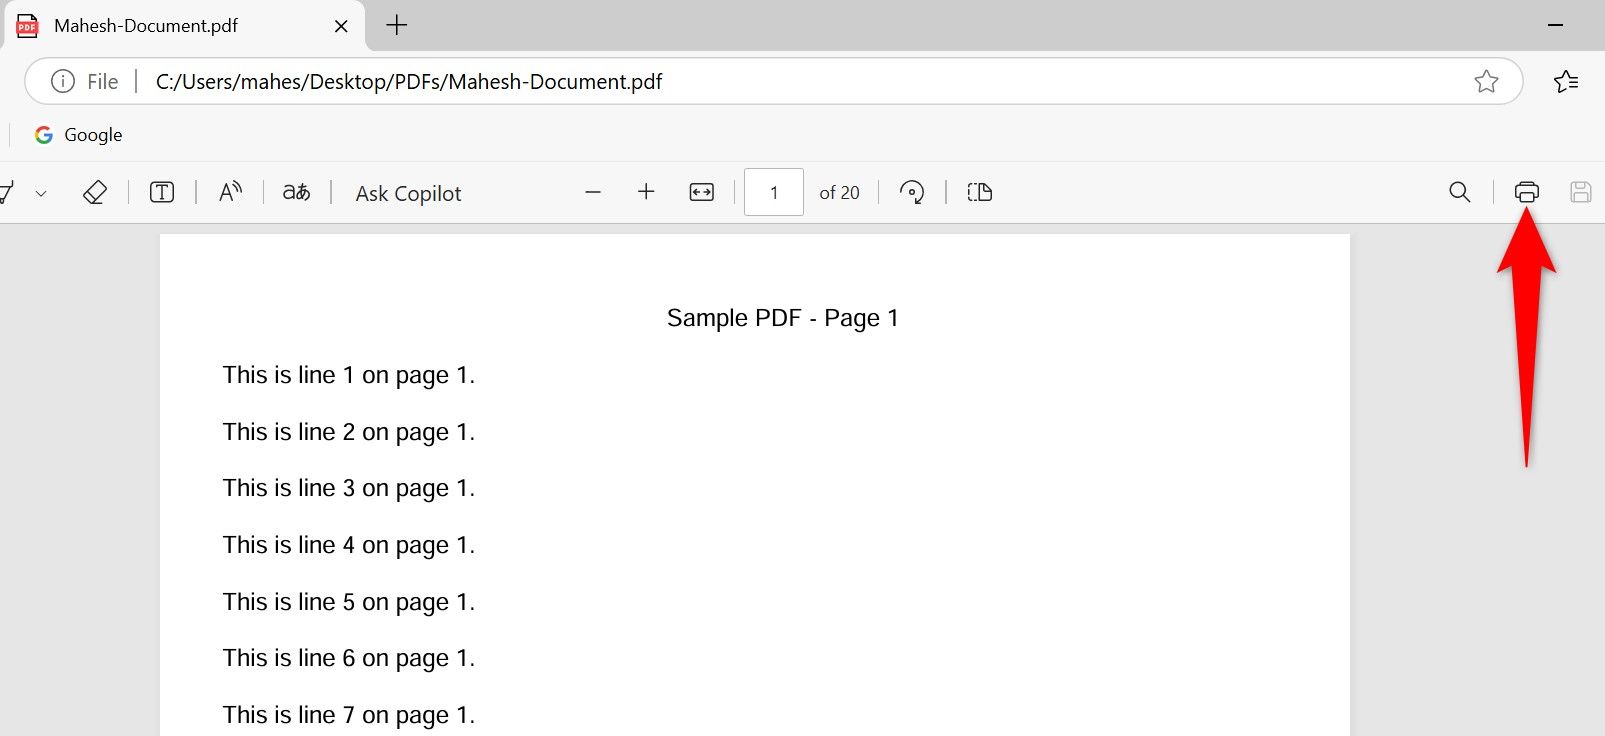
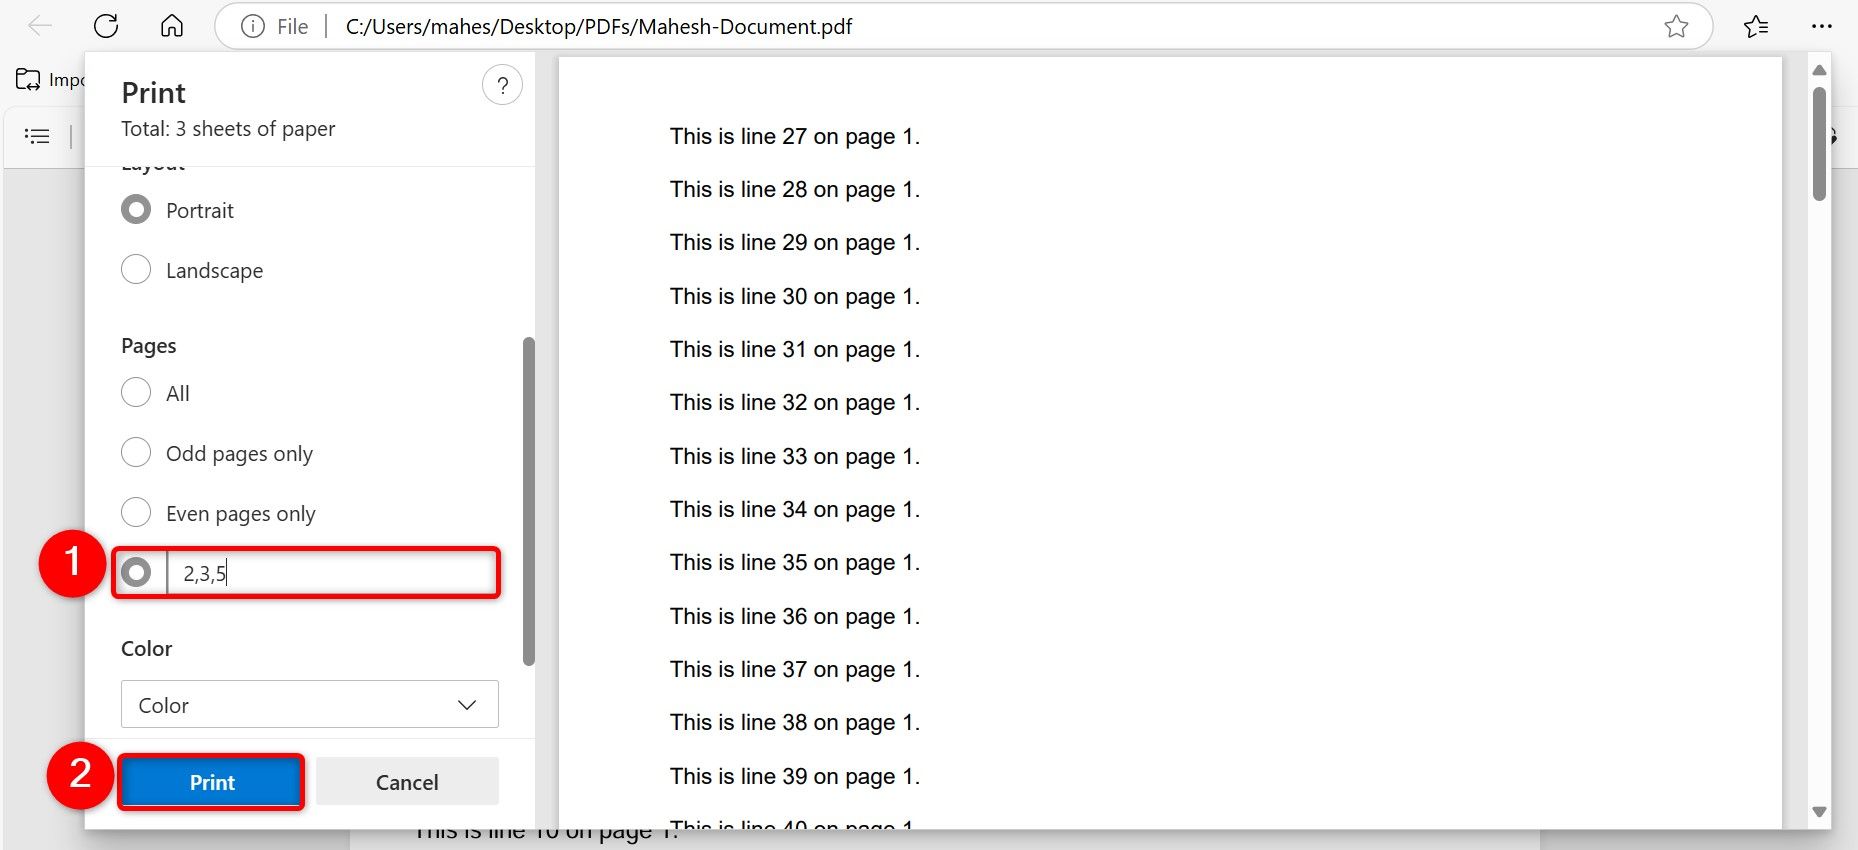
On the Print window, click the “Printer” drop-down menu and choose “Microsoft Print to PDF.” Scroll down and click the “Pages” field. Here, type the page numbers of the existing PDF you want in your new PDF. For example, to only extract the second page, type 2. To extract pages from 2 to 4, type, 2-4. To extract pages 2, 3, and 5, type 2,3,5. Then, at the bottom, click “Print”.

"Pages" and "Print" highlighted in Edge.

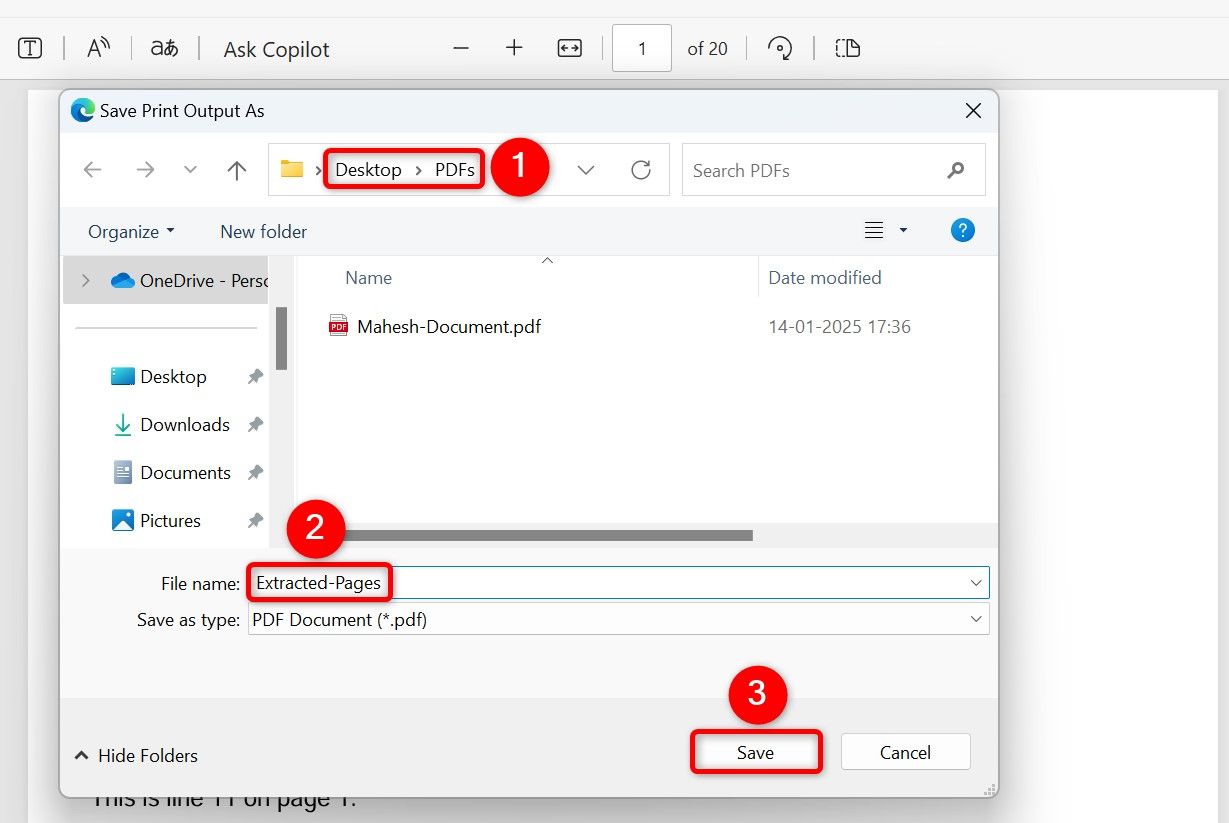
You’ll see the Save Print Output As window. Here, choose the folder to save your new PDF in. Select the “File Name” field and type a name for the file. Then, choose “Save”.

Various options highlighted on the PDF save window in Edge.

Make a New PDF From Chosen Pages Using a Free App

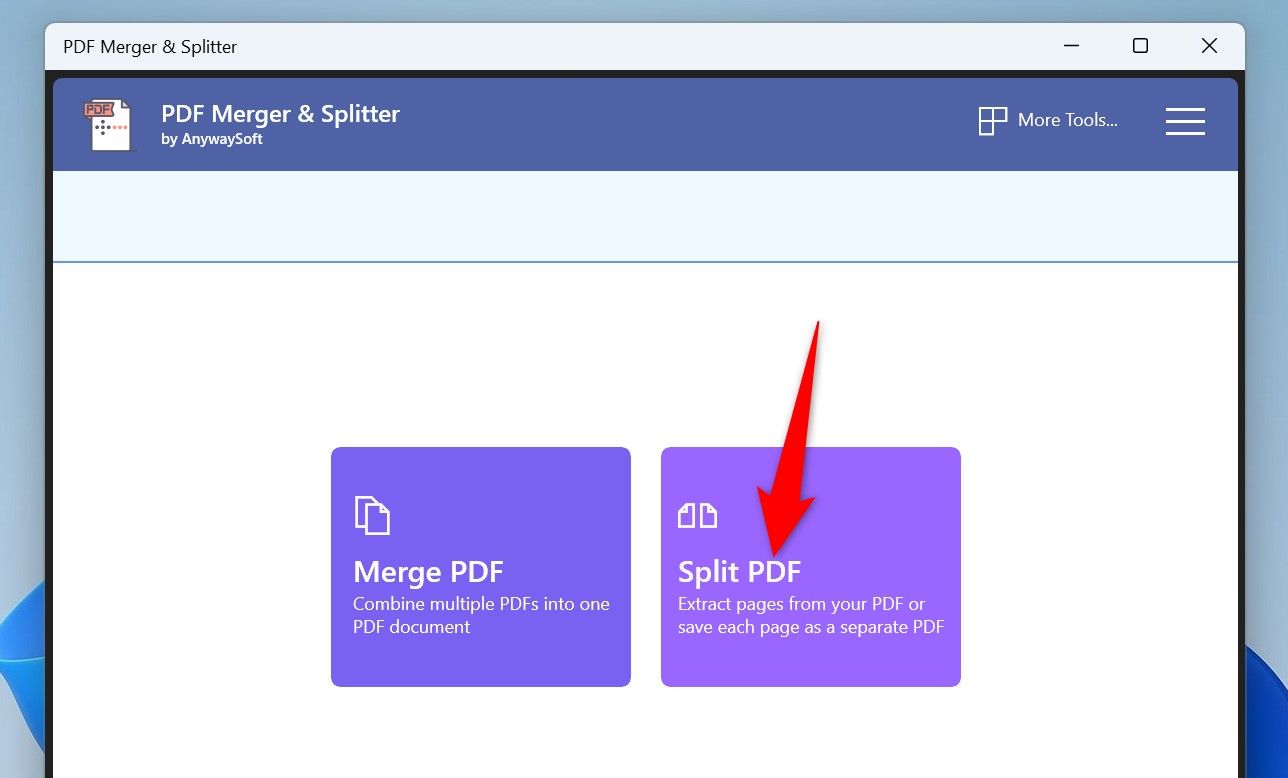
Another way to split a PDF is by using a free app called PDF Merger & Splitter. To use it, launch Microsoft Store on your PC, type PDF Merger & Splitter in the search box, press Enter, select the app in the search results, and choose “Get”.

Open the newly installed app and choose “Split PDF”.

"Split PDF" highlighted in PDF Merger & Splitter.

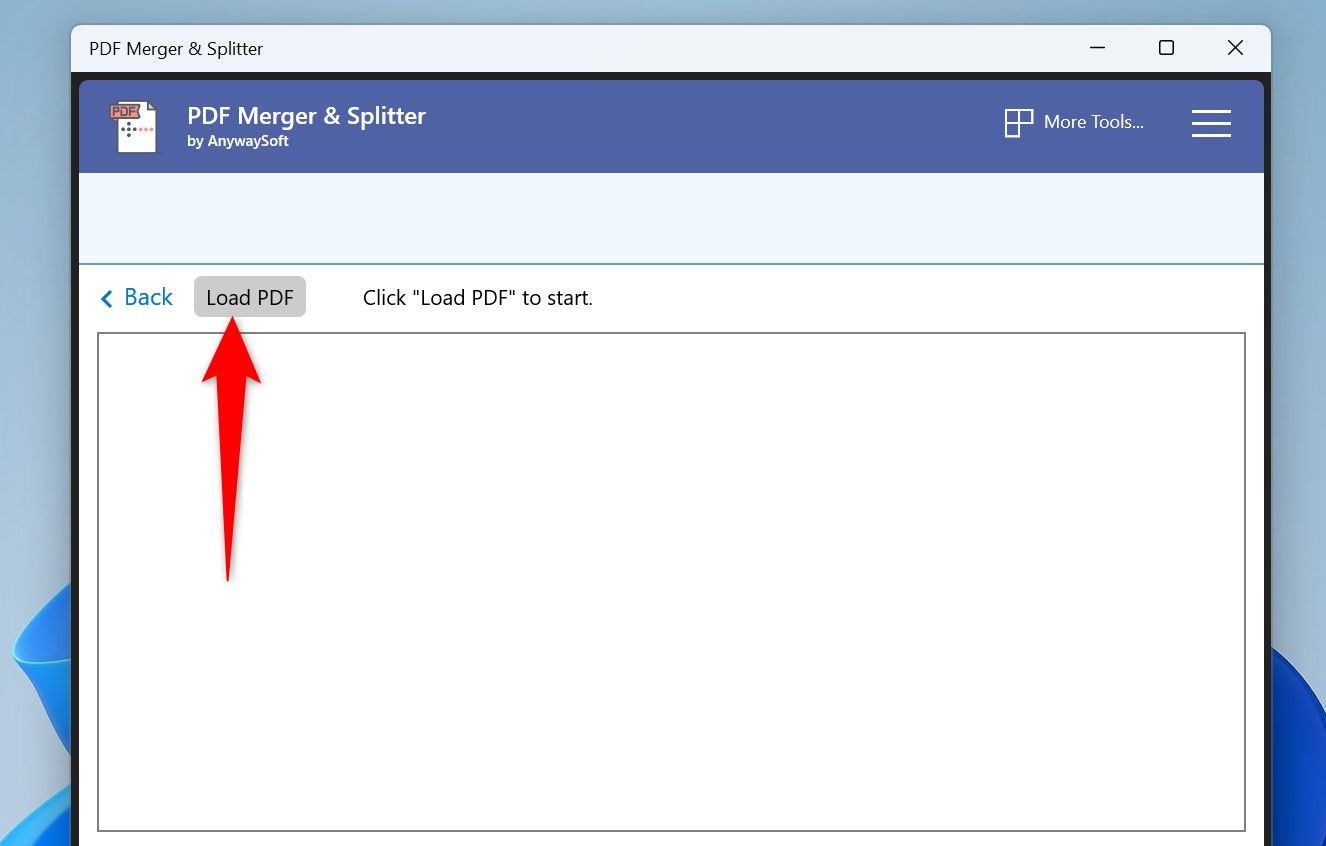
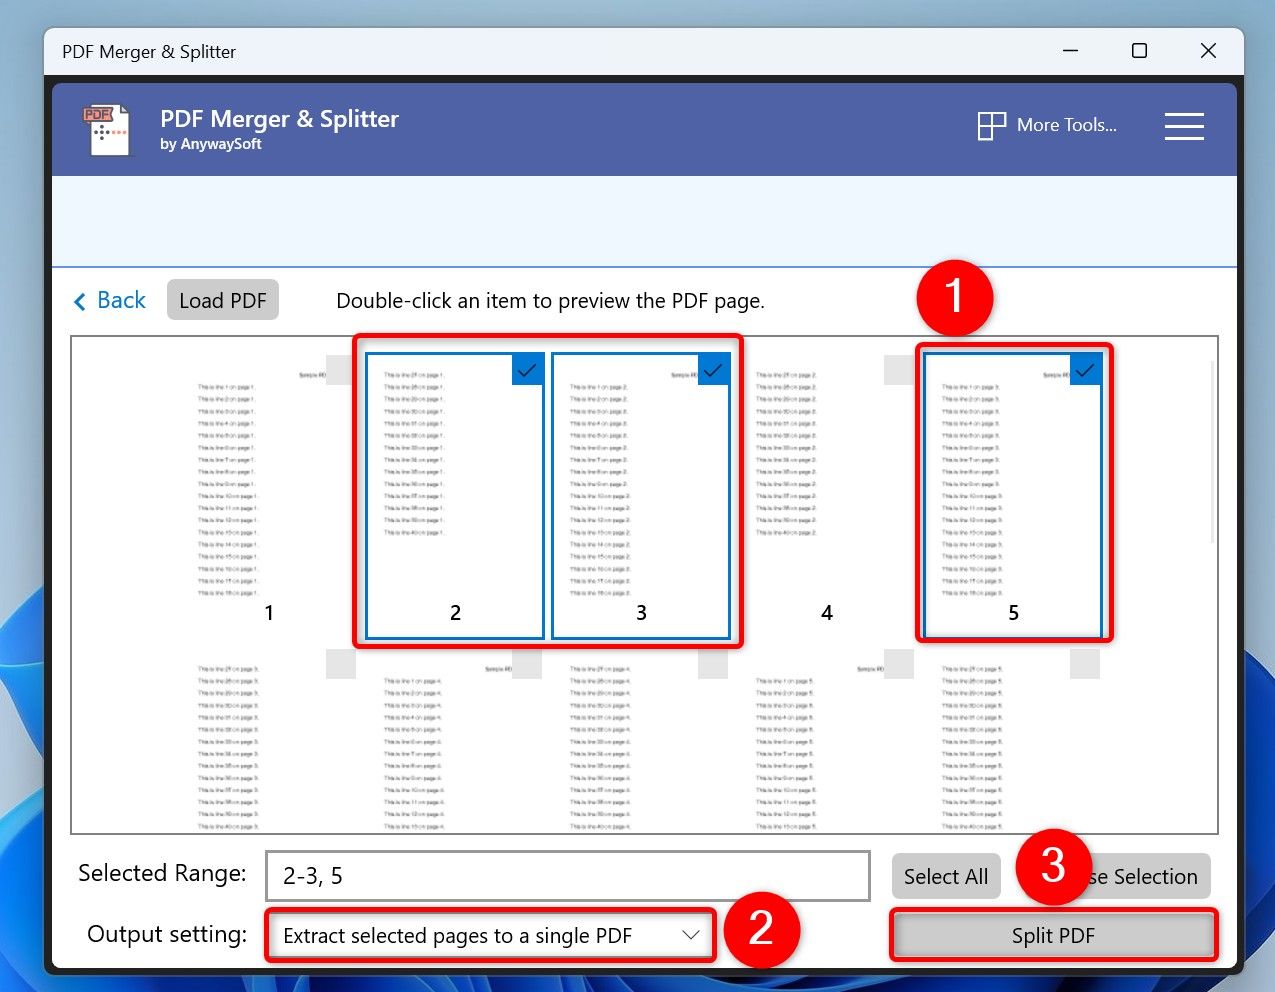
Click “Load PDF” at the top and select the PDF you want to split.

"Load PDF" highlighted in PDF Merger & Splitter.

When the PDF is loaded, you’ll see each page’s preview. Click the pages you want to create a new PDF from. As you select pages, the app fills in the page numbers in the Selected Range field.

After choosing the pages, select the “Output Setting” drop-down menu and choose one of the two options:

  • Extract Selected Pages to a Single PDF: This option extracts the selected pages from the loaded PDF file and makes a single new PDF.
  • Extract Each Selected Page to a PDF: This option turns each selected page in the source PDF file into a new PDF file. You’ll have one PDF for each page.

Then, click the “Split PDF” button at the bottom.

Various options to split a PDF highlighted in PDF Merger & Splitter.

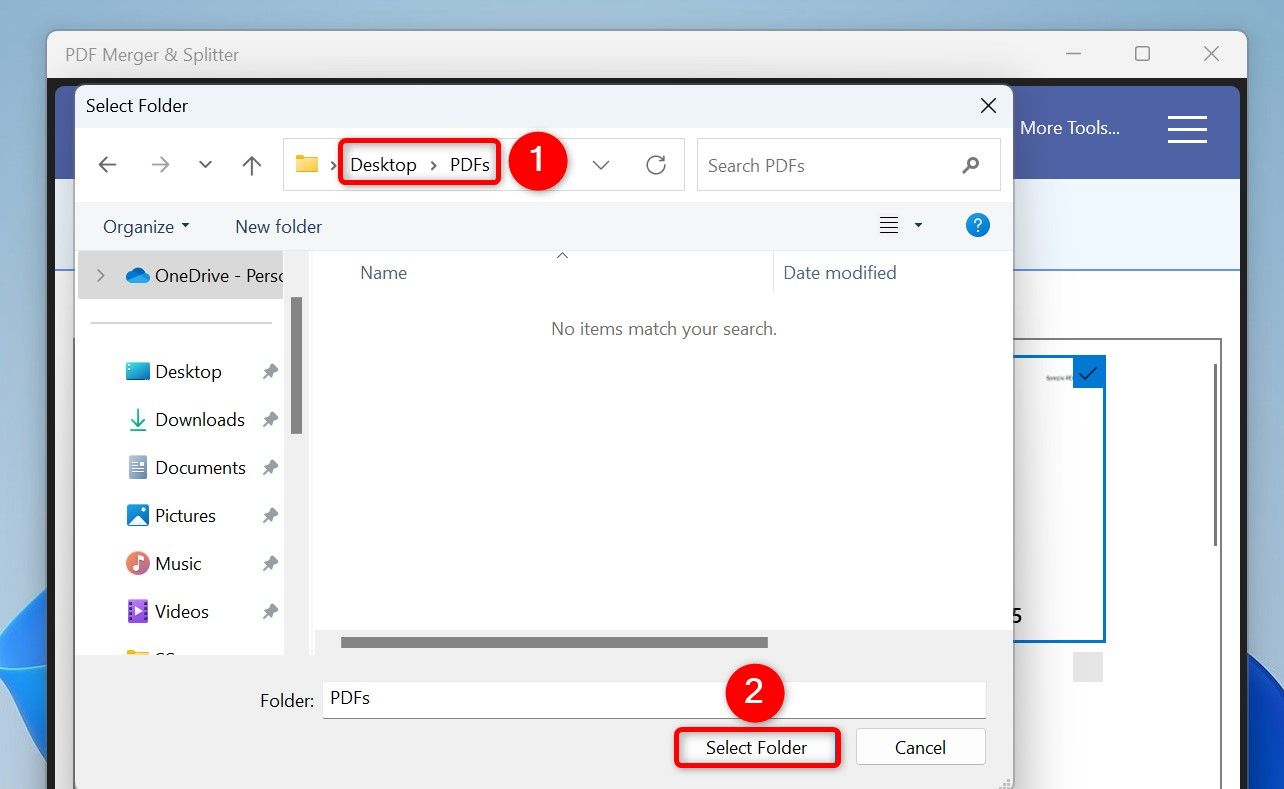
Choose the folder in which you want to save the resulting PDF and click “Select Folder”.

"Select Folder" highlighted on the Select Folder window.

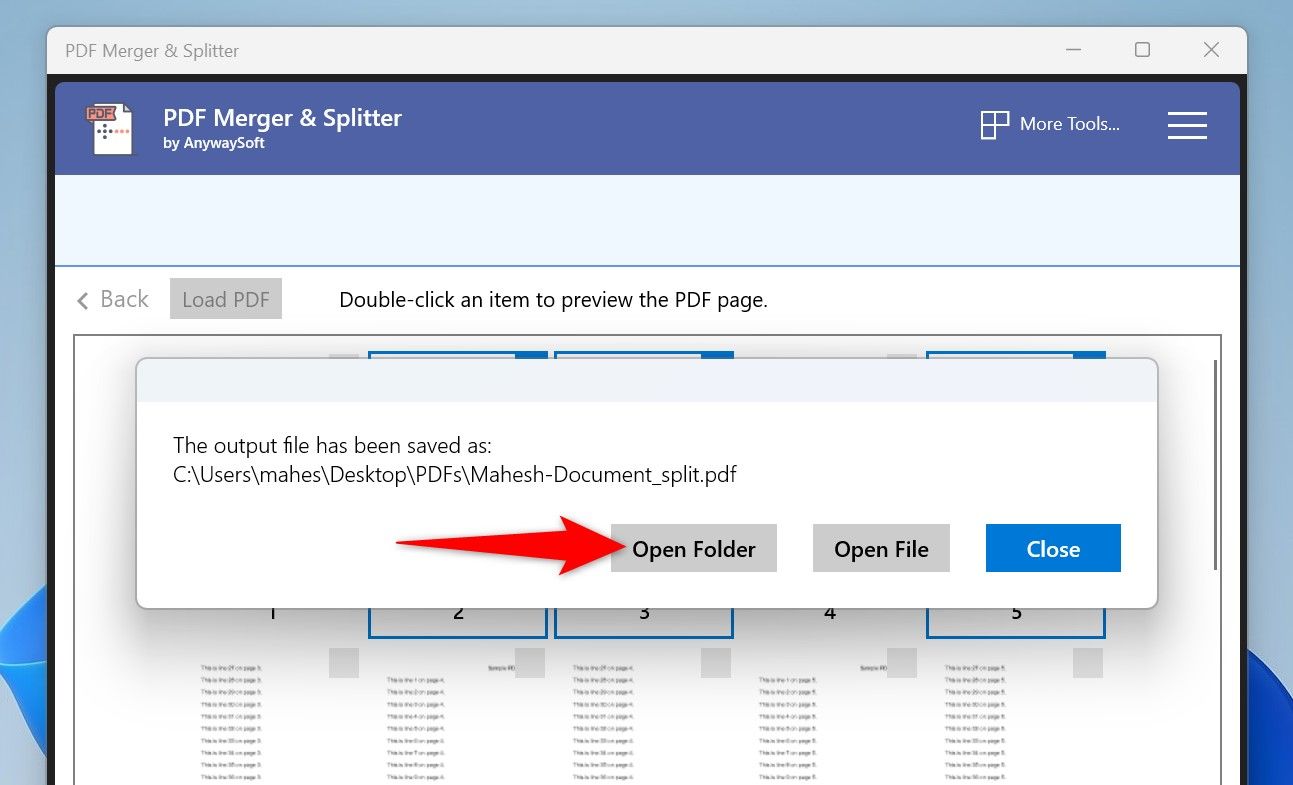
In the open prompt, click “Open Folder” to open the folder where your split PDF is located.

"Open Folder" highlighted in PDF Merger & Splitter.

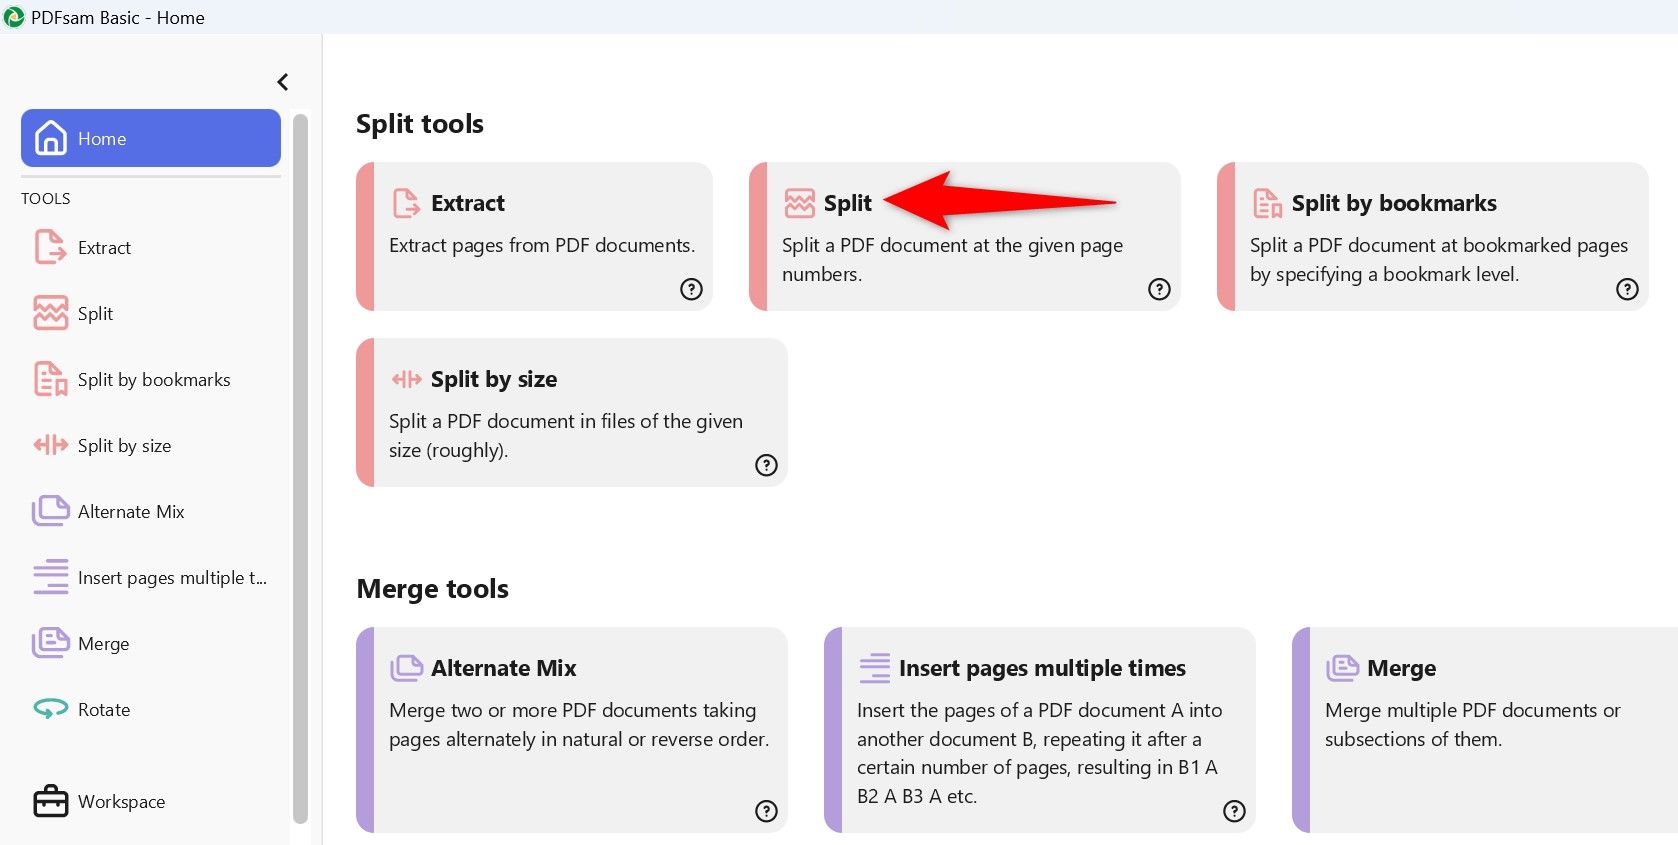
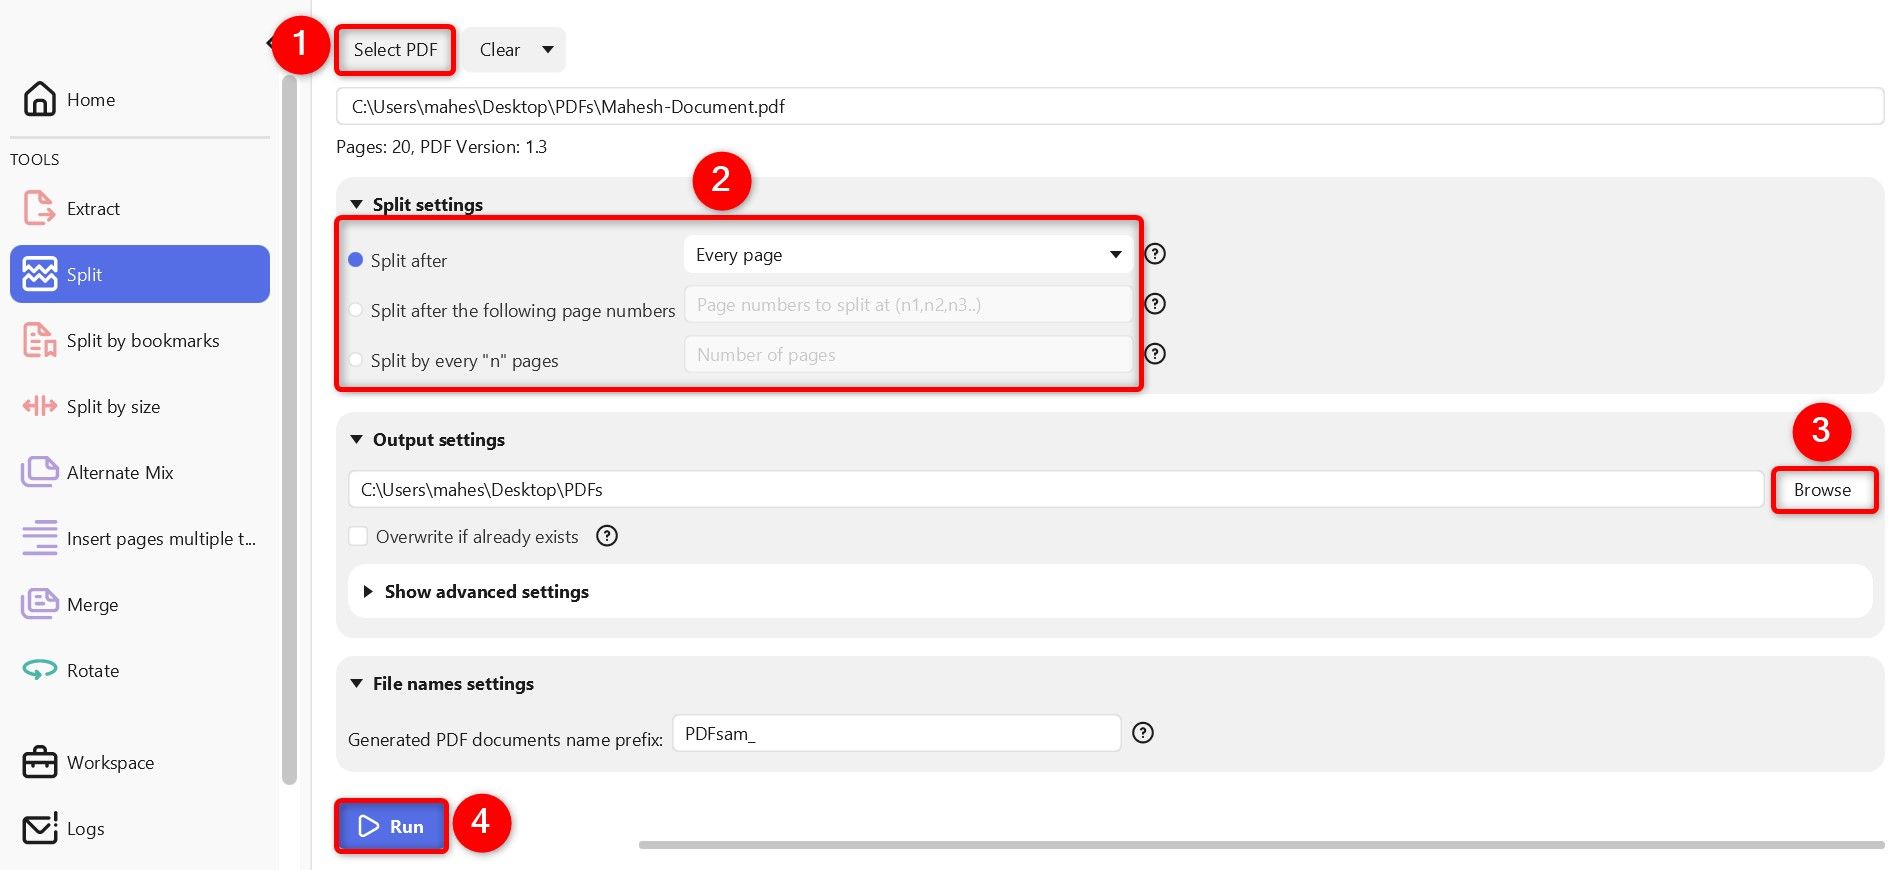
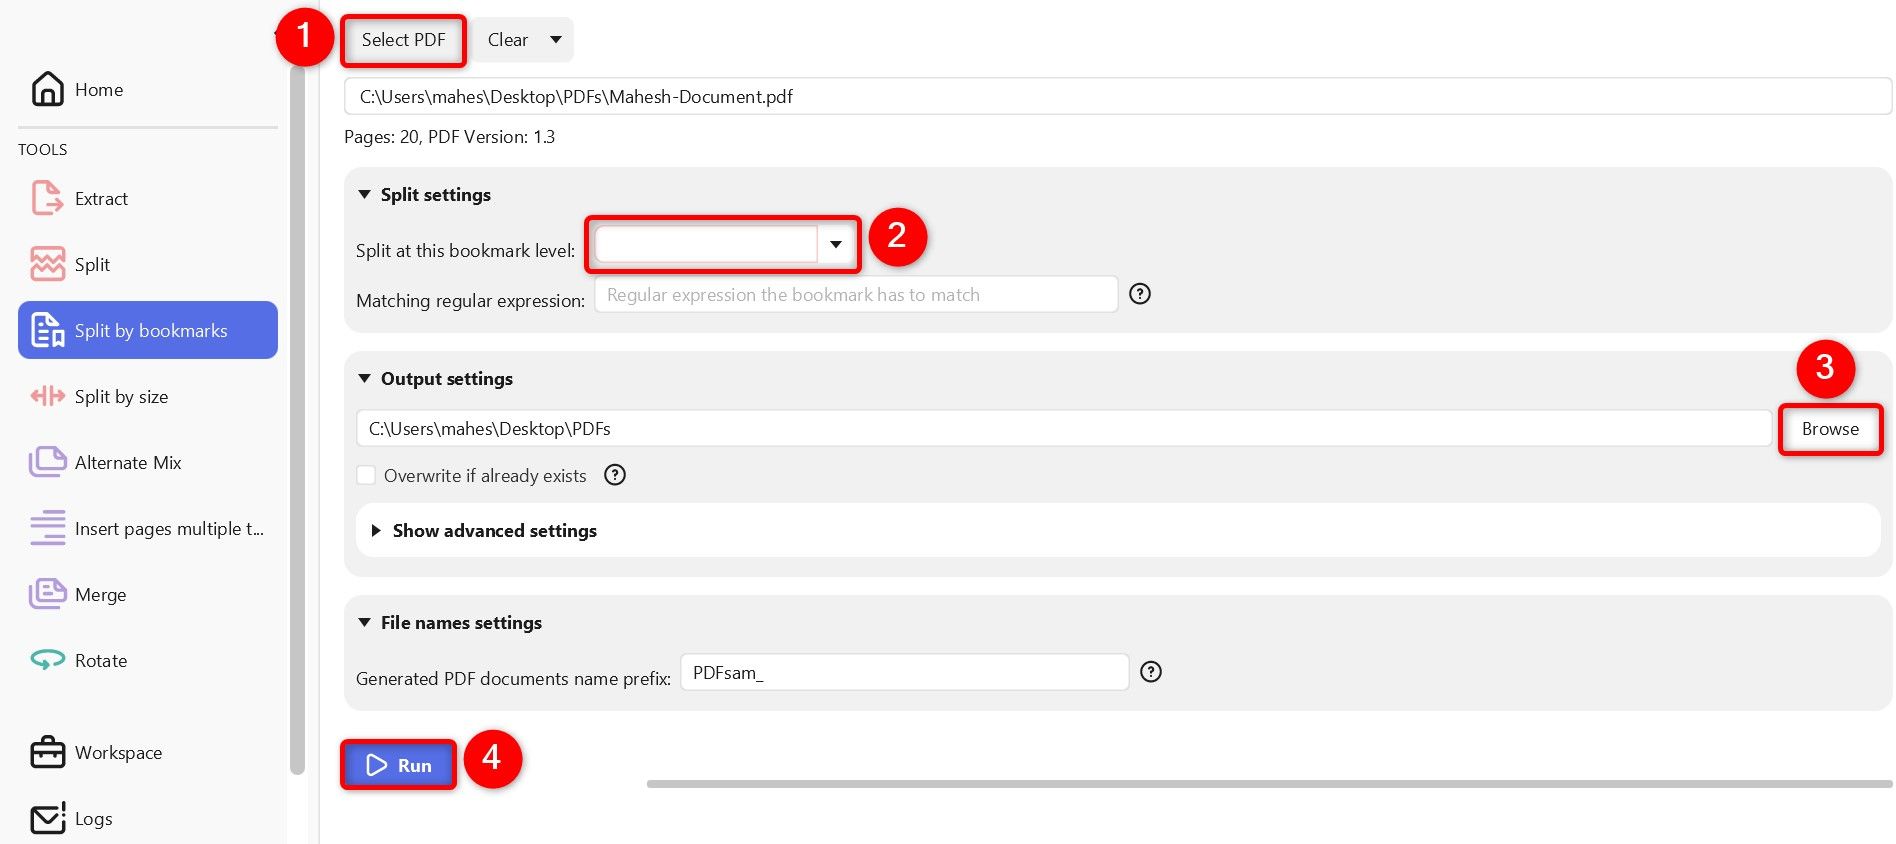
If you’re looking for more advanced options, like the ability to split a PDF by every n number of pages, after the specified page numbers, or bookmarks, use the free and open-source PDFsam Basic app.

Launch the PDFsam site and download and install the app on your PC. In the installation wizard, make sure to uncheck the option to install PDFsam Enhanced as you don’t need that to perform the task.

Launch the newly installed app. In the Split Tools section, click “Split”.

"Split" highlighted in PDF24.

At the top, click “Select PDF” and choose the PDF you want to split. In the Split Settings section, select how you want to extract pages from your file:

  • Split After: This option splits your PDF after Every Page, after Even Pages, or after Odd Pages.
  • Split After the Following Page Numbers: This option splits the PDF after the specified page numbers.
  • Split by Every N Pages: You specify the N number and the app splits the PDF for every N page.

In the Output Settings section, click “Browse” and choose where you want to save the resulting PDF files. Then, at the bottom, click “Run”.

Various options to split a PDF highlighted in PDF24.

To split a PDF by bookmarks, launch PDFsam Basic and click “Split by Bookmarks.” Choose “Select PDF” and load your PDF. In the Split Settings section, click “Split at This Bookmark Level” and type the level. Select the destination folder in the Output Settings section. Then, at the bottom, click “Run.”

Options to split a PDF by bookmarks highlighted in PDF24.

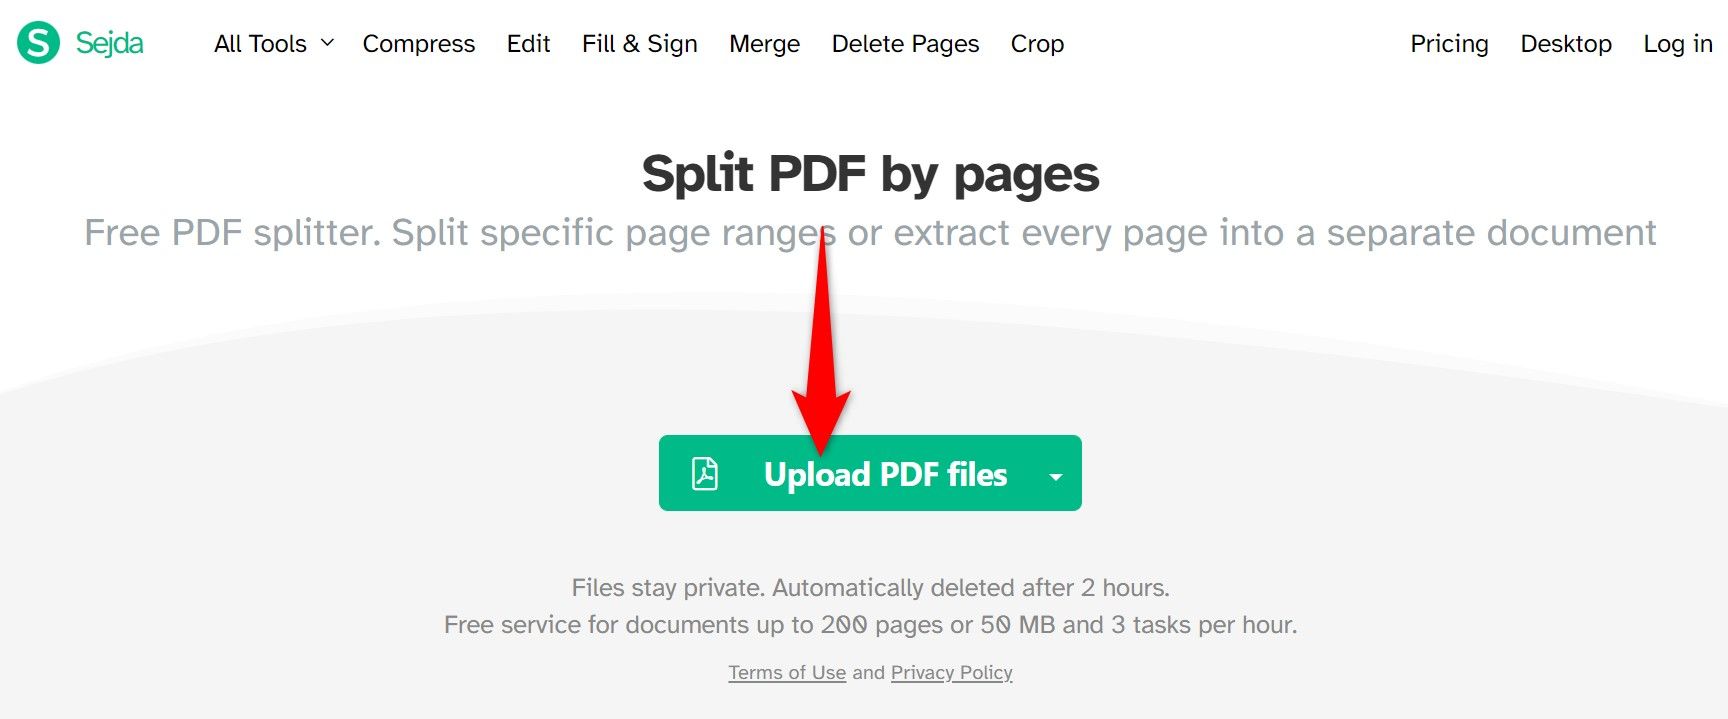
If you only have one or a few PDFs to split, you can use a web-based app to perform the task. This eliminates the need to download and install an app. Some tools you can use are Adobe Acrobat  and iLovePDF. Note that I don’t recommend using this method for confidential files, as you risk exposing your file’s data to these web-based services.

To use the Sejda method, launch its site, click “Upload PDF Files,” choose your PDF, and wait for the file to upload.

"Upload PDF Files" highlighted on Sejda.

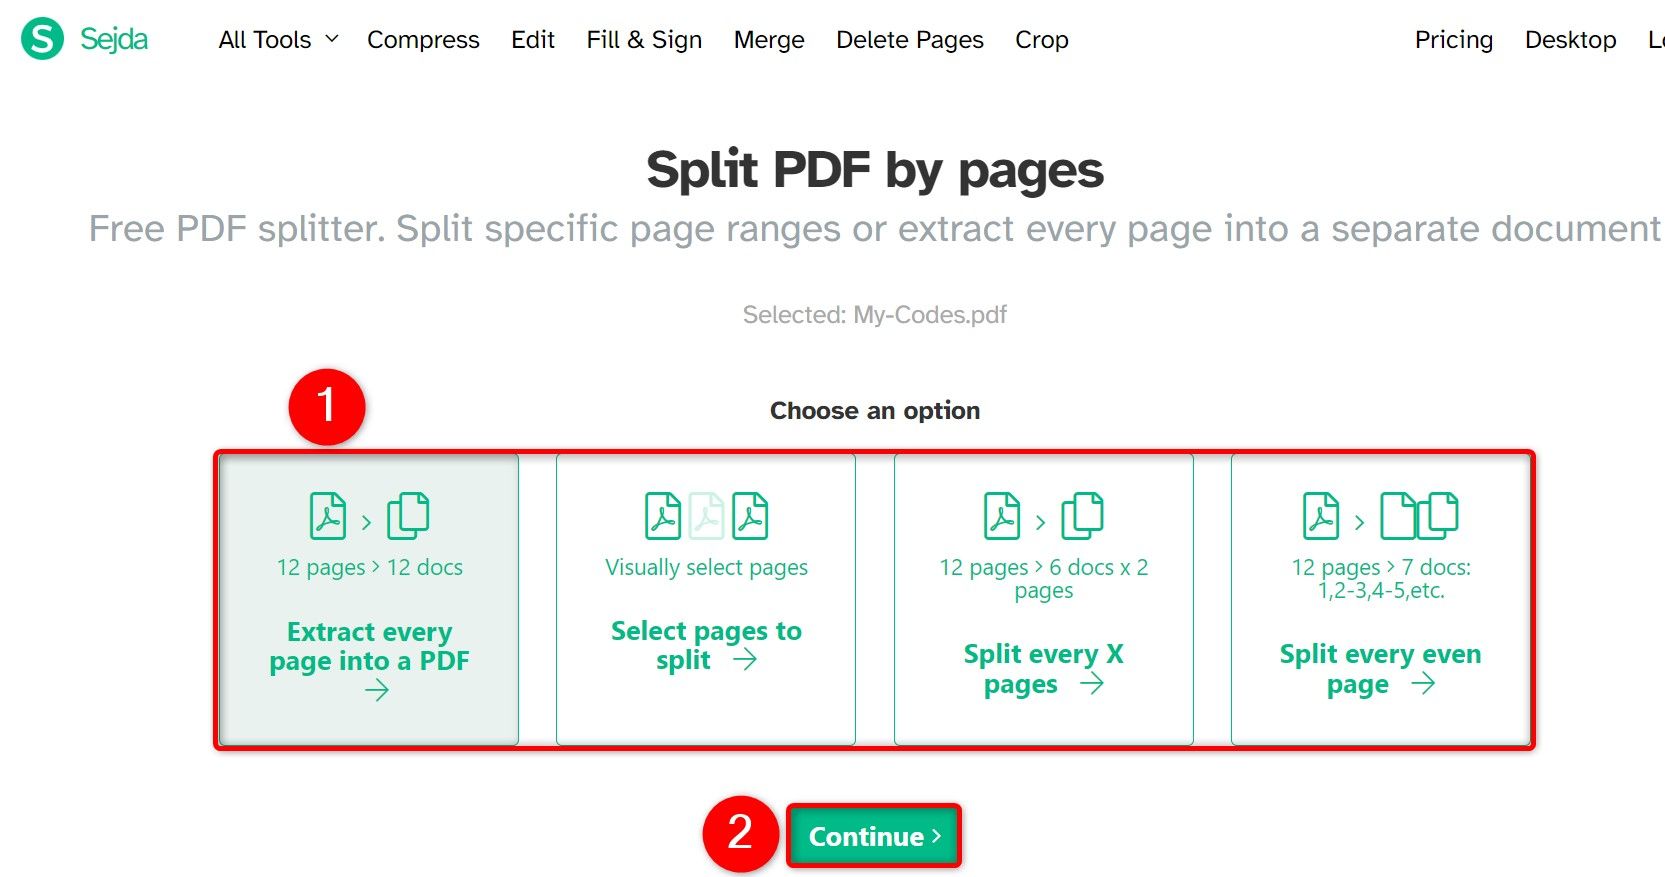
Choose how you’d like to split the file. Your options are:

  • Extract Every Page Into a PDF: This turns every page in your PDF into a new PDF file.
  • Select Pages to Split: This allows you to select the pages in your PDF to then turn into a new PDF file.
  • Split Every X Pages: This option lets you create a new PDF after every X number of pages.
  • Split Every Even Page: This option splits the PDF after every even page.

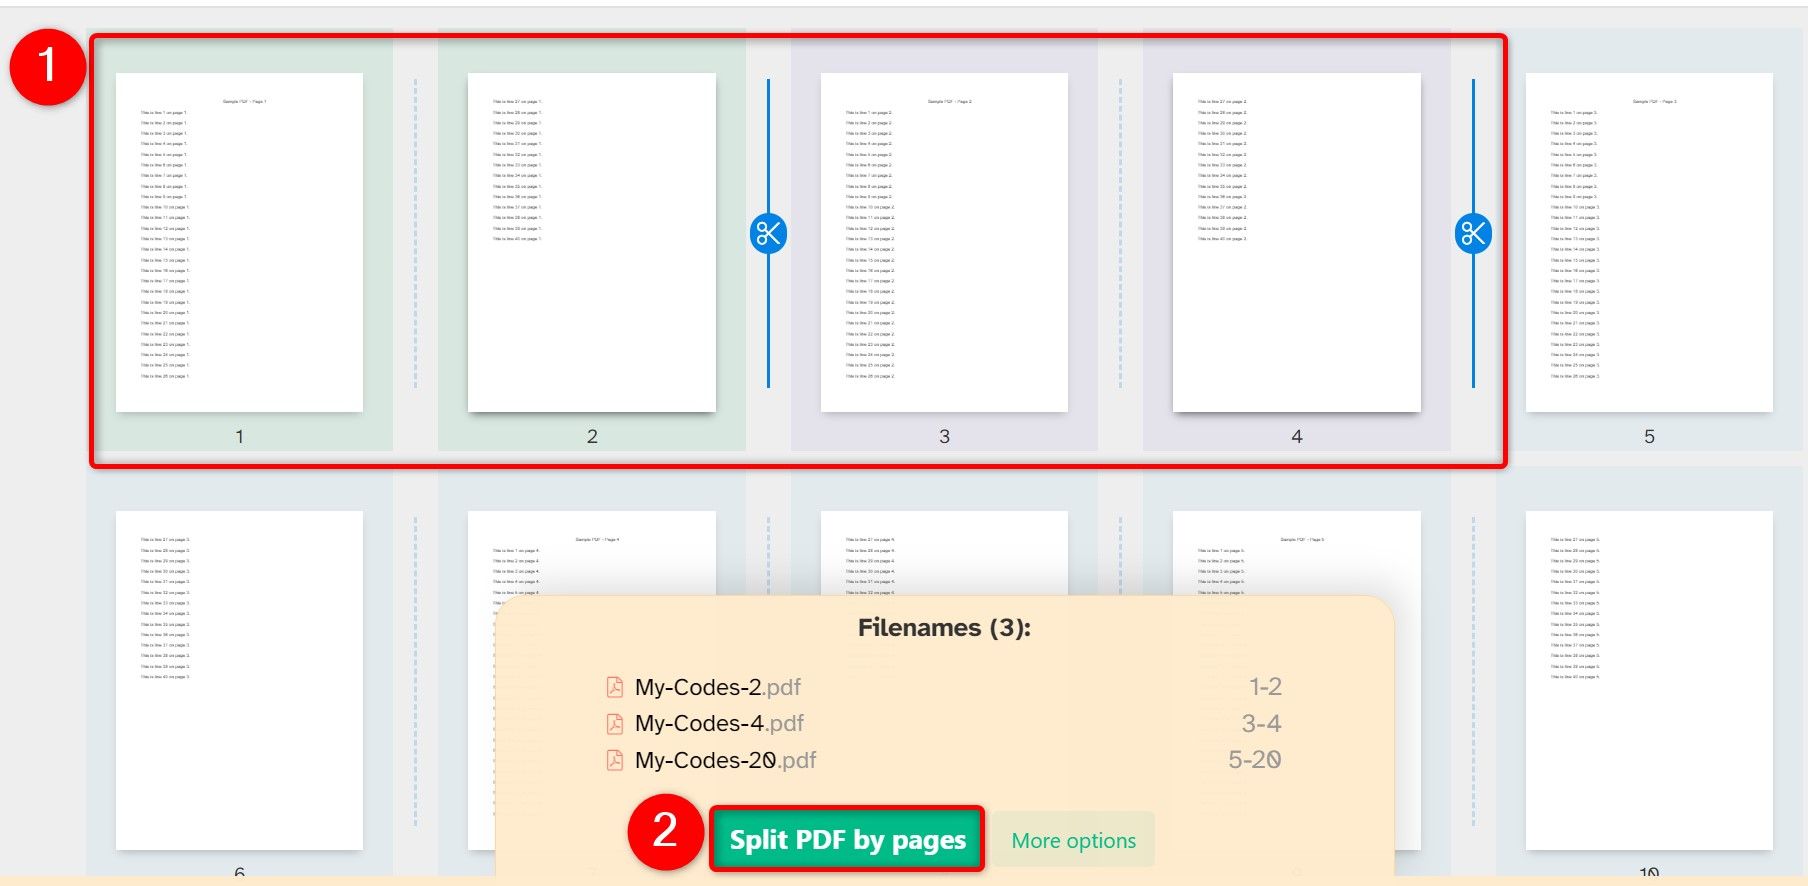
I’ll choose the “Select Pages to Split” option. Then, choose “Continue”

PDF split options and "Continue" highlighted on Sejda.

On the following screen, select the pages to extract. Click the dividing line, and the pages to the right of the line will go into a new PDF. When you’ve made your selection, at the bottom, click “Split PDF by Pages.”

PDF pages and "Split PDF by Pages" highlighted on Sejda.

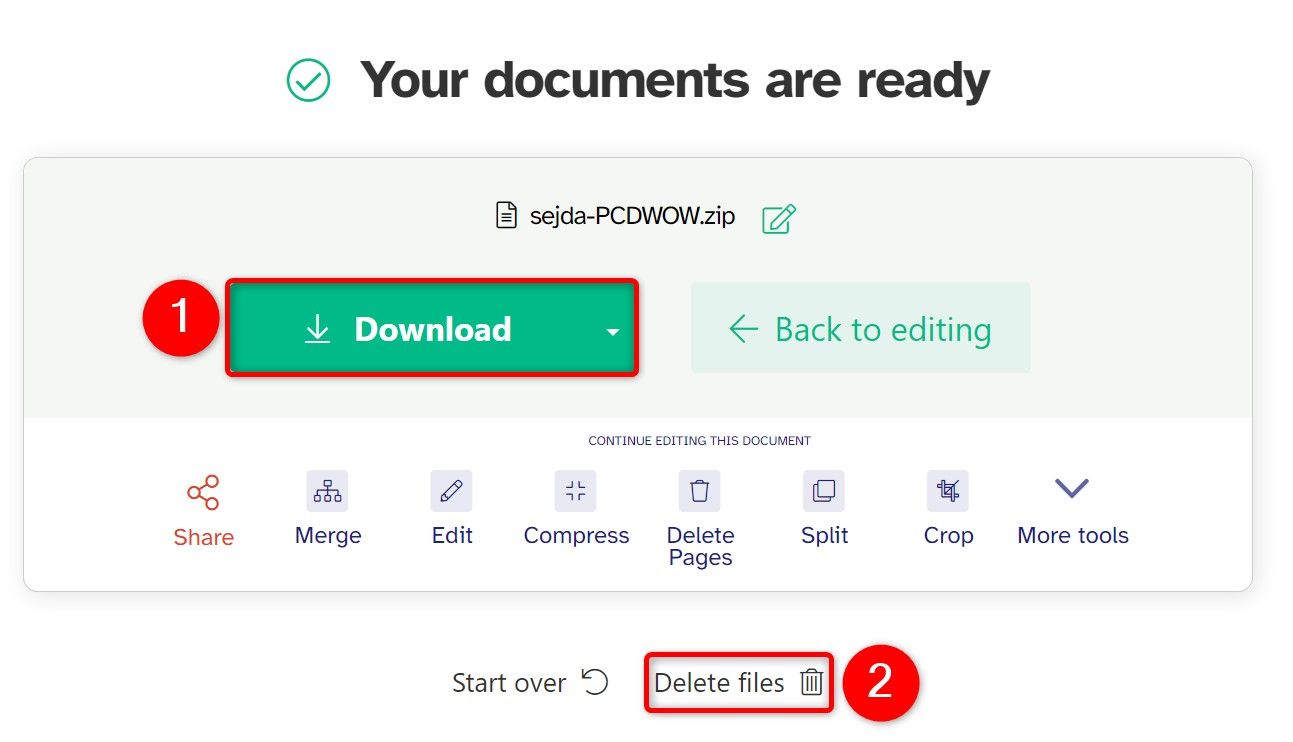
Select “Download” to save the resulting PDF(s) to your PC. Then, click “Delete Files” to remove your PDF from the site’s servers.

"Download" and "Delete Files" highlighted on Sejda.
[mai mult...]

How to recover a deleted File

If you’re unsure whether you permanently deleted a file, look around for it first. Try performing a search in File Explorer. Hopefully, you just misplaced the file and you can find it again.

Searching for a file in File Explorer on Windows.

You might also want to check your external storage drives, such as flash drives, HDDs, and SDDs, in case you moved the file there and don’t remember.

You can also peek inside the Recycle Bin. If you have a lot of files in there, you can use the search box in the top-right corner of the window to search for the file.

Searching for a file in the Recycle Bin on Windows.

You can also right-click in the Recycle Bin window and select Sort By > Date Deleted to more easily view recently deleted files.

Sorting files by the deletion date in the Recycle Bin on Windows.

If your file was stored in a cloud storage service like OneDrive, Google Drive, or Dropbox, log into your account on the service’s website and check your deleted files there—you may find the file is still recoverable. This is the cloud storage version of the Recycle Bin.

On OneDrive, for instance, click the “Recycle Bin”—the trash can icon—in the left sidebar to see your recently deleted files. Keep in mind that these will only remain in OneDrive for 30 days if it is your personal OneDrive.

The Recycle Bin in OneDrive.

Windows File History tool is useful for easily recovering deleted files and older versions of files from an external drive. It backs up files from specific locations, such as Libraries, Desktop, Contacts, and Favorites. If you enabled File History (it’s disabled by default), all you have to do is use it to recover the file.

File History saves the state of the included folders at a specific time. That means you will be reverting the entire folder to a previous version, and you may lose your recent files. Use this option if the deleted file is extremely important.

To do that, open the Start Menu, type File History in the search bar, and click it when it appears in the search results. Next, click “Restore Personal Files” in the left sidebar. Then, select the folder with the missing file and click the “Restore”—a green button with the restore icon—to restore the previous version of that folder.

Microsoft has a tool for recovering deleted and corrupted files on Windows. It’s called Windows File Recover, and it’s an easy-to-use command-line tool that ensures your files aren’t permanently lost.

Once you install Windows File Recovery, launch it by opening the Start Menu, typing Windows File Recover in the search box, and selecting it when it appears in the search results. You need to know which commands to use to find the deleted file, but since this is not an in-depth tutorial on how to use this tool, I will just use an example of finding a find named report.docx.

The command for this would look like this:

winfr C: D: /n \Users\CHIFUNDO\Documents\report.docx

In the above command, C: is the drive to check for the deleted file (source drive), and D: is the drive to store it once found (destination drive). The /n is called a switch, which is a modifier that tells the command to target specific files or folders. The file path afterward tells Windows File Recovery where to find the file on the C: drive.

Using Windows File Recovery to recover a file on Windows.

After the command runs successfully, check the destination drive for the recovered file. Keep in mind that this process can take a few minutes to complete.

[mai mult...]

How to send an encrypted mail in outlook?

  1. Create a New Email
  2. Select Options from the Ribbon
  3. Click Encrypt (or Permissions)
  4. Choose Encrypt-Only or another option from the dropdown menu

Sending with Outlook for Windows

Outlook on the Web (OWA)

  1. Create a new message
  2. Select Options from the Ribbon
  3. Select Encrypt, and then Encrypt or another option from the dropdown menu

Outlook client for Mac

  1. Create a new email
  2. Select the Encryption option from the message toolbar

Location of Encryption Button in Ribbon via Outlook Client for Mac

  1. If you don’t see the option of Encryption, select the three dots to add items to your toolbar

Location of three dots button to add more items to the message toolbar

  1. Drag the Encryption button to your toolbar and then hit Done.

Location of Encryption button to be added to Outlook's message toolbar

[mai mult...]

How to check if your computer is using all CPU cores?

To determine if your computer is effectively utilizing all CPU cores, you can use several methods depending on your operating system:

Windows:

1> Task Manager:

  • Right-click on the taskbar and select “Task Manager” or press Ctrl * Shift * Esc
  • * Go to the “Performance” tab
  • * Under “CPU,” you should see a graph showing usage for each core. If all cores are active, you’ll see activity across multiple graphs (one per core)
  • 2> Resource Monitor:
  • * Open “Resource Monitor” by searching for it in the Start menu
  • * Navigate to the “CPU” tab
  • * Look at the “CPU Usage” section to see how much of each core is being utilized.
  • macOS:
  • 1> Activity Monitor:
  • * Open “Activity Monitor” (usually found in Applications > Utilities)
  • * Click on the “CPU” tab
  • * You’ll see a graph displaying CPU usage. Each core is represented separately. If all cores are in use, you’ll see activity across multiple cores.
  • Linux (using command-line tools):
  • 1> htop:
  • * Install htop if it’s not already installed (sudo apt install htop on Debian-based systems).
  • * Launch htop from the terminal.
  • * You’ll see a detailed view of CPU usage, including individual core usage.
  • 2> top:
  • * Run top in the terminal.
  • * Press 1 (the number one) to display individual CPU core usage.
  • Checking in all cases:
  • * Activity Indicators: Most monitoring tools will show real-time activity for each core. If you see spikes or sustained usage across multiple cores, it indicates that your system is utilizing all available CPU cores.
  • * CPU Load: A high overall CPU load (close to 100% across all cores) during intensive tasks like rendering, compiling, or running multiple applications simultaneously suggests that all cores are actively used.

By using these methods, you can effectively determine if your computer is utilizing all CPU cores and monitor how they are being utilized. This information is particularly useful for ensuring that your system is performing optimally under heavy computational loads.

[mai mult...]

How to add an Email Account to Microsoft Outlook?

Add an Email Account to Outlook (New Outlook)

  1. Select View settings from the View tab
  2. Select Email accounts under Accounts
  3. Select Add Account and then type in your email address and click Connect.

Add an email account to outlook

4. If requested, enter your account password and click Done.

Add an Email Account to Classic Outlook

1. Go to File > Add Account

add an email account to classic outlook

2. Click Connect after entering your email address.

click connect after entering your email address

3. If asked, reenter your password and choose OK > Finish to access your Outlook email account.

Link Email Account in Windows

Microsoft enables you to link your iCloud, Google, Yahoo,Outlook, and Office 365 accounts in Windows.

1. Navigate to Settings > Accounts > Email & accounts. Then, choose Add account.

link email account in windows

2. Microsoft enables you to connect your Office 365, Google, Yahoo, and iCloud accounts. Select the service you wish to add, then enter your username and password to sign into the account.

add an email account to your outlook

3. Windows will display the data that the Mail, Contacts, and Calendar Windows programs require access to. To allow the required permissions, click the Agree button.

add an email address to outlook

[mai mult...]