Soluții

How to use eCryptfs on Linux

eCryptfs is a powerful encryption tool for Linux that allows users to encrypt and decrypt files and directories on their system. It is a popular option for securing sensitive data on Linux systems.

Install eCryptfs

eCryptfs is already included in the official Ubuntu repositories, so we can install it using the apt command. Open the Terminal in your Ubuntu system by pressing Ctrl+Alt+T. Now in the Terminal, execute this command to install eCryptfs:

sudo apt install ecryptfs-utils –y

Encrypt Directories using eCryptfs

For instance, I want to encrypt the “Myfiles” directory under my Home directory. In this case, the command would be:

sudo mount -t ecryptfs ~/Documents/Myfiles/ ~/Documents/Myfiles/

When you run the above command, you will be asked to provide some details along with passphrase. The passphrase is actually the encryption key that will be used to later to decrypt the encrypted directory.Also, note that the details you provide will be later used when remounting the directory.

Now the directory is encrypted and mounted. You can verify it by running the following command:

mount | grep ecryptfs
Verifying Encryption

Let’s create a document in the mounted directory using the Nano editor.

sudo nano ~/Documents/Myfiles/sample.txt

Now add some text in the file and press Ctrl+O and Ctrl+X to save and exit the file respectively. Now try to view this document using the cat command:

cat ~/Documents/Myfiles/sample.txt

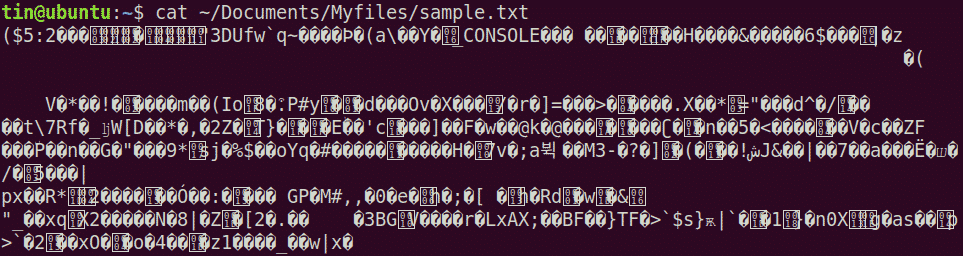
You will see that the document is unencrypted and you can view the content. It is due to the reason that the directory is mounted at this time. Remember that as long as the directory is mounted, you will be able to see the content unless you unmount it.

Now let’s try unmounting the directory. Use the following syntax to do so:

umount [mounted_directory]

In this case, it would be:

umount ~/Documents/Myfiles/

As the directory is unmounted, so now let’s view the document using the cat command. This time, you will not be able to view the original content. Instead, you will see the encrypted text.

To access your files again, you will need to re-mount them and enter the same passphrase and details you have set earlier while mounting for the first time.
[mai mult...]

How to turn off the Linux login banner

When you log into Linux, either via SSH or the console, you are greeted with a banner containing important information. If you do everything you can to protect your Linux server, the information this banner reveals can be a gold mine for strangers and potential attackers. Information such as kernel version, distribution type, available updates, and much more can be exposed.

How to disable the login banner on Linux or Unix with .hushlogin
  • First, create a new empty individual file in your login directory ($ HOME) called ~ / .hushlogin. At the Linux or Unix shell prompt, type the following touch command: touch ~/.hushlogin
  • That is all. Now try to login with ssh command: ssh vivek@192.168.2.17
Disable the login banner on Linux or Unix using the .hushlogin file
  • touch ~/.hushlogin
  • #OR#
  • touch $HOME/.hushlogin
  • #BASH#
  • >$HOME/.hushlogin

In summary, the .hushlogin file suppresses login messages in Linux or Unix, and using ssh command you can log in without revealing sensitive information about the system.

[mai mult...]

How to Set Up a Stronger Passcode on Your iPhone

Your iPhone’s passcode is the first line of defense when it comes to protecting your private data. Here’s how to set up a stronger one than the default six-digit passcode that you’re likely already using.

If someone with malicious intentions finds out the passcode for your ‌iPhone‌, they could end up causing you all sorts of trouble. With passcode access to your ‌iPhone‌’s contents, they could change your Apple ID password, allowing them to disable Find My so that you can no longer locate your device. They could make contactless payments with Apple Pay, and gain access to your iCloud Keychain passwords. They could even wipe your ‌iPhone‌ for resale.

That’s why you should never share your passcode with anyone who isn’t a trusted family member. If something out of the ordinary happens and you need to loan your ‌iPhone‌ to someone who isn’t family, you can at least temporarily change the passcode to something different, then change it back when the phone is back in your hands. (The following steps show you how to do that.)

If you’re worried about strangers seeing you enter your ‌iPhone‌ passcode in public, then the best solution is to use Face ID or Touch ID whenever possible. Your biometric information is stored on your device’s Secure Enclave, which is a lot more secure than your passcode.

If you can’t or don’t want to use ‌Face ID‌ or ‌Touch ID‌ for whatever reason, another option is to set up a stronger passcode. By default, ‌iPhone‌ passcodes are six digits, but Apple includes options to create a four-digit passcode, or a longer numeric or alphanumeric passcode.

The default six-digit passcode is obviously more secure than any four-digit one, while the strongest passcodes use a combination of letters and numbers. Just bear in mind that the longer and more complex the passcode, the harder it will be to memorize and the longer it will take to type in. If you don’t have a great memory for passcodes, it might not be the best idea to make it any longer than six digits. With all that in mind, here’s how it’s done.

[mai mult...]

Cum ștergeți mai multe contacte de pe iPhone

Aplicația „Contacte” este adesea ascunsă într-un dosar și uitată. Există șanse mari să aveți niște contacte vechi și duplicate care le aglomera. Vă vom arăta câteva modalități de a șterge mai multe contacte de pe un iPhone.

Apple are din punct de vedere tehnic o metodă oficială pentru a elimina mai multe contacte simultan pe un iPhone. A fost adăugat în iOS 16, dar așa cum vom arăta mai jos, de fapt nu este foarte practic.Din păcate, veți avea nevoie de o aplicație terță parte pentru a șterge în masă contactele într-un mod mai logic. Vestea bună este că există aplicații potrivite.

[mai mult...]