Stații de lucru

OS - Windows 7887 Solutii

Reguli si plangeri 8 Solutii

OS - OS X 407 Solutii

Reguli de configurare 11 Solutii

Licentiere 18 Solutii

Securitate 176 Solutii

Copie de rezerva (Backup) 68 Solutii

Antivirus 71 Solutii

Aplicatii specifice 4368 Solutii

Hardware 287 Solutii

How to Use Adobe Photoshop’s AI Features

Adobe Photoshop is one of the most popular and powerful software for editing and creating images. Whether you are a professional photographer, graphic designer, or hobbyist, you can use Photoshop to enhance your photos, create realistic or fantastical scenes, and express your creativity. Now Adobe Photoshop AI Is An Addition To It (Adobe Photoshop’s AI Features Herein Below)

But did you know that Photoshop also uses artificial intelligence (AI) to help you with your image editing tasks? AI is a branch of computer science that aims to create machines or systems that can perform tasks that normally require human intelligence, such as understanding language, recognizing patterns, or generating content.

In this article, we will explore some of the ways that Adobe Photoshop uses AI to make your image editing faster, easier, and more fun. We will also look at some of the benefits and challenges of using AI in Photoshop, and how Adobe is addressing them.

Generative Fill: A New Way to Manipulate Images with Text

One of the most exciting features that Adobe recently added to Photoshop is Generative Fill. This feature allows you to manipulate images with text prompts, using a generative AI system called Firefly.

Firefly is a core technology system that Adobe developed specifically for generating imagery. It was trained on Adobe’s own collection of stock images, as well as publicly available assets. Firefly can understand natural language and generate realistic images that match the style and lighting of the original image.

For example, if you have a picture of a single flower and you want to turn it into a field of flowers with a mountain range behind it, you can simply type “add more flowers and mountains” in the Generative Fill dialog box, and Firefly will do the rest. You can also delete elements from images by typing “remove” followed by the name of the element.

Generative Fill is a powerful tool that can help you create new images out of multiple ideas, without having to spend hours searching photo archives and stitching together pieces of existing images by hand. You can use it to extend an original image that was cropped too closely, add or remove objects or people from a scene, or create entirely new compositions based on your imagination.

Super-Resolution: A New Way to Increase Image Quality with AI

Another feature that Adobe added to Photoshop using AI is Super-Resolution. This feature allows you to increase the number of pixels in an image by up to four times, without losing quality or detail.

Super-Resolution uses a deep learning model that was trained on millions of images to learn how to enhance low-resolution images. It can fill in missing details, sharpen edges, and reduce noise and artifacts.

Super-Resolution is useful for improving the quality of old or blurry photos, enlarging small images for printing or web use, or preparing images for high-resolution displays. You can access it from Camera Raw, Lightroom, or Lightroom Classic software.
Benefits and Challenges of Using AI in Photoshop

Using AI in Photoshop has many benefits for users and creators. AI can help you save time and effort by automating tedious or complex tasks, such as cropping, resizing, masking, or selecting. AI can also help you enhance your creativity by generating new ideas, suggestions, or content based on your input. AI can also help you improve your skills by providing feedback, guidance, or tutorials.

However, using AI in Photoshop also poses some challenges and risks. One of them is the ethical and legal implications of using AI-generated content. How do you ensure that the content you create with AI is original and not infringing on someone else’s rights? How do you ensure that the content you create with AI is accurate and not misleading? How do you ensure that the content you create with AI is respectful and not harmful to others?

Another challenge is the trust and transparency of using AI systems. How do you know what the AI system is doing and why? How do you control or adjust the output of the AI system? How do you verify or validate the quality and reliability of the AI system?
Conclusion

Adobe Photoshop is more than just a software for editing images. It is also a platform for exploring and experimenting with artificial intelligence. By using AI features such as Generative Fill and Super-Resolution, you can create stunning images that reflect your vision and style.

However, using AI also comes with responsibilities and challenges. You need to be aware of the ethical and legal implications of using AI-generated content, as well as the trust and transparency issues of using AI systems. You also need to follow Adobe’s policies and guidelines for using AI responsibly and ethically. AI is not a replacement for human creativity but a complement to it. By using AI in Photoshop wisely and creatively, you can unleash your full potential as an image creator.

[mai mult...]

Cum se instalează Rspamd în Ubuntu

Rspamd este un sistem puternic de filtrare a spam-ului pentru serverele de e-mail. Este scris în limbaj C și este destul de rapid în performanță. Este foarte personalizabil și vă permite să utilizați diferite strategii pentru a combate spam-ul. Puteți evalua fiecare mesaj folosind expresii regulate, analize statistice și liste negre.

1. Instalați Redis

Rspamd necesită un sistem de stocare și stocare în cache a datelor. Vom folosi Redis în acest scop. Deschideți terminalul și rulați următoarea comandă pentru a instala Redis.

$ sudo apt install redis-server
2. Instalați Unbound

De asemenea, vom avea nevoie de Unbound, un solutor DNS sigur. Reduce numărul de solicitări DNS externe și îmbunătățește performanța. Puteți sări peste acest pas dacă doriți. Rulați următoarele comenzi pentru a instala Unbound.

$ sudo apt update 
$ sudo apt install nelegat

Setările implicite Unbound sunt suficiente pentru configurarea Rspamd. Rulați următoarele comenzi pentru a-l seta ca rezolutor DNS implicit.

$ sudo echo "server de nume 127.0.0.1" >> /etc/resolvconf/resolv.conf.d/head 
$ sudo resolvconf -u
3. Instalați Rspamd

Acum vom instala Rspamd. Mai întâi, vom instala pachetele necesare.

$ sudo apt install software-properties-common lsb-release 
$ sudo apt install lsb-release wget

În continuare, vom adăuga cheia GPG de depozit la lista de surse de pe sistemul nostru.

$ wget -O- https://rspamd.com/apt-stable/gpg.key | sudo apt-key add -

Activați depozitul Rspamd cu următoarea comandă.

$ echo "deb http://rspamd.com/apt-stable/ $(lsb_release -cs) main" | sudo tee -a /etc/apt/sources.list.d/rspamd.list

Odată ce am activat depozitul, instalăm rpamd cu următoarea comandă.

$ sudo apt update 
$ sudo apt install rspamd
4. Configurați Rspamd

Vom crea un fișier de configurare pentru Rspamd la /etc/rspamd/local.d/local.d/ care va suprascrie configurația implicită.

Rulați următoarea comandă pentru a crea fișierul de configurare pentru lucrătorul normal.

$ sudo you /etc/rspamd/local.d/worker-normal.inc

Adăugați următoarea linie pentru a vă asigura că Rspamd ascultă numai portul local 11333. În mod implicit, ascultă și portul 11333 pe toate interfețele.

bind_socket = "127.0.0.1:11333";

Salvați și închideți fișierul. Apoi, creați fișierul de configurare pentru proxy-ul lucrător care ascultă portul 11332.

$ sudo /etc/rspamd/local.d/worker-proxy.inc

Adăugați următoarele linii pentru a activa protocolul milter și pentru a permite altor instrumente precum Postfix să comunice cu acesta.

bind_socket = "127.0.0.1:11332"; 
milter = da; 
timeout = 120s; 
upstream "local" { 
  implicit = da; 
  self_scan = da; 
}

Salvați și închideți fișierul. Apoi, setăm o parolă pentru lucrătorul controler cu următoarea comandă. Înlocuiți password_here cu o parolă la alegere.

$ rspamadm pw --encrypt -p parola_aici

Veți vedea o ieșire ca următoarea

$4$ghz7u8nxgggsfay3qta7ousbnmi1skew$tdat4nsm7nd3ctmiigx8kjyo837hcjodn1bob5jaxt7xpkieoctb

Copiați-l.

Creați un fișier nou cu următoarea comandă, pentru lucrătorul controler.

$ sudo /etc/rspamd/local.d/worker-controller.inc

Adăugați următoarea linie la acesta.

parola = "$4$ghz7u8nxgggsfay3qta7ousbnmi1skew$tdat4nsm7nd3ctmiigx8kjyo837hcjodn1bob5jaxt7xpkieoctb";

Salvați și închideți fișierul. În continuare, vom configura Rspamd să funcționeze cu Redis. Deschideți fișierul classifier-bayes.conf.

$ sudo you /etc/rspamd/local.d/classifier-bayes.conf

Adăugați următoarea linie.

servere = "127.0.0.1"; 
backend = "redis";

Salvați și închideți fișierul. Apoi, deschideți fișierul milter_headers.conf. Adăugați următoarea linie.

utilizare = ["x-spam-bar", "x-spam-level", "authentication-results"];

Salvați și închideți fișierul. Rulați următoarea comandă pentru a reporni serverul Rspamd.

$ sudo systemctl restart rspamd
5. Configurați interfața web

În cele din urmă, vom configura interfața web pentru Rspamd, care vă permite să vedeți statistici detaliate despre performanța acestuia. În acest scop, aveți nevoie de un server web. Vom folosi NGINX în acest scop. Rulați următoarea comandă pentru a instala NGINX.

$ sudo apt install nginx

Deschideți fișierul său de configurare într-un editor de text sau creați unul nou, așa cum se arată mai jos

/etc/nginx/sites-enabled/example.conf

Adăugați următoarele rânduri la acesta.

locație /rspamd { 
    proxy_pass http://127.0.0.1:11334/; 
    proxy_set_header Gazdă $gazdă; 
    proxy_set_header X-Forwarded-For $proxy_add_x_forwarded_for; 
}

Salvați și închideți fișierul. Reporniți NGINX pentru a aplica modificările.

$ sudo systemctl reîncărcați nginx

Acum, dacă deschideți browserul și accesați https://example.com/rspamd/, veți vedea un ecran de autentificare care vă solicită parola. Introduceți parola salvată la pasul 4 pentru a trece la interfața web Rspamd.

[mai mult...]

Google Chrome Now Has More Password Manager Features

Google’s feeble password manager, integrated into Chrome, has evolved a lot by virtue of it having to compete with actual password managers. It’s still no substitute for a dedicated password manager, but Google is rolling out a few improvements.

Google has unveiled a significant update to its popular password management tool, introducing biometric authentication in the desktop browser. Biometric authentication was previously available only on mobile devices, thus boosting security and convenience by letting them log into apps and services quickly using only their fingerprint.

With the latest update, though, Google’s Password Manager now supports fingerprint and facial recognition on desktop computers as well. People can conveniently unlock their accounts by scanning their fingerprints or using facial recognition technology, thus eliminating the need to remember complex, long passwords (which you should be using at a minimum if you’re expecting to be protected against hackers since there seems to be a major security breach every few weeks these days).

In addition, the password manager is now easier to access. It has its own shortcut in Chrome’s three-dot menu, and you can even put a desktop shortcut if you’re on Mac or Windows, too. Additionally, the password manager itself feels much fresher to use.

It now employs a search bar up top, letting you quickly look up passwords, and you’re also even getting a cute, four-color icon as well. You can import passwords via a .csv file, and you can add notes to the passwords you save, letting you look them up later much more easily. These updates are now rolling out, so make sure to check them out whenever they land on your computer.

[mai mult...]

The Apple Vision Pro’s Price Isn’t As Crazy At It Seems

When Apple announced the price of their groundbreaking new mixed reality headset, the Vision Pro, jaws around the world collectively dropped. At a hefty $3,499, it’s not for everyone, but is it really so unreasonable if we take a closer look?

The Vision Pro Really Does Totally New Things

First off, the Apple Vision Pro isn’t just another gadget; it’s an entirely new way of interacting with digital content. It blends the digital and physical worlds, enabling you to navigate digital spaces with your eyes, hands, and voice. While other products have offered some subset of what the Vision Pro promises to do, there is no comparative mixed reality (really, we should say extended reality) product to compare it against directly.

While we’ll have to wait for the device to get into the hands of independent reviewers to learn if the reality (ha!) measures up to Apple’s carefully-curated presentation, assuming it does what it says on the tin, this is a landmark device.

You can point at any number of things that are peerless in the Vision Pro. The micro OLED offers such high pixel density that we expect the pixel grid to be entirely invisible. The R1 spatial processor and complex array of sensors blow everything else we can think of out of the water. The eye-tracking system is practically precognitive.

Yet, it’s not just the objectively novel subcomponents in the Vision Pro that make it something new and special. It’s the sum of those parts held together by the underlying software, the interface design, and its integration into the Apple ecosystem.

Setting aside whether the Vision Pro will do things as well as promised, there is simply no equivalent product that promises to do what the Vision Pro does—just like the first iPhone, which did not have a direct peer as a holistic product

The R&D Costs Were Likely Enormous

The Vision Pro isn’t just an iteration of existing technology; it’s a dramatic leap forward. It represents years of research and development, with a hardware design that is both innovative and complex.

Make no mistake, Apple has been working on the building blocks of this device for a long time. They were acquiring AR startups years ago, and even now, just after the launch announcement of Vision Pro, have made another such purchase.

Apple’s ARKit API in every modern iPhone and iPad paved the way for the Vision Pro to be spatially aware. When ARKit launched as a software solution working with existing iPhone cameras, it made Google hardware-based AR platform “Tango” seem quaint. It wasn’t long before Google killed off that project in favor of ARCore, its own ARKit-like solution.

The big takeaway here is that Apple has to recoup some of the R&D costs from the first generation of their product, and because it contains so much new and cutting-edge technology, we can’t imagine that the cost of each unit is particularly low.

[mai mult...]

Crucial T700 SSD Review

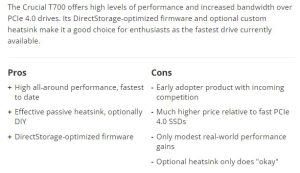
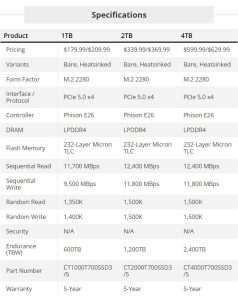
The Crucial T700 sets a new bar in performance for consumer SSDs, pushing speed higher than any other PCIe 5.0 NVMe drive on the market. It reigns as the king of the hill for sequential bandwidth and random IOPS, at least for now. Its native DirectStorage firmware optimization is an added benefit over almost all PCIe 4.0 SSDs for future gaming, as well. Crucial departs from the reference heatsink design with its own effective solution while also offering a cheaper, bare-drive variant for easier installation with motherboard and custom M.2 heatsinks. Together, this makes it a nice option for enthusiasts and early adopters.

The T700 is part of a wave of PCIe 5.0 SSDs about to deluge the consumer SSD market, all so far based on the same Phison E26 controller and Micron flash. This puts pressure on the manufacturers to differentiate their products in other ways, particularly with cooling. This could bring some innovation to the market, but current industry trends have created lingering concerns about the future of NAND that could eventually reduce the buyer’s pricing advantage from such competition.

Competing controllers are also on the way with InnoGrit’s IG5666 and SMI’s SM2508, and flash of the 232-Layer generation should be in wider production from Micron and other manufacturers. Faster drives based on the Phison E26 SSD Controller have also been announced offering up to 14 GBps, so early drives like the T700 have a limited window to shine. We’ll know more after Computex, which is currently underway, but many of these drives won’t be available until later in the year.

[mai mult...]