Situatie
We can agree that BSoD (Blue Screen of Death) is something no one wants to see on their Windows PC. They appear rarely but when they do, then they certainly point towards a major issue. A large number of users reported BSoDs caused by Chrome, while they were roaming the internet or watching videos. Apparently, the system just crashed on them.
Now, we’re afraid that this matter is hardly caused by the Chrome on its own. The browser is probably only a trigger. Nonetheless, we have a hefty number of steps for you to try and, hopefully, address the BSoD.
Solutie
1). Disable Hardware Acceleration
The large-scale issue like this can hardly be provoked by any browser. However, since the affected users reported BSoD while browsing or watching videos, we can’t ignore Chrome. There’s only one option which might cause BSoD in Windows 10 in regards to Chrome, and that’s Hardware Acceleration.
This setting allows Chrome to use the hardware instead of software to improve some functions like rendering. Disabling it is a long shot as it rarely causes any issues, but we can give it a try.
Here’s how to disable Hardware Acceleration in Google Chrome:
- Open Chrome.
- Click on the 3-dot menu and open Settings.
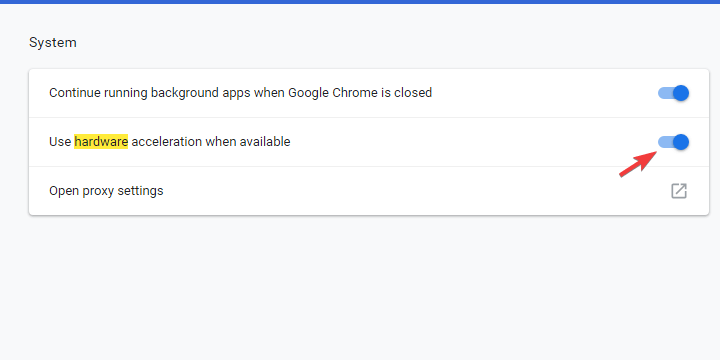
- In the Search bar, type hardware.
- Toggle off the “Use hardware acceleration when available” setting.
- Restart your browser.
2).Run SFC and DISM
This issue probably goes beyond Chrome. We’re possibly looking at the Windows system corruption of some kind and the best way to resolve it is with SFC and DISM combined.
Those two are the built-in system utilities run through the elevated command prompt. Once you get them running, they’ll scan for system errors and fix them by replacing corrupted or incomplete files.
Here’s how to run SFC and DISM respectively:
- In the Windows Search bar, type cmd. Right-click click on Command Prompt and run it as admin.
- In the command-line, type sfc/scannow and press Enter.
- After its done, type the following command and press Enter after each:
- DISM /online /Cleanup-Image / ScanHealth
- DISM /Online /Cleanup-Image /RestoreHealth
- When the procedure ends, restart your PC.
3). Disable Fast Boot and start PC in a clean boot regime
One common troubleshooting step is to try clean boot which should eliminate a possible negative impact of third-party applications on your system stability. In addition, disabling Fast Startup feature on Windows 10 might help as well.
- In the Windows Search bar, type Power and open Power & sleep settings.
- Click on the Additional power settings.

- Click on the “Choose what the power buttons do” from the left pane.
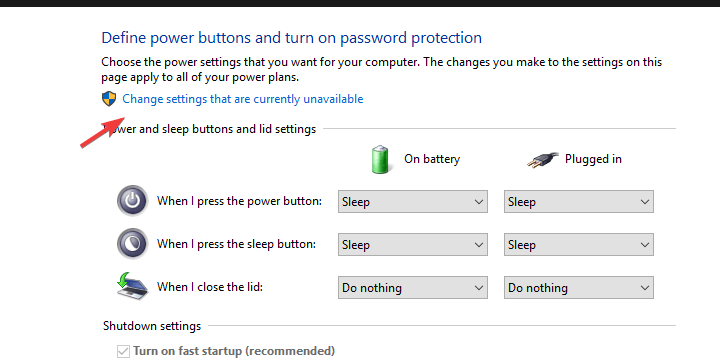
- Choose Change settings that are currently unavailable.
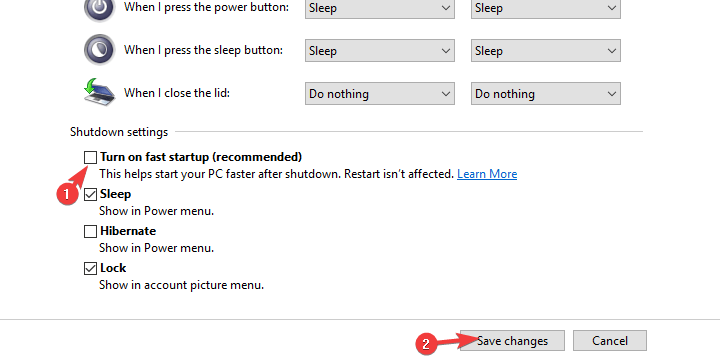
- Disable Fast Startup and confirm changes.
- Now, in the Windows Search bar, type msconfig and open System Configuration.
- Under the Services tab, check the “Hide all Microsoft services” box.
- Click “Disable all” to disable all active third-party services.
- select the Startup tab and go to Task Manager.
- Prevent all programs from starting with the system and confirm changes.
- Restart your PC.
4).Boot into Safe mode
If you’re still experiencing BSoD, let’s try booting in the Safe mode with Networking. Now, if the problem disappears, we strongly suggest following instructions from step 6 on this list. If it’s still present, move to the next step. Booting into the Safe mode was simpler before, but it requires an extra effort to get it on Windows 10.
Here’s how to boot into the Safe mode with Networking on Windows 10 and test Chrome:
- During the startup, when the Windows logo appears, press and hold the Power button until the PC shuts down.
- Power on the PC and repeat the procedure 3 times. The fourth time you start the PC, the Advanced recovery menu should appear.
- Choose Troubleshoot.
- Select Advanced Options and then Startup settings.
- Click Restart.
- Choose Safe mode with Networking from the list.
- Run Chrome and look for improvements.
5). Update Windows and BIOS
Now we’re reaching the most probable reason for the BSoD. And those are drivers. The simplest way to address this is to allow Windows Update to install all missing drivers. In addition, we’ll need you to check on the BIOS/UEFI version you’re running and apply updates if necessary.
For the driver update, we suggest opening Device Manager and checking for driver updates. They should be administered automatically. If that doesn’t help, move to next step.
6). Run Driver Verifier and reinstall failing drivers
The final step before we move to a clean reinstallation. If you’ve made any hardware changes recently, double check the associated drivers. Some of them are probably causing the BSoD, and the focus is on wireless and GPU drivers. The best way to get your hands on a proper fully-functional driver is to look it up on the official OEM’s support website.
However, if you’ve already checked in the Device Manager and no drivers are missing, we suggest running Driver Verifier, the built-in tool which detects illegal actions made by the corrupt drivers. That way you’ll find out what exact driver is causing BSoD and you can install a proper iteration timely.
Here’s how to run Driver Verifier on Windows 10:
- Make sure to create a Restore point.
- Right-click on the Start and open Command Prompt (Admin) from the Power User menu.
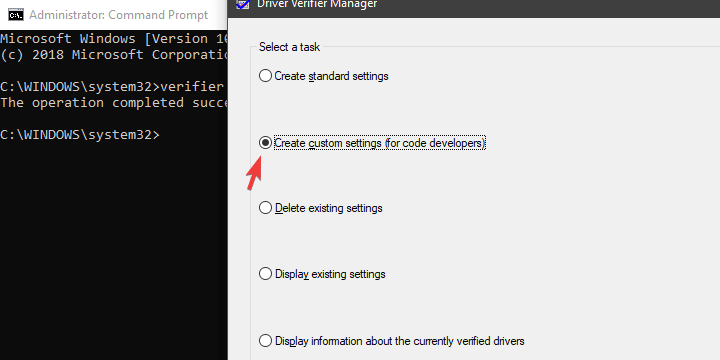
- In the command line, type verifier and press Enter.
- The windows will pop-up.
- Choose “Create custom settings (for code developers)” and click Next.
- Select I/O verification, Force pending I/O requests, and IRP logging from the list and click Next.
- On the next screen, click “Select driver names from a list”.
- Check all non-Microsoft drivers and click Finish.
- Reboot your PC and let the Driver Verifier work in the background for no more than 48 hours. 24 hours should do. You might experience slight performance drops as the tool will be a burden on drivers for the testing purpose.
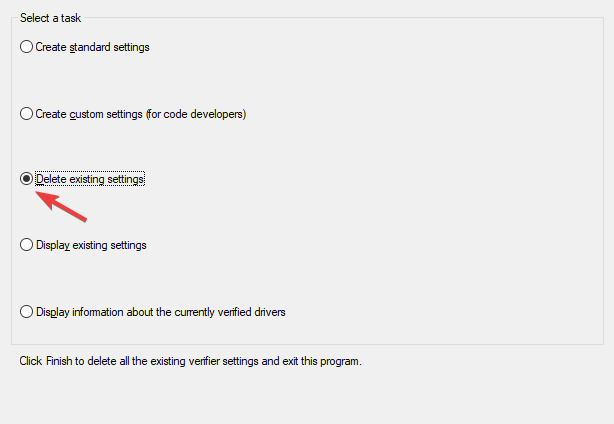
- After 24 hours or so, open Driver Verifier again and choose to Delete existing settings and click Finish. Restart your PC.
7).Reinstall Windows 10
Finally, if none of the previous steps worked for you, we suggest reinstalling Windows 10 cleanly. Of course, this time we suggest relying on OEM-provided drivers instead of their generic versions provided by Windows Update.


Leave A Comment?