Situatie
Adding a table of contents to your document is a useful way to show readers each topic/chapter listed inside your file. When you create a table of contents in Google Docs, it automatically generates one and adds links that jump to each section they reference when clicked, allowing for quick access to specific parts of your document.
Place the insertion point in your document where you want the table of contents to go. Typically, tables of content appear after the initial title but before the introduction or body of your document.
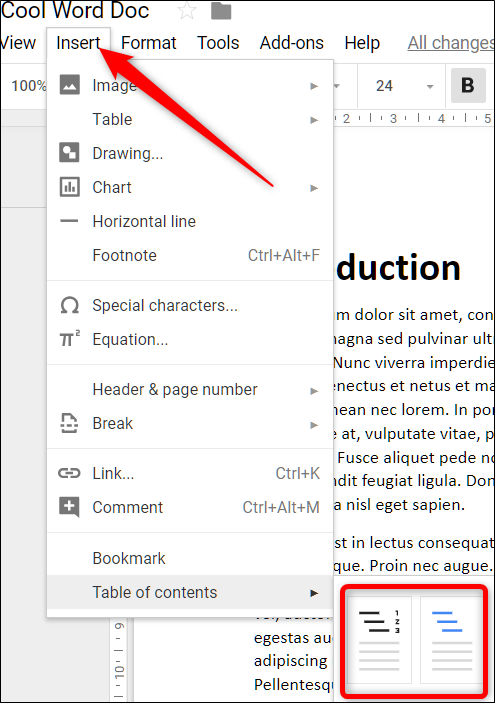
Click “Insert,” point to “Table of Contents,” and then click on either of the two options provided. The first option is a plain-text table of contents with numbers on the right side. The second option doesn’t use page numbers, but instead inserts hyperlinks that jump to the noted section. The first is intended for documents you’ll print, the second for documents to be viewed online.

Note that in order to create an automatically generated table of contents that links to specific sections of your document, you must format each chapter—or title—using Google Docs’ built-in head styles. This lets Docs know how to populate the table add clickable links.

Each heading style is treated slightly differently in the table of contents. For example, the Heading 1 style denotes a top-level entry in the table of contents. Headings using the Heading 2 style are considered subsections and appear indented under the preceding Heading 1 style in the table. Heading 3 is a subsection of Heading 2, and so on.

If you change your headings (add, remove, or just modify the text), you can update your table of contents to reflect those changes by clicking the table of contents in the body of the document and then clicking the “Update Table of Contents” button (which looks like a Refresh button).

To delete a table of contents, right-click it and select “Delete Table of Contents.”


Leave A Comment?