Situatie
With the update 11.5.1, macOS 11 Big Sur has stopped supporting photo libraries on external drives that are either formatted for Windows OS or exFAT drives. The only file system that macOS now supports is APFS.
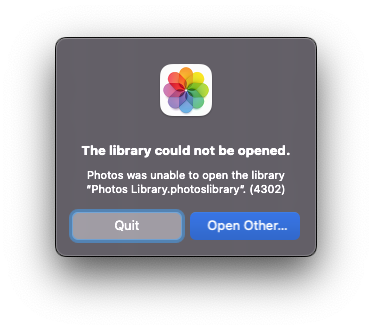
Various users who updated their Mac to Big Sur (11.5.1) were unable to access their Photos library from an external hard drive and saw error 4302. The error might also surface when: There are disk errors, Conflicting permissions, Library corruption.
Solutie
Pasi de urmat
Repair Corruption Issues With Photos Library
- Exit Photos app
- Open Photos from Launchpad or Dock
- Choose Repaid
- Enter your Mac’s password
- Wait for the process to complete.
Use A Time Machine Backup
- Exit Photos app
- Start Finder and head to the directory that has your photo library
- From the menu bar, select Time Machine and choose Enter Time Machine
- Navigate the Time Machine backups using the up arrow and down arrow keys
- Once you have found the version you want to restore, click on Restore.
- Open Photos. In case you use iCloud Photos, recent changes will start syncing soon.
Ignore Ownership of External Hard Drive
- Select the External Drive using the ctrl + click operation, or select File > Get Info from the Finder sidebar
- Click on the Lock icon and furnish your admin password
- Click on the arrow next to Sharing & Permissions
- Click on the checkbox that says Ignore ownership on this volume.
Perform a System Update
- Click on the Apple Menu
- Select System Preferences
- Select Update Now
- If there is an update available you will see an Upgrade Now button.
Repair External Drive Using Disk Utility
- Open Launchpad
- Select Other, and then click on Disk Utility
- Select the drive from the sidebar
- Choose the First Aid option
- Click on Run
- Wait until Mac checks for any errors and once the process is complete, click Done.
Format Your External Drive To APFS or HSF+
- Open Disk Utility
- Select your external drive from the sidebar
- Click on the Erase button
- Set the Format to Mac OS Extended or APFS and Scheme to GUID Partition Scheme
- Choose Erase to confirm
- Select Done.
Leave A Comment?