Situatie
You have three options when it comes to Windows Search Indexing:
- Remove folders from indexation to reduce the scan time
- Disable content indexation
- Disable Windows Search indexing completely
- Remove folders from indexation
It may be enough sometimes to limit the folders that you want Windows Search to index. Windows Search indexes some folders, like Downloads, Documents or Desktop by default. If you are a heavy downloader, the downloads folder may be full of files and folders all the time. Additionally, file and folders may get deleted regularly as well which means that indexing has a lot of work to do to process that folder.
Tip: It is a good idea to limit indexation to folders that you want Windows Search to index. If you work with a lot of documents and use Windows Search to find them, you may want to keep the Documents folder but remove others that you don’t require.
- Indexing Options
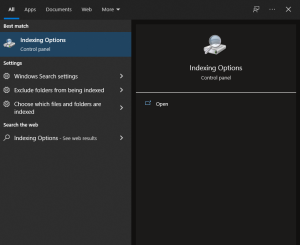
You manage the indexing locations in the Indexing Options. To load the configuration, tap on the Windows-key, type indexing options, and select the result of the same name.
The Indexing Options window lists all folders that are included or excluded from indexation. It furthermore highlights the number of items that are in the index currently, and the status of indexing.
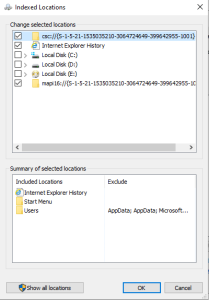
Select Modify at the bottom to manage the indexing locations. This opens a dual-pane window that lists all available locations in the top pane, and all folders selected for indexation at the bottom.
Tip: Make sure you click on the “show all locations” button to reveal locations that may not be shown by default.
You add new locations by checking boxes in front of items in the top pane, and remove existing ones by removing the checkmarks from the boxes. Since you may not want to navigate the top folder structure to locate all indexed locations, you may click on a location in the lower pane to jump straight to it. This allows you to remove it with just two clicks.
When you remove a location from Windows Search indexing, Windows Search won’t scan it anymore when it runs scans for changes in those locations.
You may also exclude subfolders from indexation. This is useful if you want some locations of a folder to be indexed but not others. Using exclude options may further help reduce the load of indexation when Windows Search indexing runs.
Check the Advanced options once you are done. Make sure that the options “index encrypted files” and “treat similar words with diacritics as different words” are not selected.
You may delete and recreate the index on the page as well, and change the location of the index. The latter may be useful if the computer’s main drive is slower than another drive connected to the device.
- Disable content indexation
Another thing that you may want to check is whether Windows Search is allowed to index file content and not only file properties on select drives. It takes more time obviously to scan the content of files as well, and if you don’t need that, you may want to make sure that this is not done on the Windows machine in question.
You need to repeat the following steps for any drive of the Windows 10 PC:
- Open File Explorer.
- Right-click on the drive, e.g. Local Disk (c:), and select properties from the context menu.
- Go to the General tab if it does not open automatically.
- Remove the checkmark from “Allow files on this drive to have contents indexed in addition to file properties”.
- Confirm the Attribute changes by selecting “apply changes to drive, subfolders and files, and click ok.
The process may take a while before it completes. It can run for minutes and even longer than that depending on the size of the drive. You may get an access denied error. I suggest you select “ignore all” when that happens to tell Windows that it should ignore any future access denied error automatically.
- Disable Windows Search Indexing completely
The final option that you have is to disable Windows Search indexing completely. This prevents any indexation processes and should improve the situation on all devices that are affected by high load or performance issues that are caused by Windows Search indexing.
- Tap on the Windows-key, type services.msc, and tap on the Enter-key. This opens the Windows Services Manager.
- Locate Windows Search when the services listing opens. The services are sorted automatically, so jump to the bottom to find it more quickly.
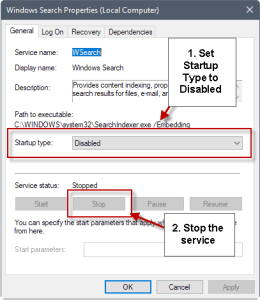
- Right-click on Windows Search and select properties from the menu.
- Switch the startup type to “disabled”.
- Select “stop” under service status to block the service from running in that session.
- Click apply and then ok.
You may still run searches, but without indexing. This means that searches may take longer to complete.


Leave A Comment?