Situatie
Synology has a very user-friendly Network Attached Storage (NAS) devices. Also, there are many add-on packages to add the functionality of the Synology NAS like sharing files on the cloud, setting up a VPN environment, sharing photos to an online album or even an antivirus to protect the system. Everything can be found & done with few clicks in Package Center. The result will be a multi-function device which performs the tasks of a full-size computer.
The Synology platform is so much more than just simple network-attached-storage & keeping the packages updated is critical in ensuring a bug-free & smooth experience.
Synology NAS offers automatic download & installation of updates for packages but in some cases, the user wants to install updates manually.
Solutie
Pasi de urmat
To get started with the update process,
- Navigate to the web-based interface of the Synology NAS.
- On the desktop, the Package Center shortcut will be shown. Remember that if there are packages in need of update you’ll see, like in the screenshot below, a red indicator displaying the number of them.
- If you cannot find the Package Center shortcut, you can always find the shortcut for the Package Center by clicking on the Start Menu-like button in the upper corner to access your full application list.

- Inside the Package Center, the default view is “Installed”, showing all your installed packages with any packages in need of updates, if applicable, “Attention required” section will display the list in the top.

- In three ways packages can be updated from here.
- Click the “Update All” button to update all the packages without reviewing then.
- You can selectively update by selecting the “Update” button beside each entry in need of updates.
- Finally, if you wish to review the release notes for a particular update before approving it, you can click on the general entry for an individual application package to see the detailed view.
Here in the detailed view, we can see there is an additional “Update” button and, more importantly for our purpose, the “What’s new in version” release note section that highlights what the update adds/removes/repairs. In this case, it’s just a simple bug fix.
At this point, you can manually approve the update by clicking the green “Update” button, or fall back to the previous menu to review your other updates and to update all the packages at once without the user interference click the “Update All”.
One thing you may notice on this detailed view is the small “Auto-update” checkbox beneath the “Update” button. Let’s take a look at the automatic update feature now.
Setting Your Packages to (Selectively) Auto Update
While you can check the “Auto-update” checkbox in the detailed view, as described in the previous section, there’s a much faster way to turn on bulk (& selective) automatic updates. For this purpose, let us follow the steps below
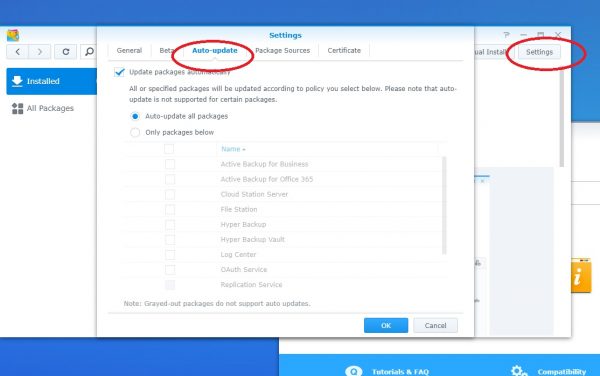
- From the main list of packages, click on the grey button labeled “Settings” along the top edge of the window.
- Select the “Auto Updates” tab in the Settings menu, which is along the upper navigation bar.
- In the Auto Updates menu of the Settings, check the “Update packages automatically” option and then set either as the “All packages” option or the “Only packages below” option.

To enable selective automatic updating, simply check off all the packages that you do not wish to keep automatically updated. Click “OK” to save your changes after you are done, Your Synology NAS will now automatically update the application packages whenever new updates are rolled out.

Leave A Comment?