Situatie
If an image is too large, you can reduce its size in two ways. You can resize and reduce the resolution, or you can export it in a lower quality. Here’s how to resize or reduce photo size on Mac.
Solutie
The fastest way to reduce the photo size is by reducing the photo resolution.
Using the Preview app, you can do this for one image at a time or for multiple images at once. First, open the Finder app and locate the image (or images) that you want to resize. Then, simply double-click the file to open it in Preview.

If Preview is not set as the default image viewer, right-click, and choose the Open With > Preview. Now that the photo is open in Preview, click the Edit button from the top toolbar. Then, from the editing options, click the Resize button.

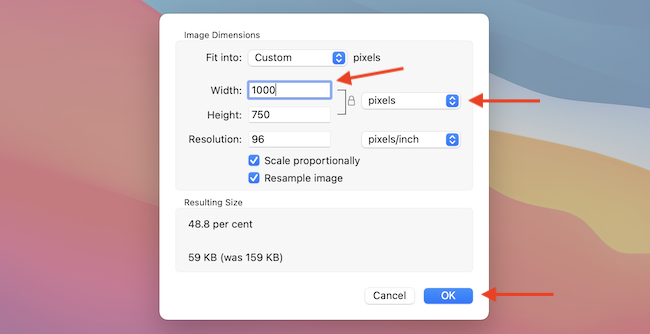
From the pop-up, first, switch to the “Pixels” option. Then, change the width. Instantly, Preview will tell you the new file size of the image.

Preview will automatically save your changes to the image, but you can use the Command+s option to manually update the image. Now, you can close the Preview window by clicking the red Close button from the top-right corner, or you can use the Command+q keyboard shortcut instead.
When you return to the Finder window, you’ll see the updated file size for the photo.

If you can’t resize the image, the Preview app can help you there as well. You can export an image in JPEG format with lower quality. To get started, open the image file in Preview. Then, from the menu bar at the top, click the “File” option and select “Export.”

Once you switch to “JPEG” as the file format, you’ll see a “Quality” slider. Here, slide toward the “Least” quality side, and you’ll see the file size update in real-time. As Preview is exporting a new image, you can edit the name of the photo as well as the destination from the top. Click the “Save” button.

Go to the designated folder in Finder and you’ll find the exported image.


Leave A Comment?