Situatie
How the ip Command Works
With the ip command, you can adjust the way a Linux computer handles IP addresses, network interfaces controllers (NICs), and routing rules. The changes also take immediate effect — you don’t have to reboot. The ip command can do a lot more than this, but we’ll focus on the most common uses in this article. The ip command has many subcommands, each of which works on a type of object, such as IP addresses and routes. There are, in turn, many options for each of these objects. It’s this richness of functionality that gives the ip command the granularity you need to perform what can be delicate tasks. This isn’t ax work — it calls for a set of scalpels. We’ll look at the following objects:
- Address: IP addresses and ranges.
- Link: Network interfaces, such as wired connections and Wi-Fi adapters.
- Route: The rules that manage the routing of traffic sent to addresses via interfaces (links)
Solutie
Using ip with Addresses
Obviously, you first have to know the settings you’re dealing with. To discover which IP addresses your computer has, you use the ip command with the object address. The default action is show, which lists the IP addresses. You can also omit show and abbreviate address as “addr” or even “a.” The following commands are all equivalent:
ip address show
ip addr show
ip addr
ip a
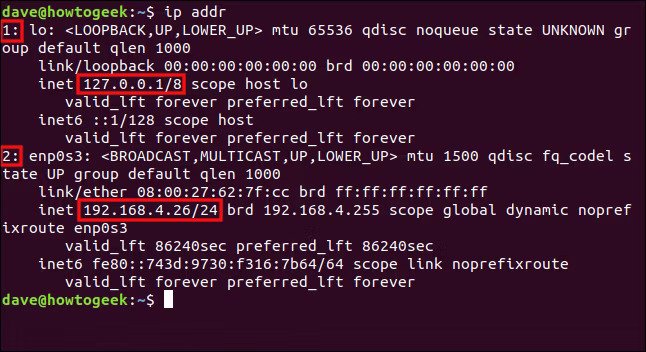
We see two IP addresses, along with a lot of other information. IP addresses are associated with network interface controllers (NICs). The ip command tries to be helpful and provides a bunch of information about the interface, too.
The first IP address is the (internal) loopback address used to communicate within the computer. The second is the actual (external) IP address the computer has on the local area network (LAN).
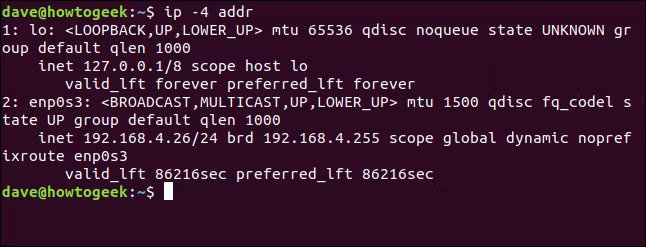
Display Only IPv4 or IPv6 Addresses
If you want to limit the output to the IP version 4 addresses, you can use the -4 option, as follows:
ip -4 addr
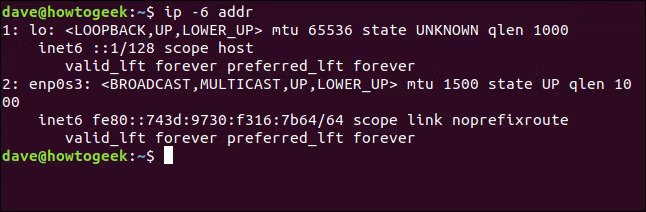
If you want to limit the output to the IP version 6 addresses, you can use the -6 option, as follows:
ip -6 addr
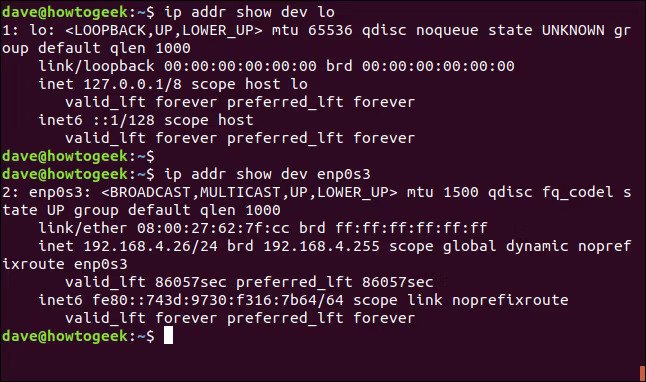
Display Information for a Single Interface
If you want to see the IP address information for a single interface, you can use the show and dev options, and name the interface, as shown below:
ip addr show dev lo
ip addr show dev enp0s3
You can also use the -4 or -6 flag to further refine the output so you only see that in which you’re interested. If you want to see the IP version 4 information related to the addresses on interface enp0s3, type the following command:
ip -4 addr show dev enp0s3

Adding an IP Address
You can use the add and dev options to add an IP address to an interface. You just have to tell the ip command which IP address to add, and to which interface to add it. We’re going to add the IP address 192.168.4.44 to the enp0s3 interface. We also have to provide the CIDR notation for the subnet mask. We type the following:
sudo ip addr add 192.168.4.44/24 dev enp0s3
We type the following to take another look at the IP version 4 IP addresses on this interface:
ip -4 addr show dev enp0s3
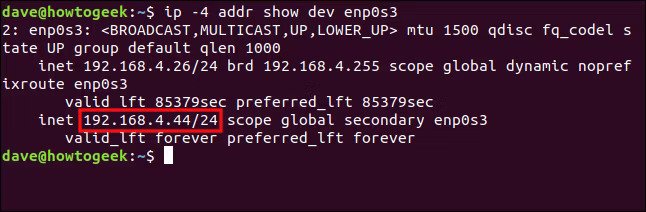
The new IP address is present on this network interface. We jump on another computer and use the following command to see if we can ping the new IP address:
ping 192.168.4.44
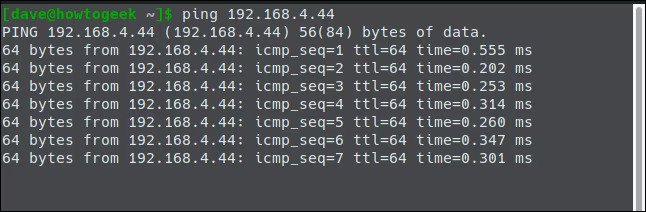
The IP address responds and sends back acknowledgments to the pings. Our new IP address is up and running after one simple ip command.
Deleting an IP Address
To delete an IP address, the command is almost the same as the one to add one, except you replace add with del, as shown below:
sudo ip addr del 192.168.4.44/24 dev enp0s3
If we type the following to check, we see the new IP address has been deleted:
ip -4 addr show dev enp0s3

Using ip with Network Interfaces
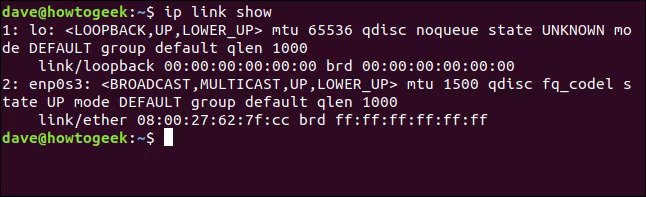
You use the link object to inspect and work with network interfaces. Type the following command to see the interfaces installed on your computer:
ip link show
To see a single network interface, just add its name to the command, as shown below:
ip link show enp0s3
Starting and Stopping Links
You can use the set option with either up or down to stop or start a network interface option. You also have to use sudo, as shown below:
sudo ip link set enp0s3 down
We type the following to take a look at the network interface:
ip link show enp0s3

Using ip with Routes
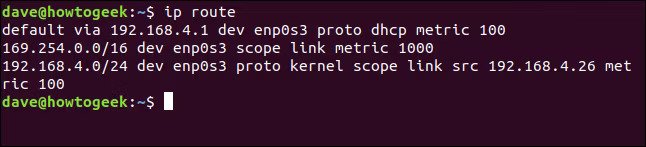
With the route object, you can inspect and manipulate routes. Routes define to where network traffic to different IP addresses is forwarded, and through which network interface. If the destination computer or device shares a network with the sending computer, the sending computer can forward the packet directly to it. However, if the destination device is not directly connected, the sending computer forwards the packet to the default router. The router then decides where to send the packet. To see the routes defined on your computer, type the following command:
ip route
Display Information for a Single Route
If you want to focus on the details of a particular route, you can add the list option and IP address range of the route to the command as follows:
ip route list 192.168.4.0/24

Adding a Route
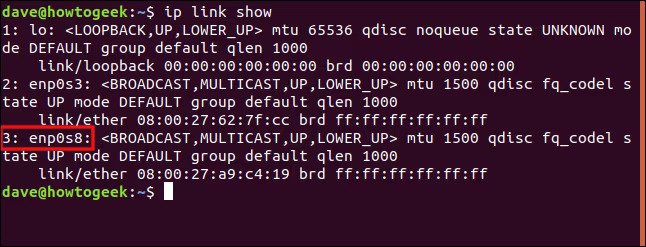
We just added a new network interface card to this computer. We type the following and see it’s showing up as enp0s8:
ip link show
We’ll add a new route to the computer to use this new interface. First, we type the following to associate an IP address with the interface:
sudo ip addr add 192.168.121.1/24 dev enp0s8
A default route using the existing IP address is added to the new interface. We use the delete option, as shown below, to delete the route and provide its details:
sudo ip route delete default via 192.168.4.1 dev enp0s8
We’ll now use the add option to add our new route. The new interface will handle network traffic in the 192.168.121.0/24 IP address range. We’ll give it a metric of 100; because it will be the only route handling this traffic, the metric is pretty much academic. We type the following:
sudo ip route add 192.168.121.0/24 dev enp0s8 metric 100
![]()
Now, we type the following to see what it gives us:
ip route
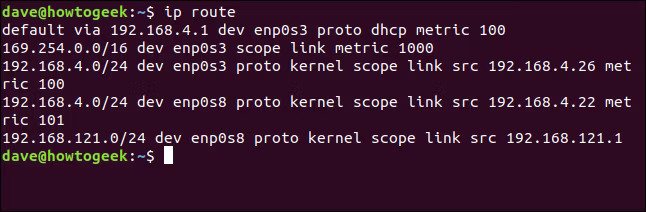
Our new route is now in place. However, we still have the 192.168.4.0/24 route that points to interface enp0s8 — we type the following to remove it:
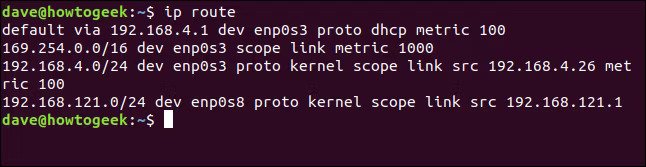
sudo ip route delete 192.168.4.0/24 dev enp0s8
We should now have a new route that points all traffic destined for IP range 192.168.121.0/24 through interface enp0s8. It should also be the only route that uses our new interface. We type the following to confirm:
ip route
Leave A Comment?