OS - Windows

Depanare VPN 4 Solutii

instalare printer 50 Solutii

Optimizare pc 49 Solutii

Optimizare PC 103 Solutii

Scanare cu malwarebyte 4 Solutii

shareuire si mapare 14 Solutii

adaugare la domeniu 5 Solutii

Migrare profil 9 Solutii

Instalare/reinnoire certificate 2 Solutii

Personalizare sistem operare 274 Solutii

Configureaza si verifica setarile de boot 11 Solutii

Transfer de date 20 Solutii

Configurare OS 109 Solutii

Reparare OS 47 Solutii

Punct de restaurare OS 8 Solutii

Windows Event Viewer 6 Solutii

Reinstalare/reconfigurare VPN 8 Solutii

Optimizare client e-mail 12 Solutii

Optimizare PC 30 Solutii

Optimizare PC 20 Solutii

Reinstalare / Reconfigurare VPN 6 Solutii

Reinstalare OS 32 Solutii

Reparare sistem de operare 45 Solutii

Programare sistem operare 12 Solutii

Puncte de restaurare sistem de operare 14 Solutii

Instalare imprimanta 44 Solutii

Mapare si partajare 13 Solutii

Modificari firewall 12 Solutii

Migrare profil 8 Solutii

Transferuri de date 32 Solutii

Upgrade sistem operare 12 Solutii

Windows Event Viewer 6 Solutii

Verificare HDD 32 Solutii

Spatiu partitie 31 Solutii

Scanare cu MalwareBytes 5 Solutii

Setari servicii sistem operare 42 Solutii

Setari retea sistem operare 25 Solutii

Setari partitii 19 Solutii

Actualizare sistem operare 15 Solutii

Clonare HDD 11 Solutii

Compatibilitate program 13 Solutii

Instalare / Reinnoire Certificate 6 Solutii

Configurare si verificare setari de BOOT 15 Solutii

Configurare Sistem de operare 1327 Solutii

Identificare DLL-uri lipsa 2 Solutii

Depanare 942 Solutii

Editarea politicilor de grup ale sistemului de operare 13 Solutii

Drivere 50 Solutii

How do you fix File System Errors-10 Steps

1. Scan for Viruses

Many times, a file might be corrupted or inaccessible owing to a virus. Malware and viruses are designed to do something malicious to your computer, whether it be taking files hostage or erase them. Some viruses specifically target system files, so that they can steal your information and you can do nothing about it.

Try running an antivirus program or using the built-in Microsoft Defender. These programs will scan your computer for missing files, malicious software, and any other viruses or the like. Afterward, they’ll quarantine and remove the virus, which should clear any virus-related system errors.

2. Run SFC

If you’ve scanned for a virus and removed it or don’t have any malicious software on your computer, but the system error in Windows 11/10 still occurs, the next thing to do is to run “System File Checker”. This tool is built into the Windows operating system, meaning that you won’t have to download any app.

Running SFC is very easy, although if you know what to do. There are a few steps, although they’re not too difficult:

    • Search CMD or Command Prompt in your Search bar (Windows key).
    • Right-click and press Run as Administrator.
    • A box may pop up and ask you if you want to grant administrative access; press Yes or Accept.
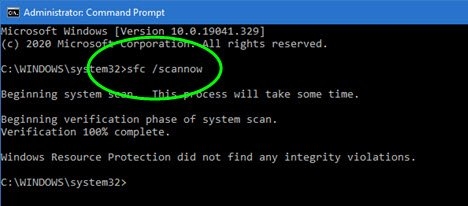
    • Once the Command Prompt has opened, type SFC /scannow.
sfc command
  • Let the SFC run and after that, restart your computer.
3. Run chkdsk

Check Disk (or chkdsk) scans your hard drive for any errors or issues, which it’ll then try to fix. This fix uses the CHKDSK program, which comes with every computer running any version of Windows. CHKDSK checks every file on your hard drive, finding issues and fixes the files. This program works for any file system error that’s related to your actual hard drive, meaning it’ll work for most errors.

Similar to running SFC, to use Check Disk, you’ll need to follow these steps:

  • Search CMD or Command Prompt in your Search bar (Windows key).
  • Right-click and press Run as Administrator, or press the same words to your right.
  • A box may pop up and ask you if you want to grant administrative access; press Yes or Accept.
  • Once the Command Prompt has opened, type chkdsk:/f and press Enter key.
  • Let Check Disk operate, which may take a few minutes.
4. Run DISM

Deployment Image Servicing and Management, known as DISM, is used to repair your Windows image (.ISO file or your Windows OS image). This option is used for issues relating to the Windows Store or your operating system as a whole.

When activated, DISM will run, scan, and repair items from the counterpart on Microsoft’s services. It’s recommended to use DISM alongside SFC, as SFC will scan and fix what it can, with DISM fixing whatever is left. As another Command Prompt service, to use DISM, you need to:

    • Once the Command Prompt has opened, type dism /online /cleanup-image /restorehealth.
dism cmd command
  • Let DISM connect to the Microsoft servers, scan your computer, and initiate repairs.
5. Update Windows

Many issues relating to a file system error are in your Windows update files. The file system error -2147219196 is a notable example, as that error means that your Windows update was corrupted or messed with. Even with that example, many other errors pertain to updates, which can be fixed by repairing your OS files.

To run a Windows update, search your computer for update, press the Windows Update option, then click check for updates. Once it finishes loading, press download or continue, let the update finish, then hit restart when the option appears.

6. Repair/Reinstall the Photos App

Error code -2147219195 is the most common Photos app issue, which can be fixed by either repairing or reinstalling the Photos app. Photos app oftentimes attempts to open files that aren’t actual photos, which may result in your computer being quite confused.

To repair the Photos app:

  • Open Settings through the shortcut Win + I.
  • Choose Apps, then locate Photos app and select Advanced Options.
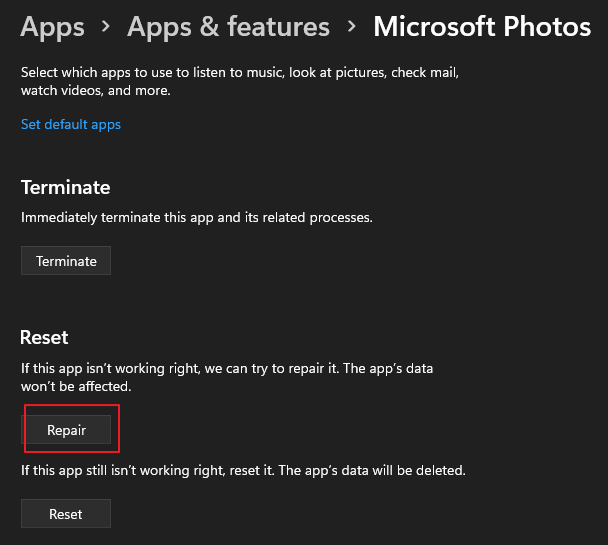
  • When a menu appears, scroll down and press Repair.
microsoft photos repair

To reinstall the Photos app:

  • Search PowerShell to open it and click Run as administrator.
  • Enter Get-AppxPackage Microsoft.Windows.Photos | Remove-AppxPackage and hit Enter key.
  • Reinstall the app from Microsoft Store.
7. Run the Windows Store Apps Troubleshooter

For any problem relating to the Photos app or other apps that can’t be solved by repairing or reinstalling, the Windows Store Apps Troubleshooter is a good option to fix the system file errors. To use the troubleshooter:

    • Search Troubleshoot then press the option.
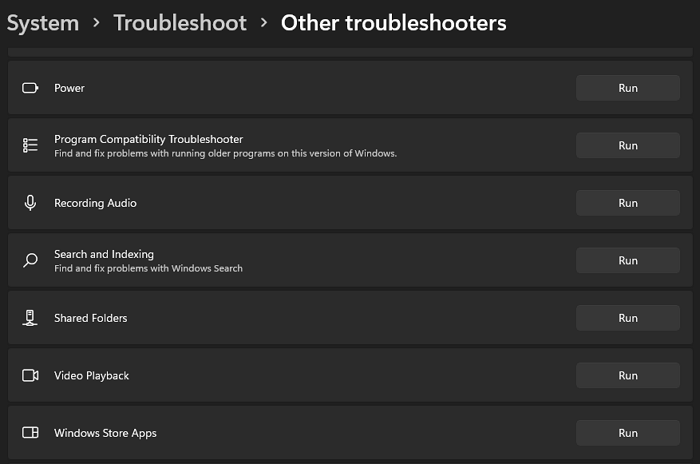
    • Find Other troubleshooters and click it.
    • Scroll down and find Windows Store Apps.
other troubleshooters
  • Press the option and let the troubleshooter run.
8. Reset Windows Store Cache

If your issue involves the Windows Store, whether with an outdated app or issue update, clearing your cache might be the issue. Over time, cache stores itself on your computer, which can lead to issues accessing files. To clear your Windows Store cache, type wsreset.exe into your Run box, then press Enter. This will reset your Windows Store cache and should allow you to use it.

9. Set Windows Theme to Default

In some scenarios, your Windows theme may cause a file system error. Occasionally, your background theme may interfere with applications or your system, which may result in an error. If you accidentally shut down your computer or don’t save unfinished customization, it can cause a file system error. To set your theme to default:

  • Go to Settings > Personalization.
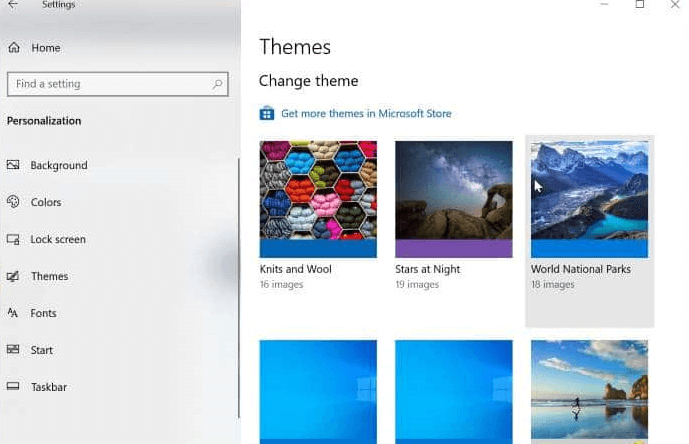
  • Choose Themes and you should have options to change your theme, so find and select the Windows theme from the list of Windows default themes.
settings themes
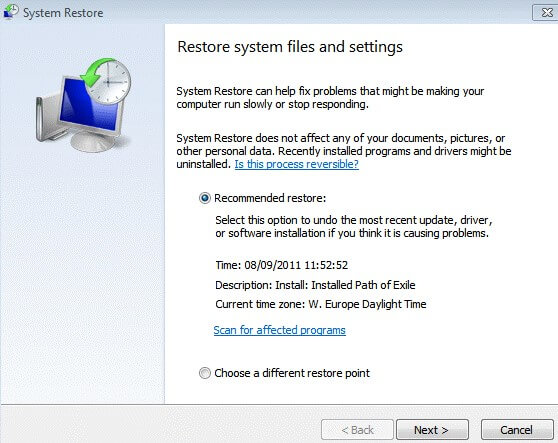
10. Run System Restore

If you can’t find a solution to your file system error, it may be a major issue with files or your OS. The only reasonable solution would then be to run system restore. This option will undo recent changes, which might have caused your error, leaving documents and the like untouched.

    • Open Control Panel and click Recovery.
    • Press Open System Restore, the 2nd option in the middle
    • When it appears, you may be asked to choose the restore point.
system restore choose restore point
  • Then follow the instructions to complete the process.
[mai mult...]

Cum se instalează Rspamd în Ubuntu

Rspamd este un sistem puternic de filtrare a spam-ului pentru serverele de e-mail. Este scris în limbaj C și este destul de rapid în performanță. Este foarte personalizabil și vă permite să utilizați diferite strategii pentru a combate spam-ul. Puteți evalua fiecare mesaj folosind expresii regulate, analize statistice și liste negre.

1. Instalați Redis

Rspamd necesită un sistem de stocare și stocare în cache a datelor. Vom folosi Redis în acest scop. Deschideți terminalul și rulați următoarea comandă pentru a instala Redis.

$ sudo apt install redis-server
2. Instalați Unbound

De asemenea, vom avea nevoie de Unbound, un solutor DNS sigur. Reduce numărul de solicitări DNS externe și îmbunătățește performanța. Puteți sări peste acest pas dacă doriți. Rulați următoarele comenzi pentru a instala Unbound.

$ sudo apt update 
$ sudo apt install nelegat

Setările implicite Unbound sunt suficiente pentru configurarea Rspamd. Rulați următoarele comenzi pentru a-l seta ca rezolutor DNS implicit.

$ sudo echo "server de nume 127.0.0.1" >> /etc/resolvconf/resolv.conf.d/head 
$ sudo resolvconf -u
3. Instalați Rspamd

Acum vom instala Rspamd. Mai întâi, vom instala pachetele necesare.

$ sudo apt install software-properties-common lsb-release 
$ sudo apt install lsb-release wget

În continuare, vom adăuga cheia GPG de depozit la lista de surse de pe sistemul nostru.

$ wget -O- https://rspamd.com/apt-stable/gpg.key | sudo apt-key add -

Activați depozitul Rspamd cu următoarea comandă.

$ echo "deb http://rspamd.com/apt-stable/ $(lsb_release -cs) main" | sudo tee -a /etc/apt/sources.list.d/rspamd.list

Odată ce am activat depozitul, instalăm rpamd cu următoarea comandă.

$ sudo apt update 
$ sudo apt install rspamd
4. Configurați Rspamd

Vom crea un fișier de configurare pentru Rspamd la /etc/rspamd/local.d/local.d/ care va suprascrie configurația implicită.

Rulați următoarea comandă pentru a crea fișierul de configurare pentru lucrătorul normal.

$ sudo you /etc/rspamd/local.d/worker-normal.inc

Adăugați următoarea linie pentru a vă asigura că Rspamd ascultă numai portul local 11333. În mod implicit, ascultă și portul 11333 pe toate interfețele.

bind_socket = "127.0.0.1:11333";

Salvați și închideți fișierul. Apoi, creați fișierul de configurare pentru proxy-ul lucrător care ascultă portul 11332.

$ sudo /etc/rspamd/local.d/worker-proxy.inc

Adăugați următoarele linii pentru a activa protocolul milter și pentru a permite altor instrumente precum Postfix să comunice cu acesta.

bind_socket = "127.0.0.1:11332"; 
milter = da; 
timeout = 120s; 
upstream "local" { 
  implicit = da; 
  self_scan = da; 
}

Salvați și închideți fișierul. Apoi, setăm o parolă pentru lucrătorul controler cu următoarea comandă. Înlocuiți password_here cu o parolă la alegere.

$ rspamadm pw --encrypt -p parola_aici

Veți vedea o ieșire ca următoarea

$4$ghz7u8nxgggsfay3qta7ousbnmi1skew$tdat4nsm7nd3ctmiigx8kjyo837hcjodn1bob5jaxt7xpkieoctb

Copiați-l.

Creați un fișier nou cu următoarea comandă, pentru lucrătorul controler.

$ sudo /etc/rspamd/local.d/worker-controller.inc

Adăugați următoarea linie la acesta.

parola = "$4$ghz7u8nxgggsfay3qta7ousbnmi1skew$tdat4nsm7nd3ctmiigx8kjyo837hcjodn1bob5jaxt7xpkieoctb";

Salvați și închideți fișierul. În continuare, vom configura Rspamd să funcționeze cu Redis. Deschideți fișierul classifier-bayes.conf.

$ sudo you /etc/rspamd/local.d/classifier-bayes.conf

Adăugați următoarea linie.

servere = "127.0.0.1"; 
backend = "redis";

Salvați și închideți fișierul. Apoi, deschideți fișierul milter_headers.conf. Adăugați următoarea linie.

utilizare = ["x-spam-bar", "x-spam-level", "authentication-results"];

Salvați și închideți fișierul. Rulați următoarea comandă pentru a reporni serverul Rspamd.

$ sudo systemctl restart rspamd
5. Configurați interfața web

În cele din urmă, vom configura interfața web pentru Rspamd, care vă permite să vedeți statistici detaliate despre performanța acestuia. În acest scop, aveți nevoie de un server web. Vom folosi NGINX în acest scop. Rulați următoarea comandă pentru a instala NGINX.

$ sudo apt install nginx

Deschideți fișierul său de configurare într-un editor de text sau creați unul nou, așa cum se arată mai jos

/etc/nginx/sites-enabled/example.conf

Adăugați următoarele rânduri la acesta.

locație /rspamd { 
    proxy_pass http://127.0.0.1:11334/; 
    proxy_set_header Gazdă $gazdă; 
    proxy_set_header X-Forwarded-For $proxy_add_x_forwarded_for; 
}

Salvați și închideți fișierul. Reporniți NGINX pentru a aplica modificările.

$ sudo systemctl reîncărcați nginx

Acum, dacă deschideți browserul și accesați https://example.com/rspamd/, veți vedea un ecran de autentificare care vă solicită parola. Introduceți parola salvată la pasul 4 pentru a trece la interfața web Rspamd.

[mai mult...]

Cum oprești Windows Security de la a șterge fișiere

Trebuie să dezactivați această funcție de fiecare dată când actualizați Windows

Securitatea Windows este una dintre cele mai bune aplicații antivirus de acolo și pe cont propriu face o treabă minunată de a vă păstra computerul în siguranță. Cu toate acestea, uneori poate scana fișierele greșite și le poate semnala ca fiind corupte, făcându-le astfel inutilizabile.

  • Windows Security poate scana și corup uneori fișiere care nu sunt dăunătoare.
  • Fișierele legate de jocurile video, cum ar fi fișierele de salvare, sunt afectate, dar pot afecta și alte fișiere.
  1. Apăsați WindowsI pentru a deschide Settings
  2. Accesați Privacy & security și faceți click pe acesta
  3. Accesați Windows Security și faceți click pe fila
  4. Selectați Virus & threat protection și faceți click
  5. Accesați Virus & threat protection settings și faceți click pe Manage settings
  6. Accesați Tamper Protection și dezactivați-o
  7. Reporniți computerul și verificați aplicația Windows Security pentru a vedea dacă protecția în timp real se reactivează sau nu.

Tamper Protection este o caracteristică Windows care vă asigură că sunteți protejat împotriva programelor malware în orice moment. De exemplu, dacă dezactivați protecția în timp real, această funcție o va activa înapoi după un timp. De aceea trebuie să dezactivați și această funcție.

De asemenea, trebuie să știți că Tamper Protection este activată automat după fiecare actualizare importantă Windows pe care o instalați pe computer. Dacă întâmpinați această problemă, imediat după ce ați instalat actualizările Windows, atunci dezactivarea Tamper Protection ar trebui să o rezolve.

[mai mult...]

Cum verificati memoria calculatorului

Memoria inseamna doua lucruri diferite pe computer. Memoria fizica este spatiul pe hard disk, ceea ce determina numarul de fisiere pe care le puteti pastra pe computer. Random Access Memory (RAM) determina, in mare parte, cat de rapid poate rula calculatorul. Ambele sunt usor de verificat daca folositi Mac sau PC-uri.

[mai mult...]